CCC 2024 Day 19: Personalized Snowman Family
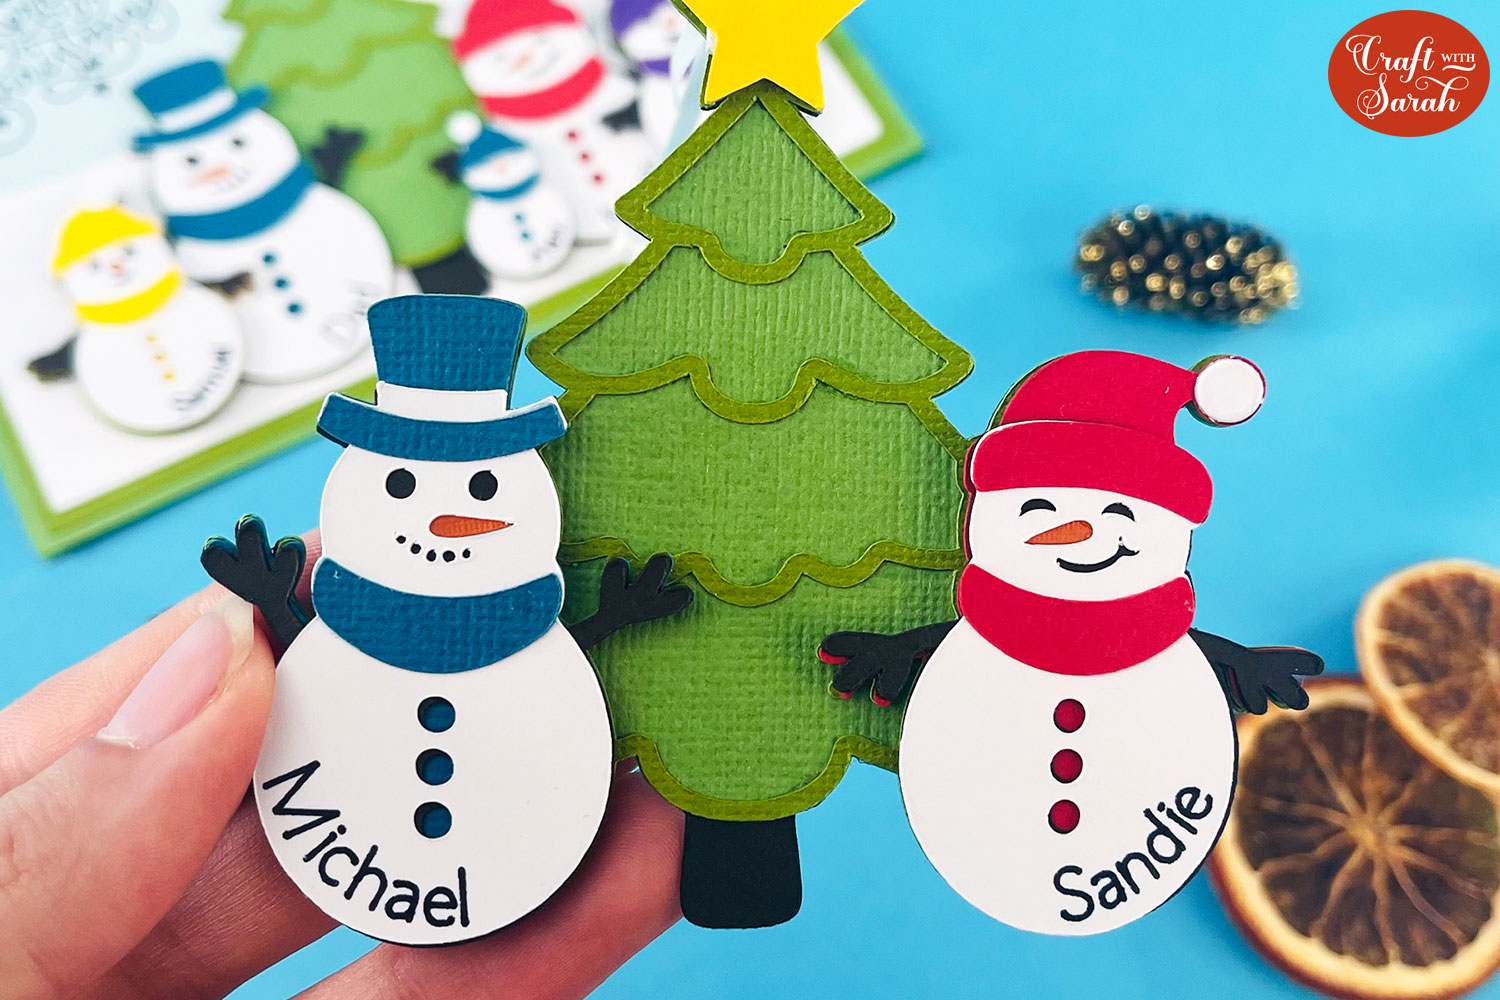
Welcome to day nineteen of the 2024 Christmas Craft Countdown, where I’m sharing 20 festive themed Cricut papercraft projects in 20 days.
Create personalized snowman family artwork with your Cricut machine!
This project lets you combine adorable snowman illustrations to represent your family, friends, or loved ones, making it a perfect choice for custom holiday decor or thoughtful gifts.
With so many ways to arrange your snowman family, each piece becomes a one-of-a-kind creation.
Follow along to learn how to set up and cut your snowman family, plus tips for adding color, embellishments, and backgrounds. By the end, you’ll have custom snowman artwork ready to bring smiles to friends and family all season long!
This customizable design works great for all kinds of projects, whether you’re making greeting cards, Christmas tree ornaments, or wall art.
This Project was part of the Christmas Craft Countdown 2024
Materials supply list
Here is a list of the materials that I used to make this project.
Please note that some of the links included in this article are affiliate links, which means that if you click through and make a purchase I may receive a commission (at no additional cost to you). You can read my full disclosure at the bottom of the page.
- Cricut machine
- Light blue Cricut cutting mat
- Coloured Card
- Glue (I like Bearly Art Glue and Collall)
- 3D foam pads
- Ribbon (if making a tree decoration)
This project is suitable for the following types of Cricut machine: Explore Air 2, Explore Air 3, Maker, Maker 3, Venture, Joy Xtra and Joy. You will need to make the design smaller to cut on the original Joy.
Foundation learning
If you're new to crafting with your Cricut, you may find the below links helpful.
They teach some of the skills mentioned throughout this tutorial.
- How to upload SVG files into Design Space
- How to make 3D layered Cricut projects
- The BEST way to frame papercraft projects
- How to mount multiple designs in the same frame with magic guides
- How to score with a Cricut (even without scoring tools)
- Print then cut tutorial
- Design Space tools (Combine, Attach, Slice, Weld, Flatten, etc.)
- Pattern fill tutorial (for making backgrounds & cutting images to a specific shape/size)
- Free envelope SVGs that can be sized to fit any card
- How to write inside cards with Cricut pens
- How to cut layered designs at a small size
- Design Space tips & tricks
- Cricut pens tutorial
Video tutorial
Watch the video below to see how to make this project. Keep scrolling for a written tutorial.
PART ONE: Creating a Family Display
The first part of this video covers how to position the snowman together to make a family scene.
Step 1) Download the cutting file & upload to Design Space
Download the files using the box below.
Purchase the File(s)
This cut file is available as part of the Instant Access Bundle.
Or, purchase this design individually here
Before you upload the SVG to Design Space, you need to unzip the download folder that it comes in.
- How to unzip a folder on Windows computer
- How to unzip a folder on a Mac
- How to unzip a folder on an iPad/iPhone
- How to unzip a folder on an Android device
After unzipping, upload the SVG file into Cricut Design Space. This is the file which starts svg- in the filename.
Not sure how to do this? Here’s how to upload SVGs to Cricut Design Space. Make sure you upload the file which starts svg- in the filename!

Step 2) Create the family layout
Click the design and press “Ungroup” to separate out the different pictures.
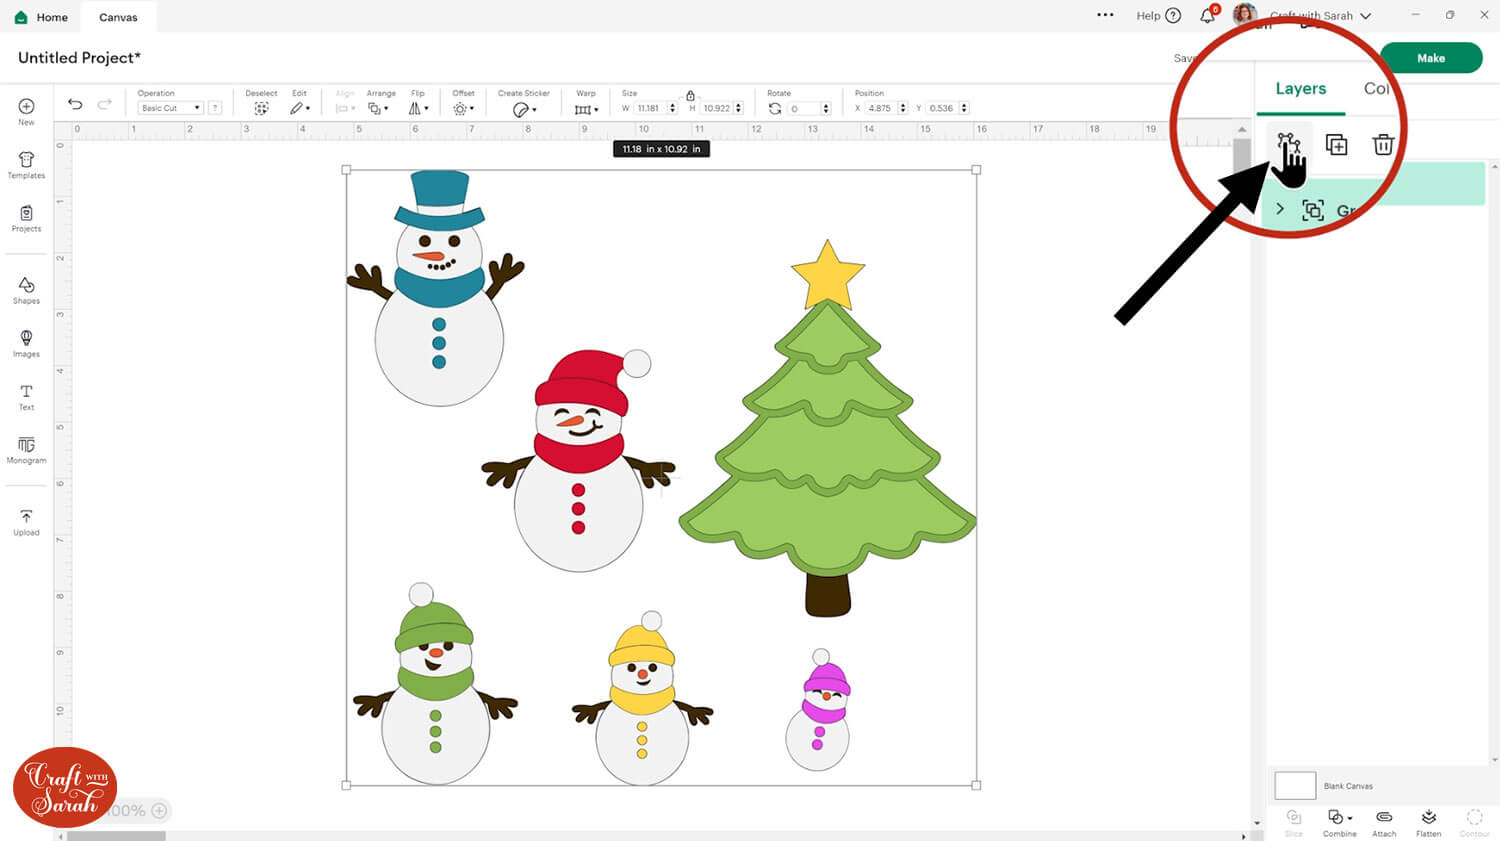
After Ungrouping, you will see each snowman picture (and the tree) as a separate group.
Delete any snowmen that you don’t want to use and position the ones you are using around the Christmas tree.
You may need to resize them to look “to scale” against the tree.
To make all the images “line up” neatly along the bottom, select them all and press “Align > Align Bottom”.
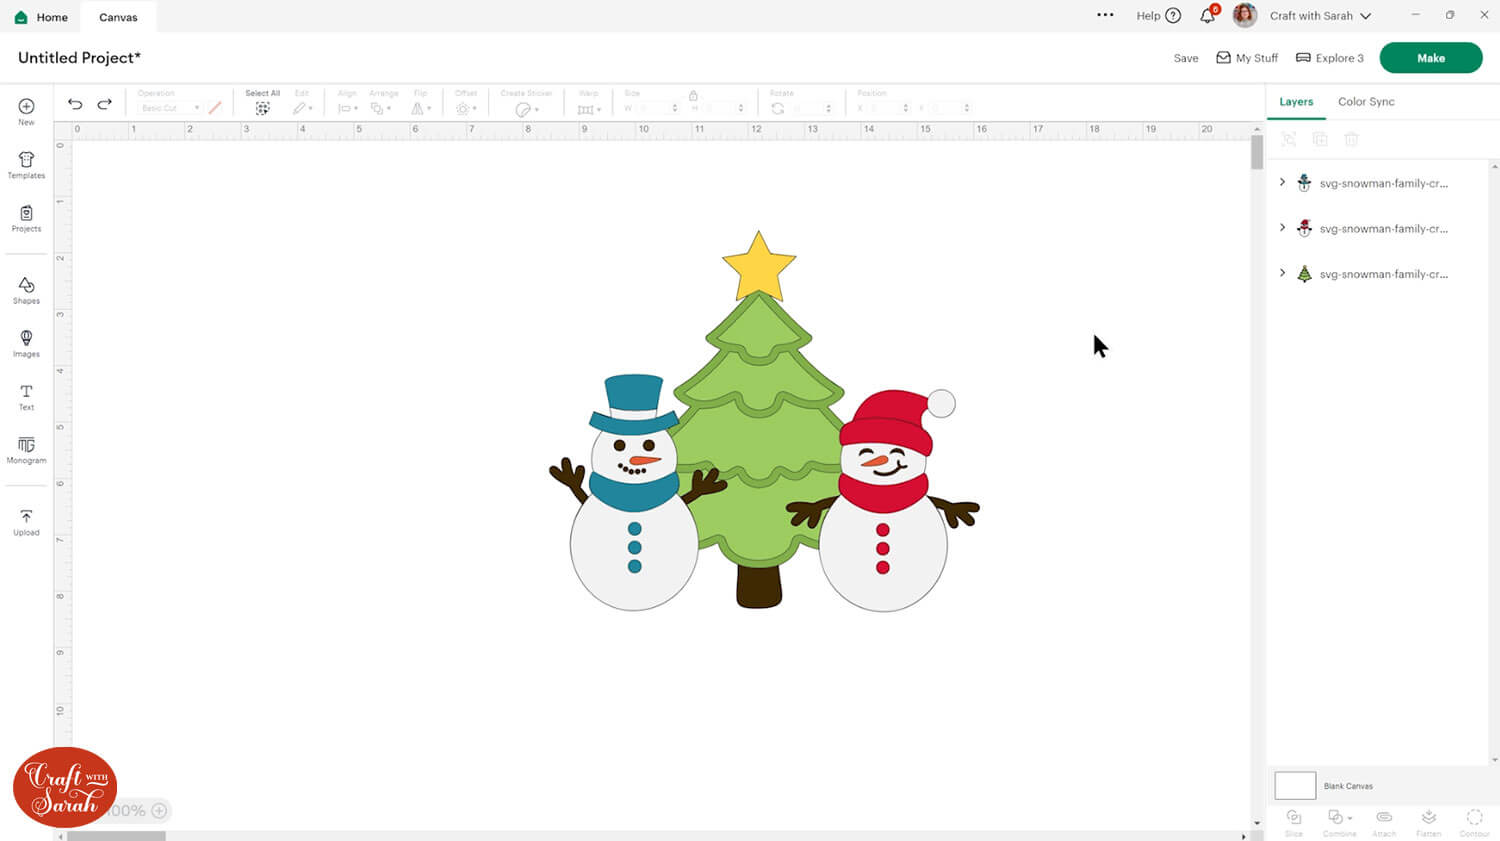
To change the colours, open up the group of layers for an individual snowman, click the pieces you want to change the colour of and then click the colour box along the top of the screen.
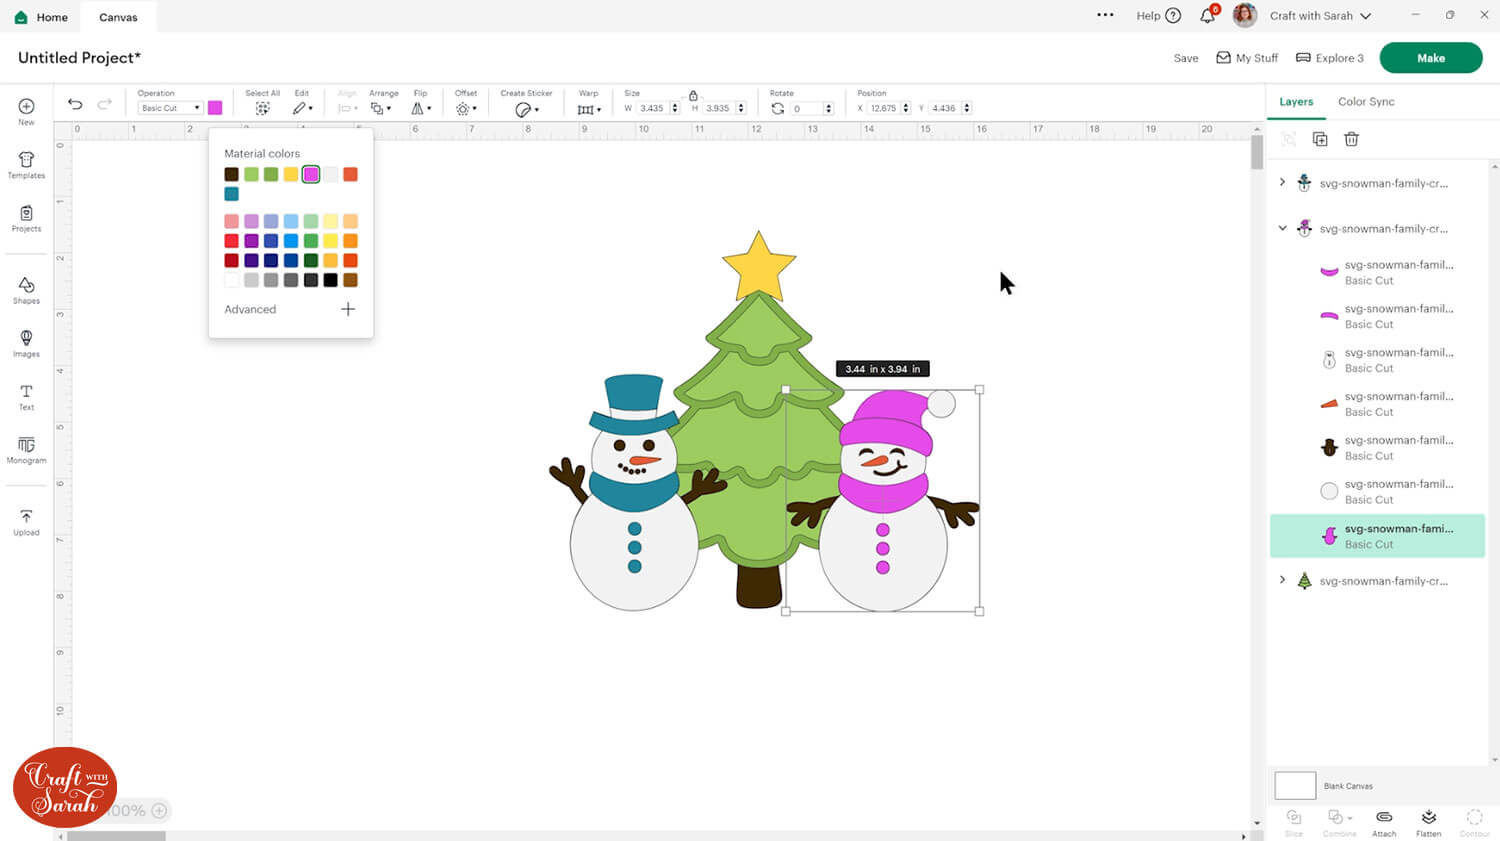
Step 3) Add names to each snowman
It’s a nice “extra” touch to add names to each of the snowman to show the person they are representing.
To do that, click “Text” and type out the name. I kept it at the default Cricut Sans font as that one works well when drawn with the Cricut pens at a small size, but you can change the font if you wish.
Change it to “Writing” in the “Style” dropdown menu along the top of the screen.
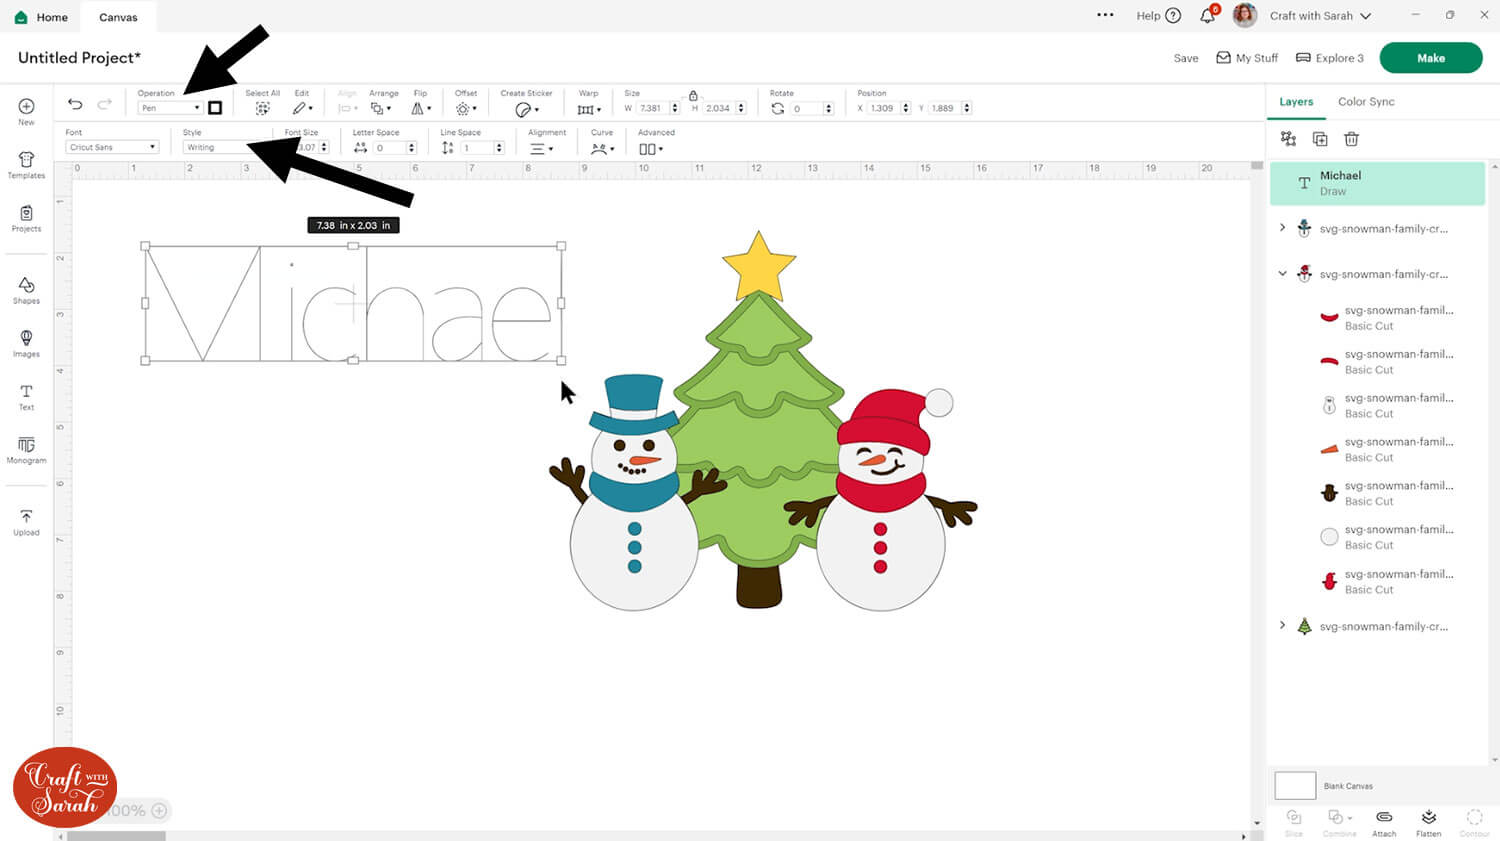
If your word looks like “outlines” of the letter (also known as “bubble letters”) like the image below, instead of single lines, it may be that you have turned it into a Pen/Draw layer but the “Style” dropdown still says “Regular” instead of “Writing”. Change it to “Writing” to make single-line letters instead.

Use the “Curve” button to add a subtle curve to the name so that it will fit better along the edge of the snowman.
Note: If you have Cricut Access then you could use the “Warp” option instead of “Curve”. If you do not have Cricut Access then you will need to use the Curve option as Wrap is Access-only. I found the Curve button works better for this particular project.
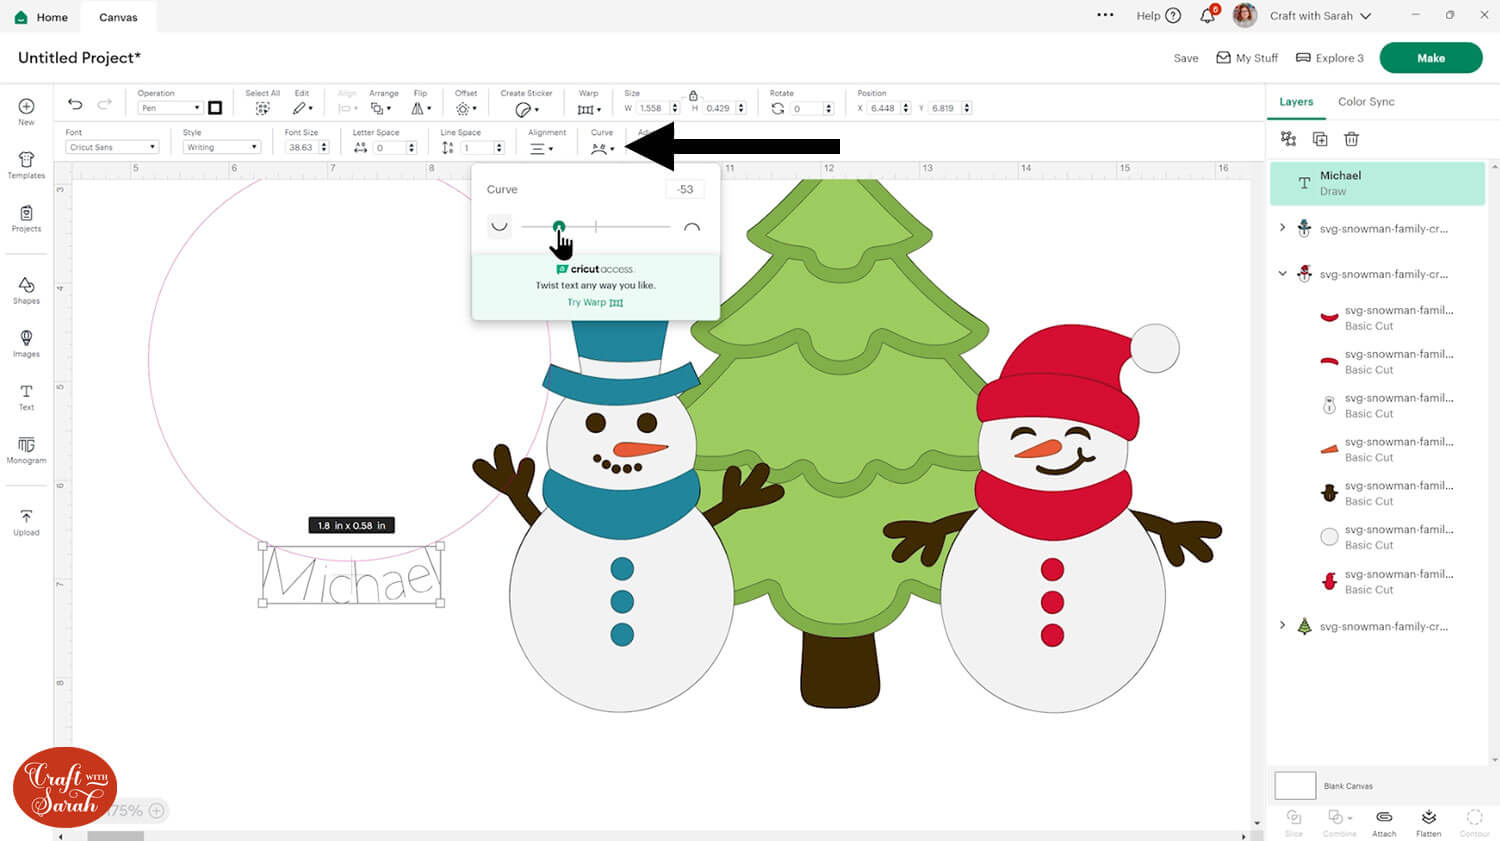
Rotate and resize the name and place it on top of the snowman.
Repeat for all the snowman characters in your project.
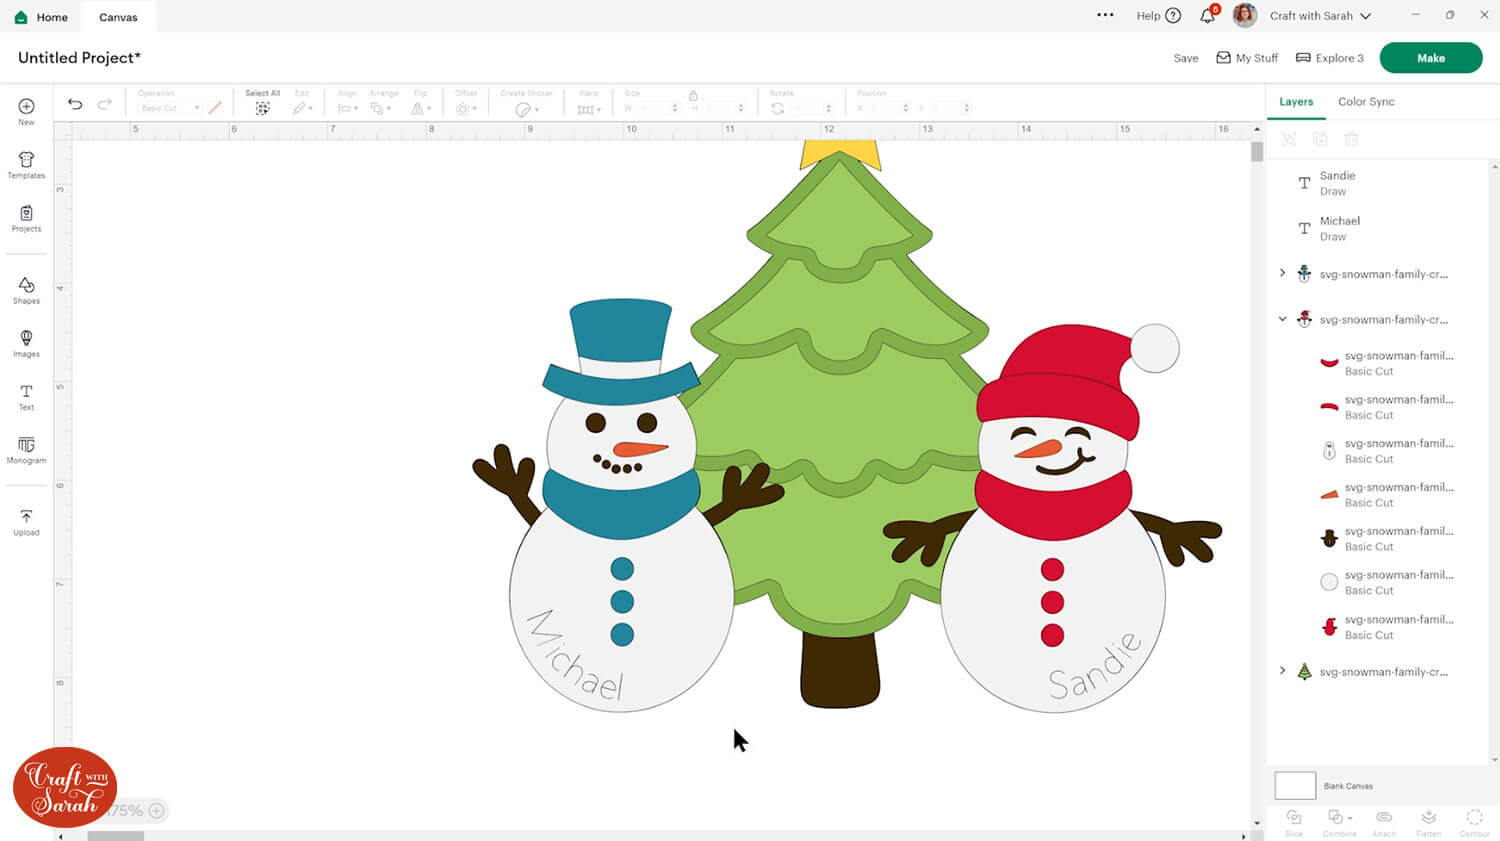
Next we need to “tell” the Cricut to do the writing on the tummy of each snowman.
Click one of the snowmen and press “Ungroup” at the top of the layers panel to separate out the layers.
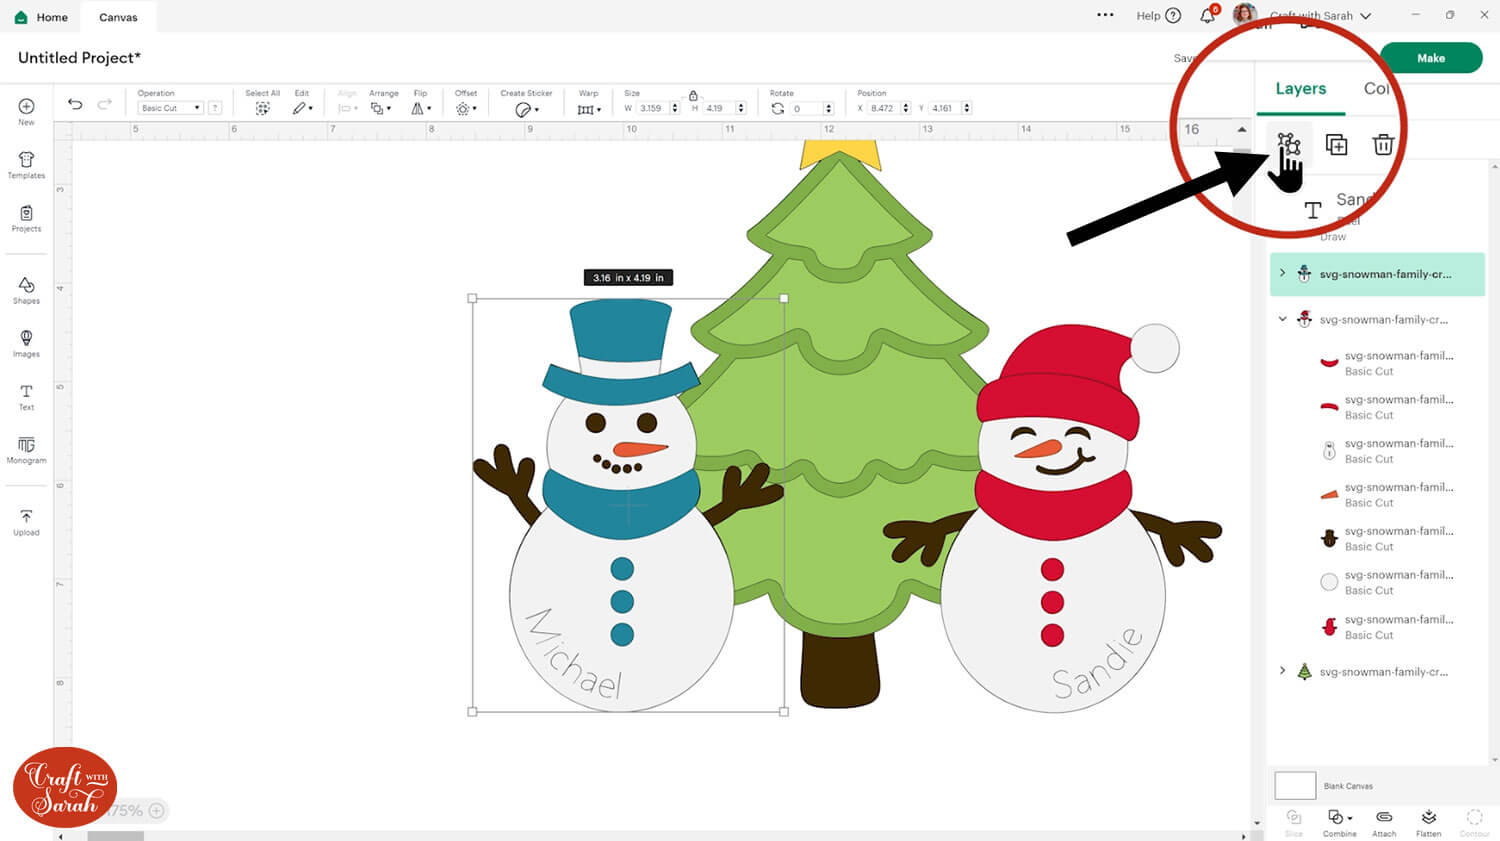
Select the white tummy layer and the name and press “Attach” at the bottom of the layers panel.
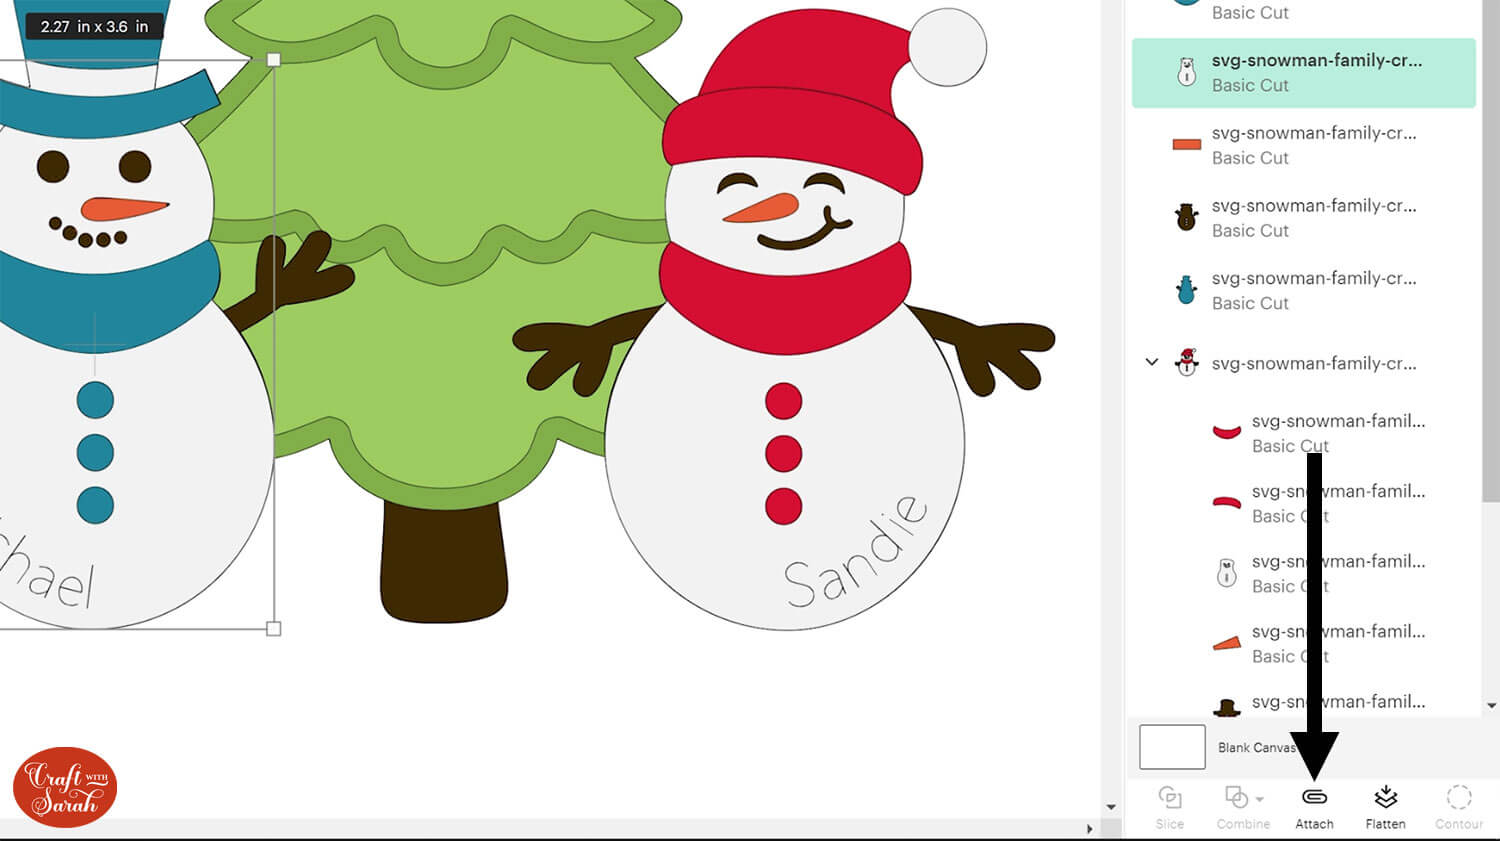
Attaching layers together moves them to the top of the layers panel, so your snowman will be looking a bit strange now!
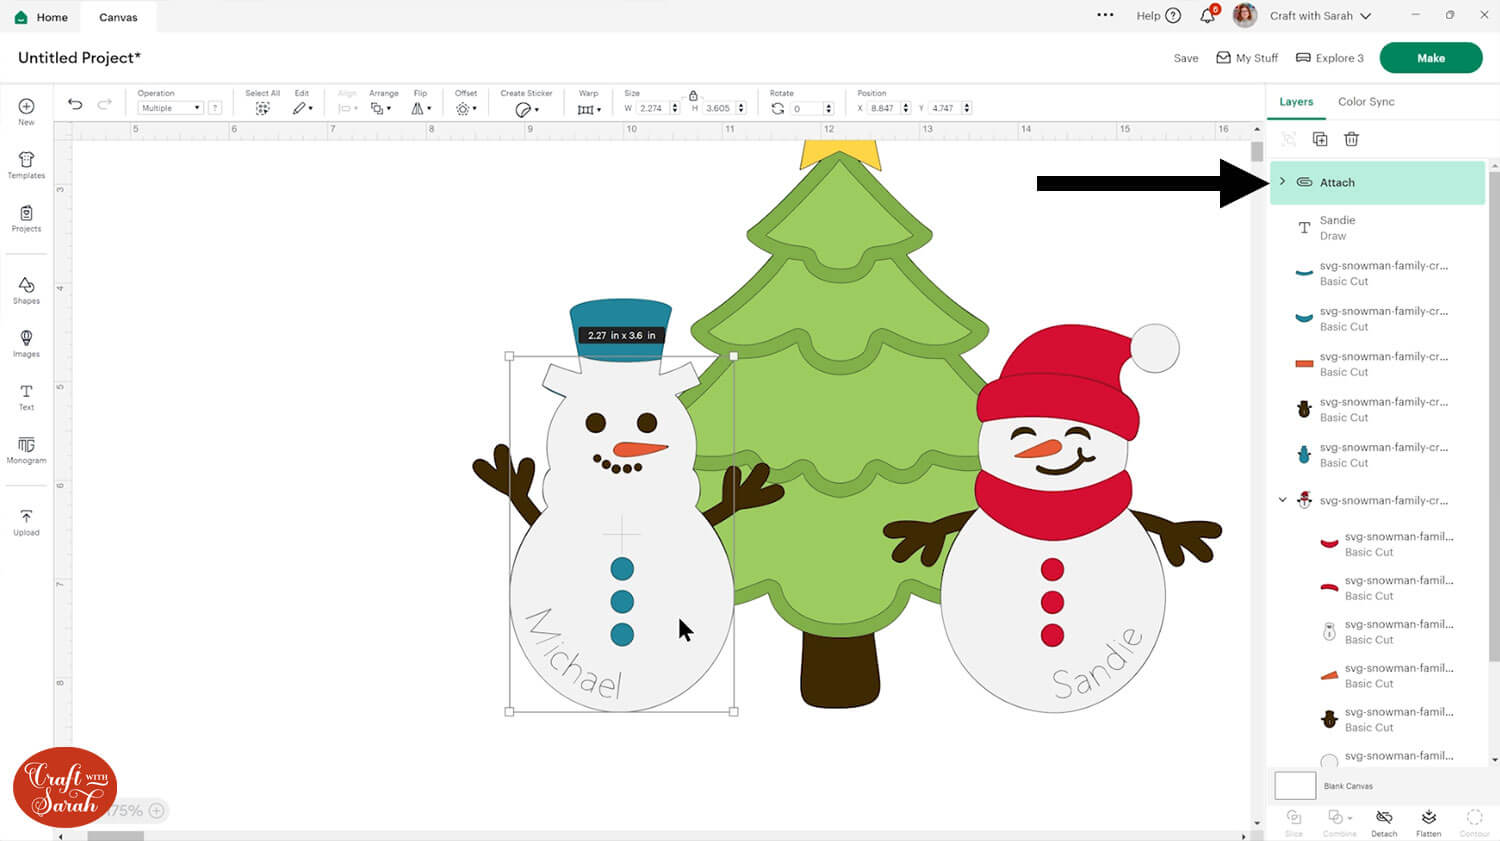
Drag the layer back to it’s “proper” place in the design, then repeat the Attaching process for all of the snowman images.
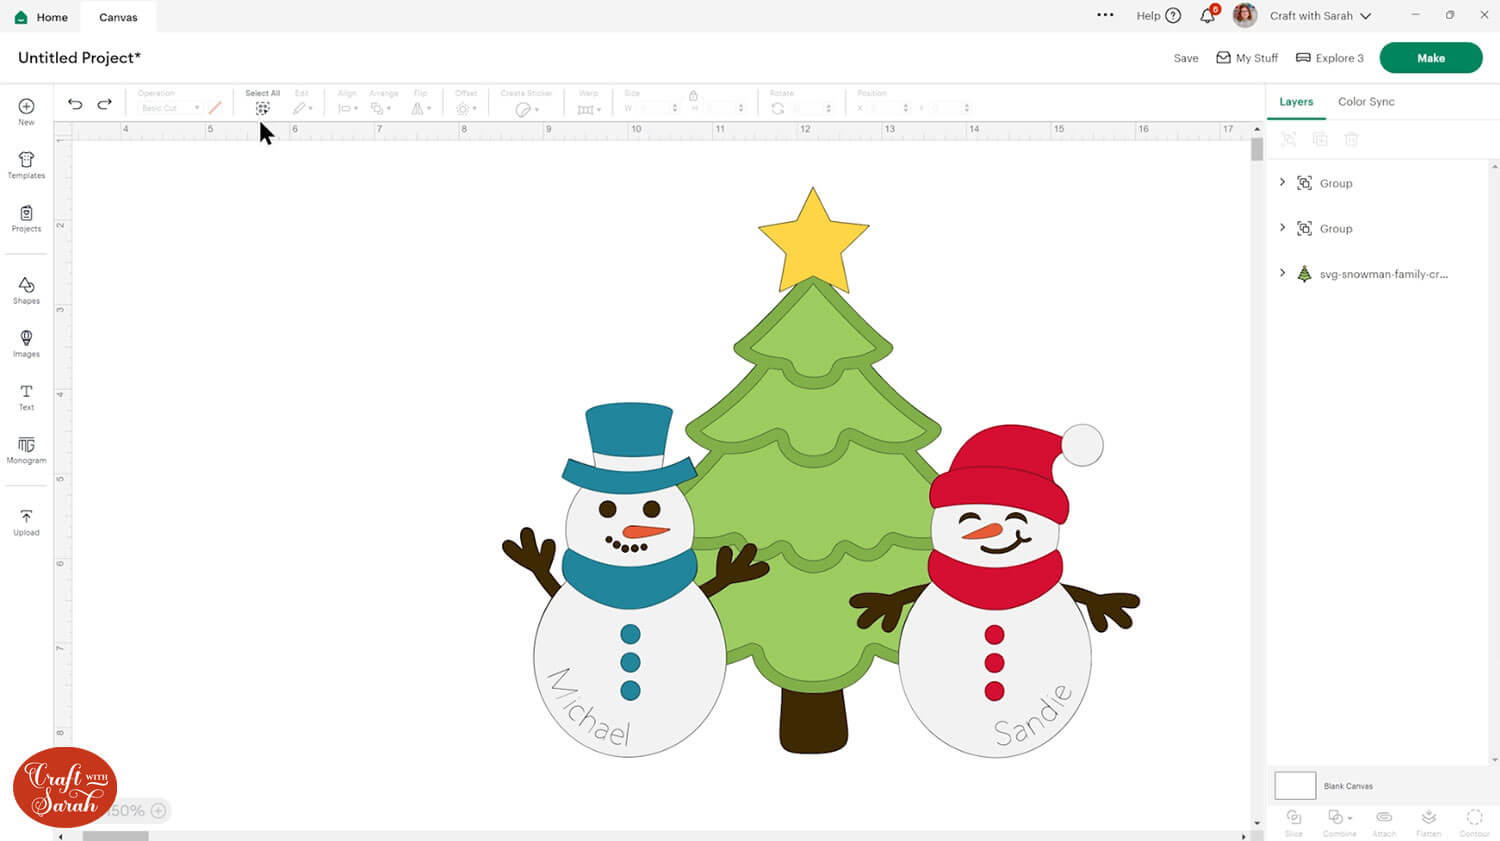
After Attaching, select all the layers of each individual snowman and put each one into a separate Group.
You can see in the image below, I have three groups in my project now: one for the male snowman, one for the female and one for the tree.
Step 4) Merge the layers together
Next, we need to join the outline shapes of the snowman to the Christmas tree layers. This enables us to glue everything together as one single image, making it much easier to stick the project together.
Open up one of the snowman groups by clicking the arrow next to it in the layers panel.
Click on the very bottom layer of the snowman (it will be a coloured layer, not a white one).
Hover your mouse over the snowman on the main Canvas and press the Alt key on your keyboard if you are using a Windows computer, or the Option key on a Mac. Move your mouse slightly and you should see that your cursor changes to have a little “plus” icon next to it.
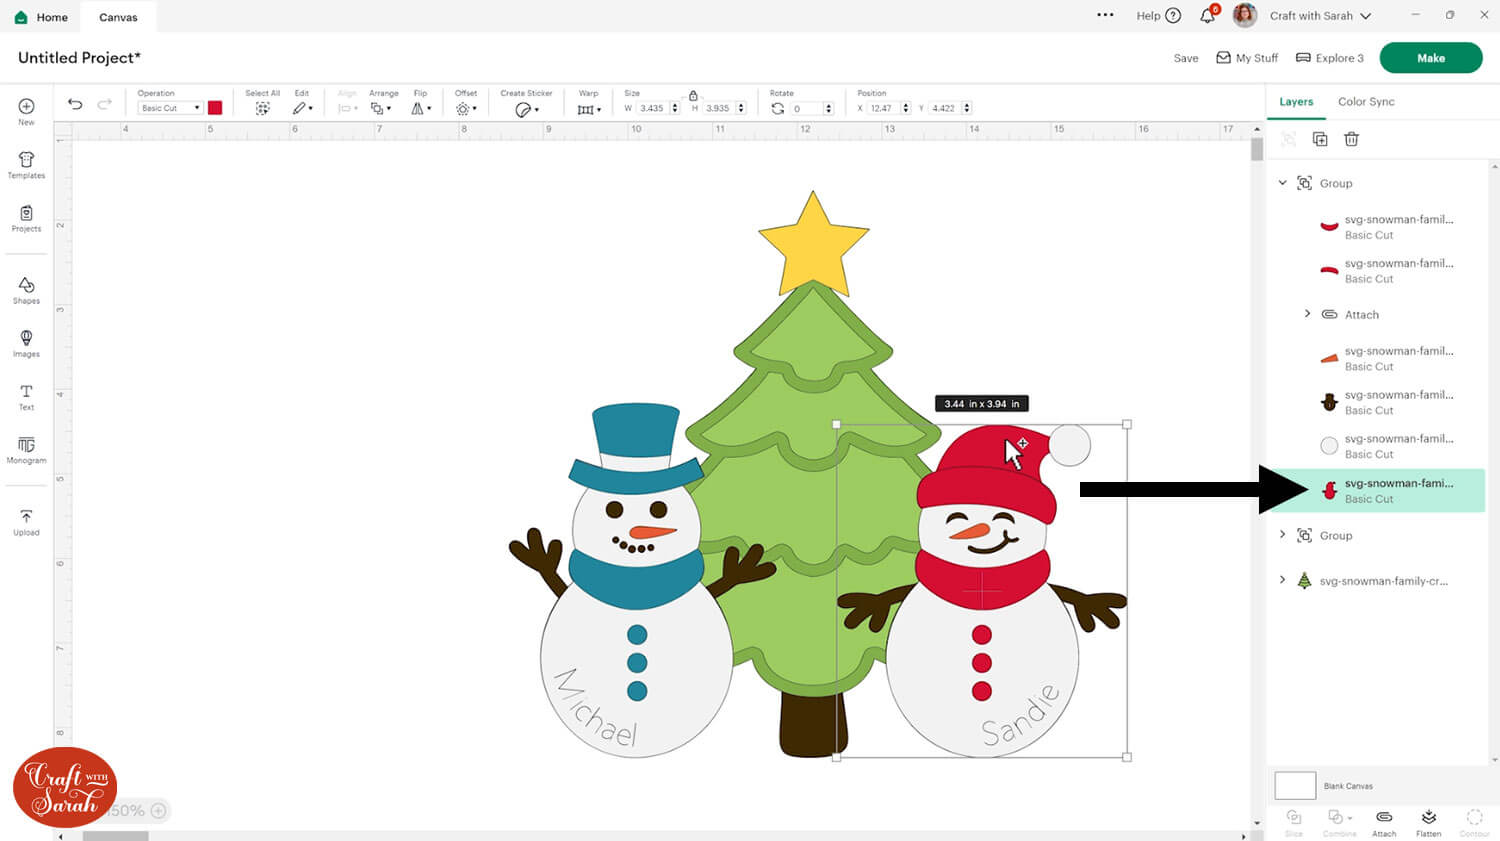
Left-click the mouse when you see the “plus” appear.
This will make a copy of the bottom snowman layer in exactly the same place on the screen.
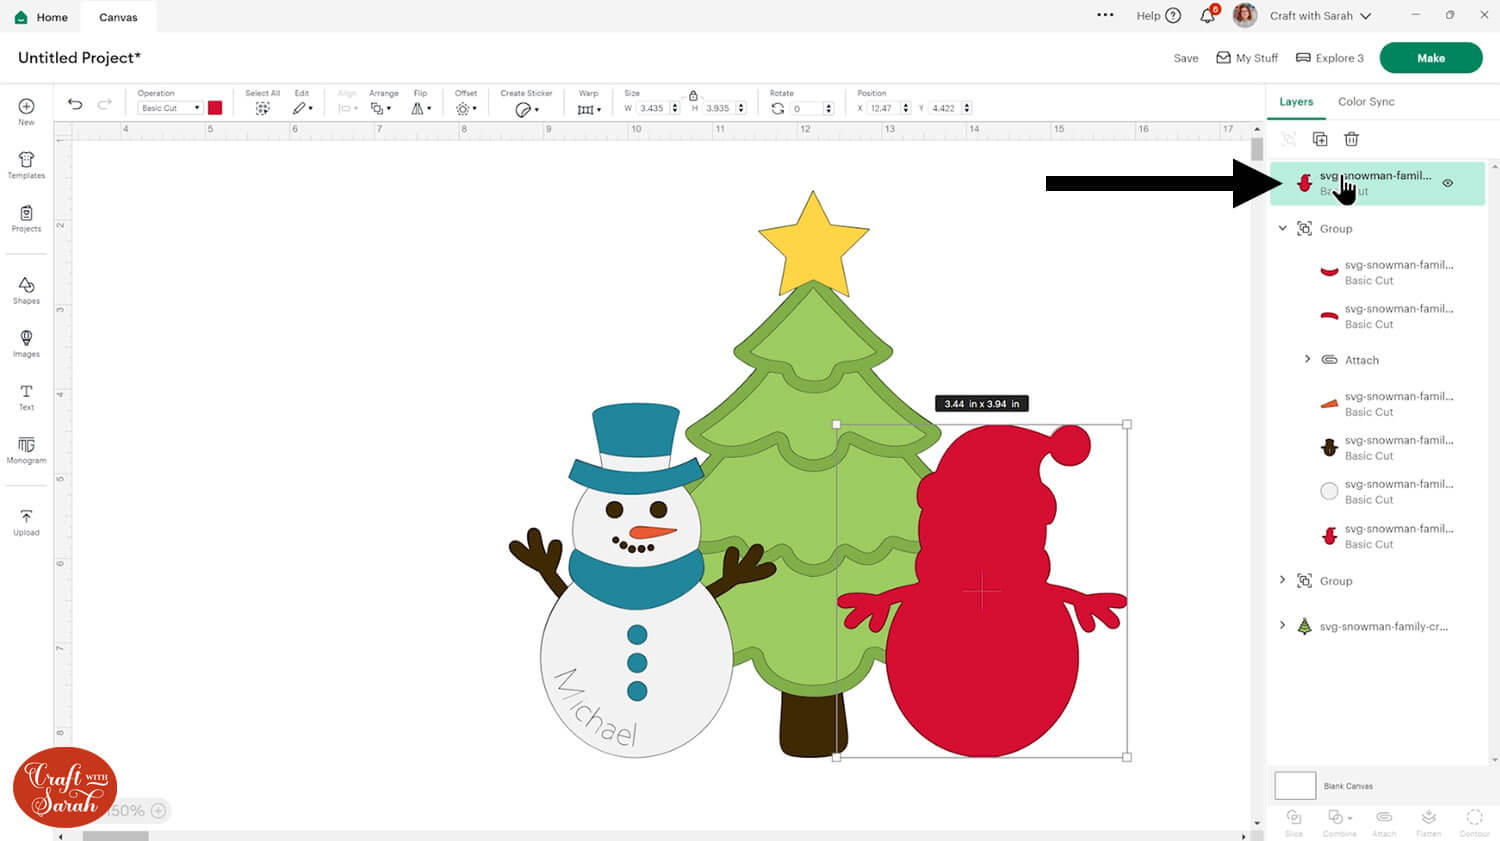
Repeat this for all other snowmen.
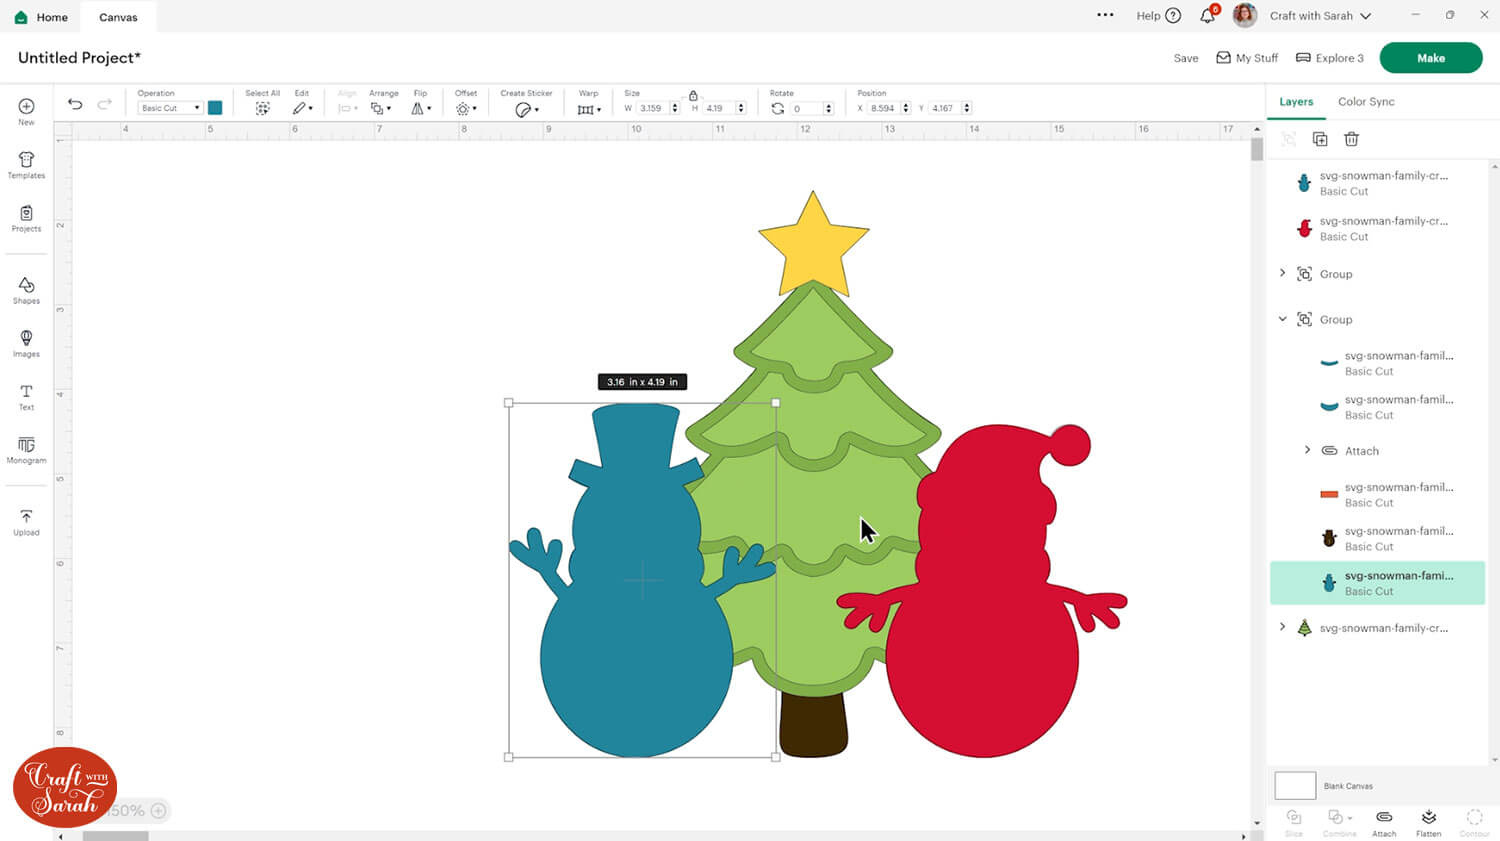
Select all of the new snowman layers and press “Combine > Weld” to join them into one layer. This will change them all to the same colour.
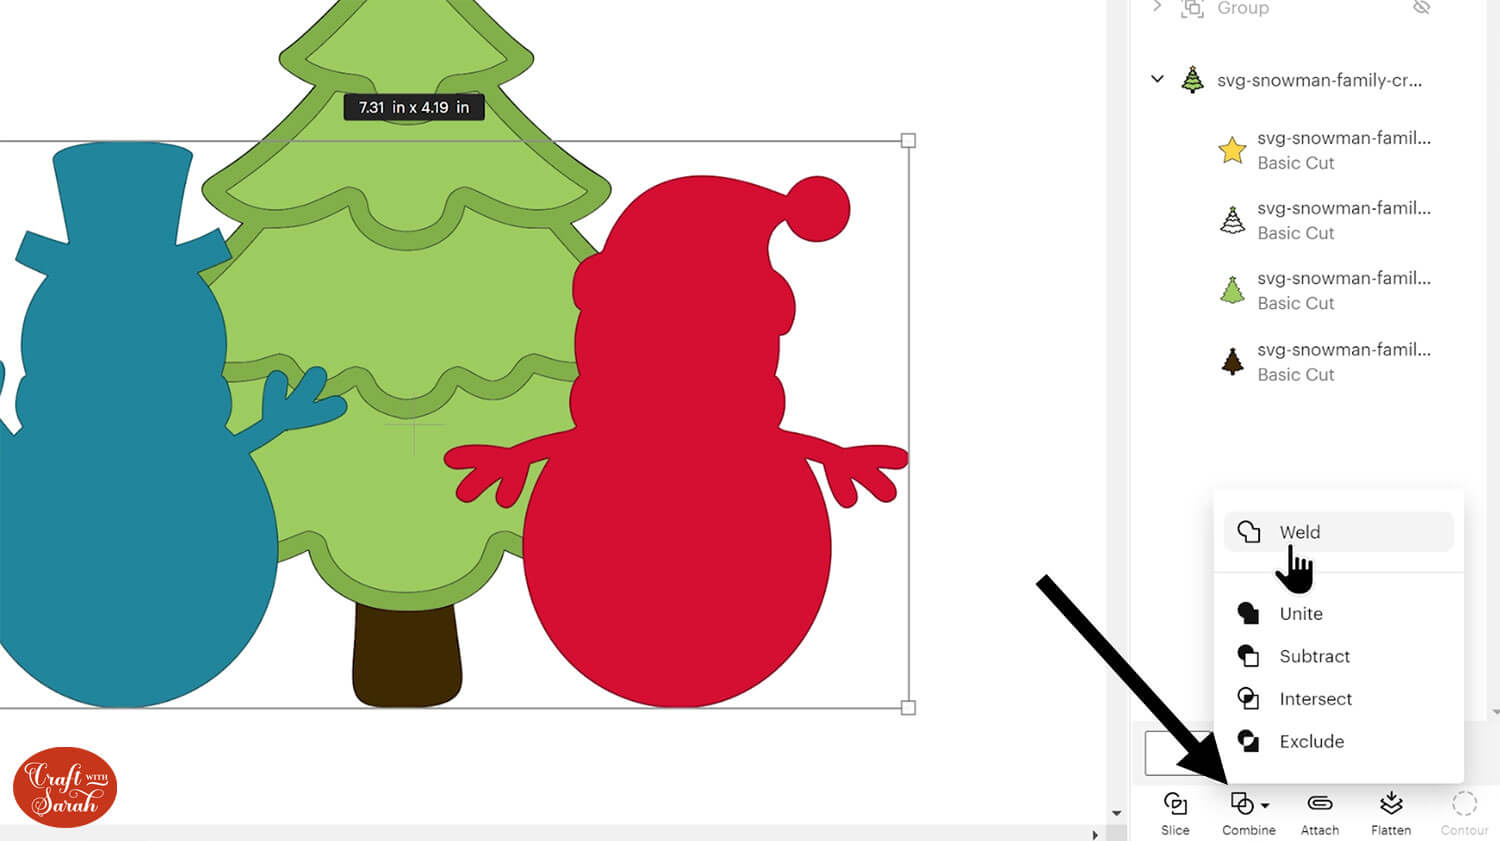
We need three copies of this new “Welded” layer as we will be merging them with each of the main layers of the Christmas tree images.
Duplicate the Welded layer twice using the same “Alt/Option and click” trick, then colour each of them to the same colours as the tree: brown, light green and dark green.
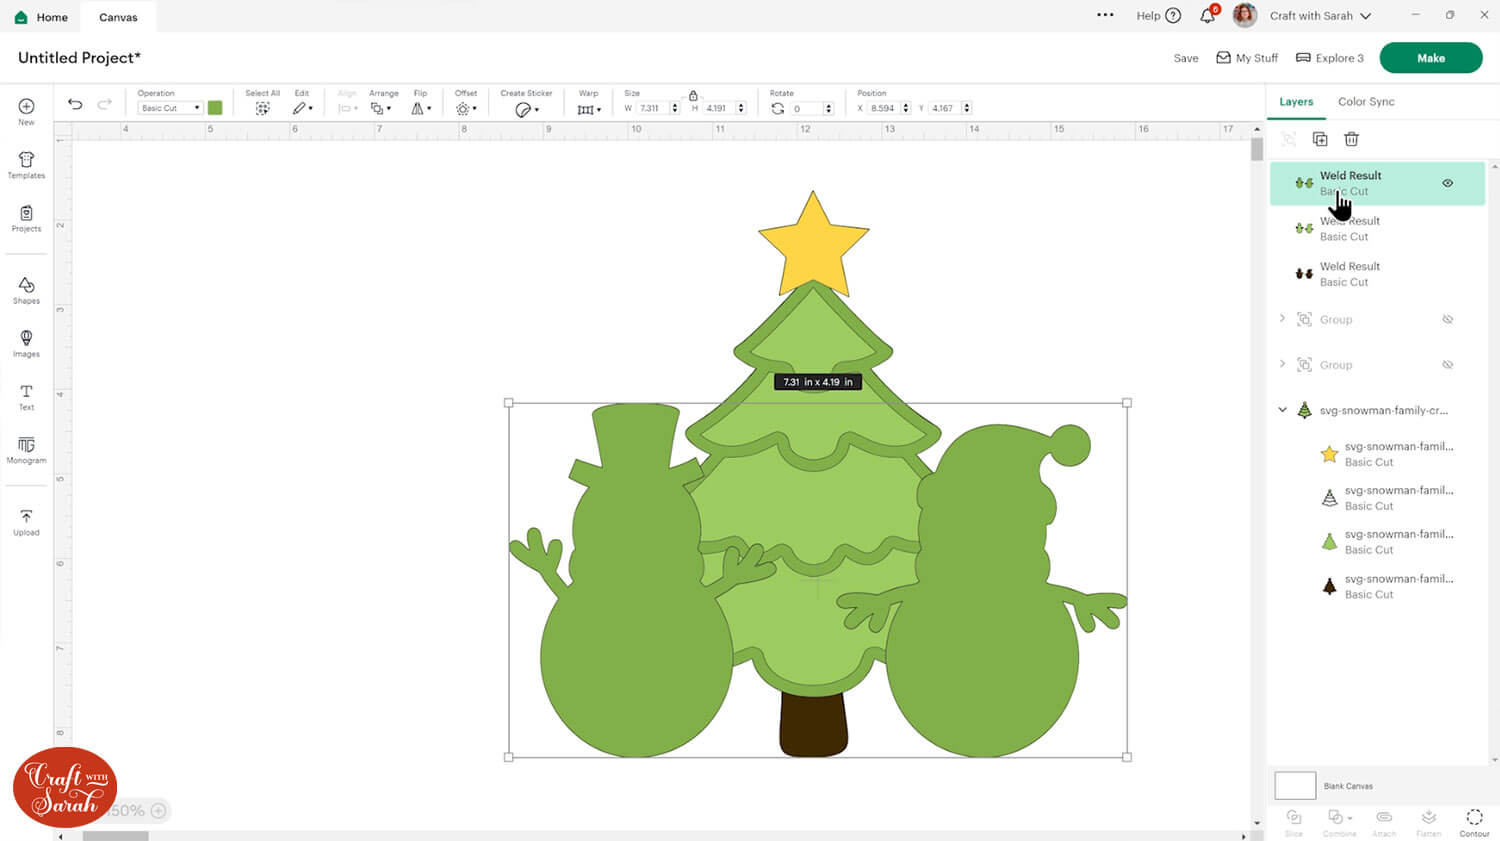
It might be easier to hide the main snowman groups at this point by hovering over them in the layers panel and clicking the eye icon.
Ungroup the layers of the tree.
Select the dark green layer of the tree and the dark green version of your snowman image.
Press “Combine > Weld” to join them together.
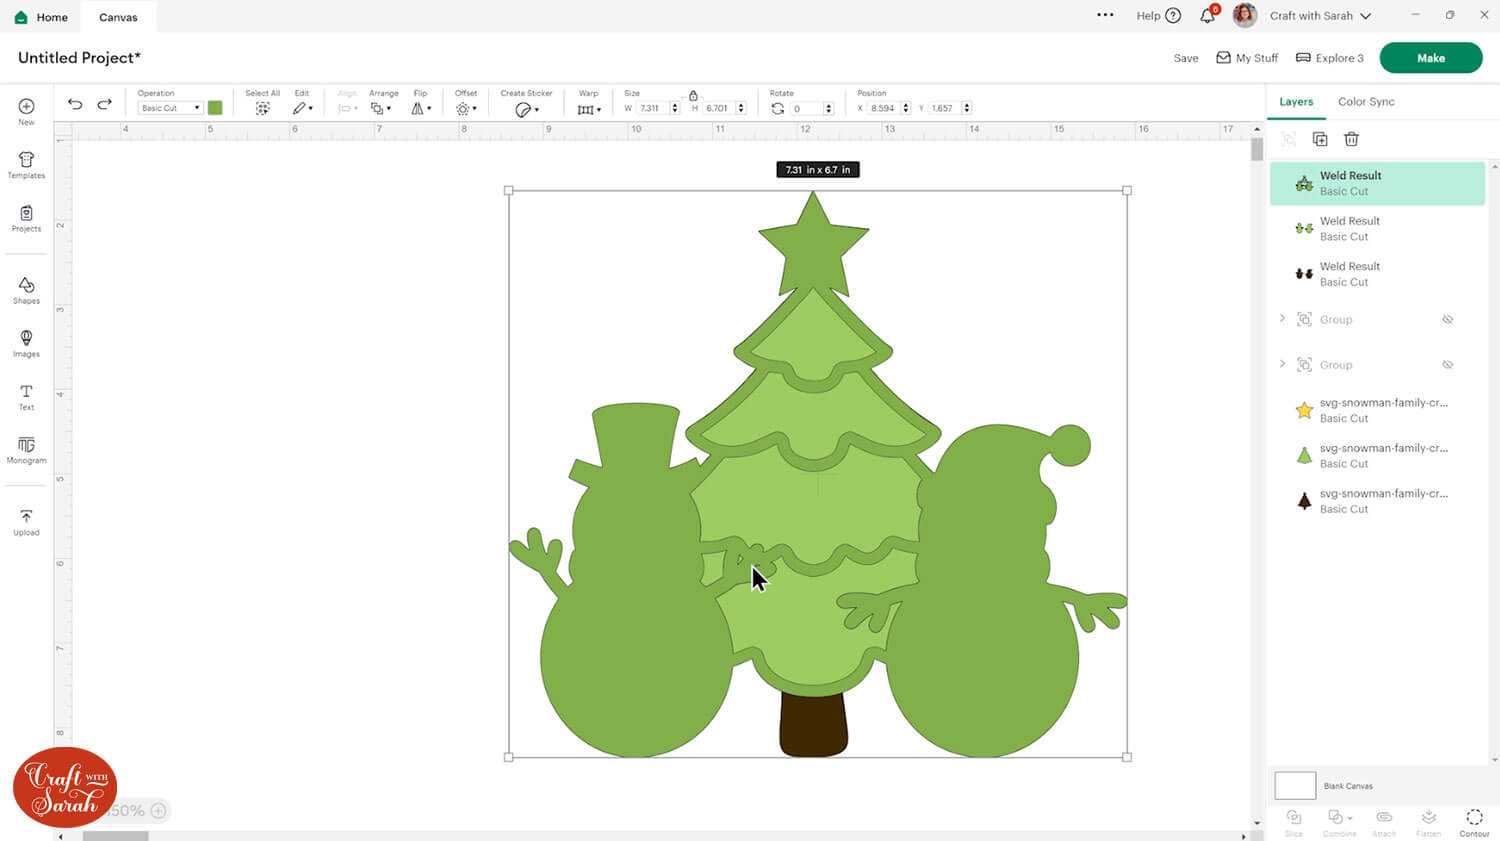
If there are any tiny gaps in the Welded layer that the Cricut might struggle to cut, you can remove them by clicking the “Contour” button and then click into the small gaps in the Contour window to hide them.
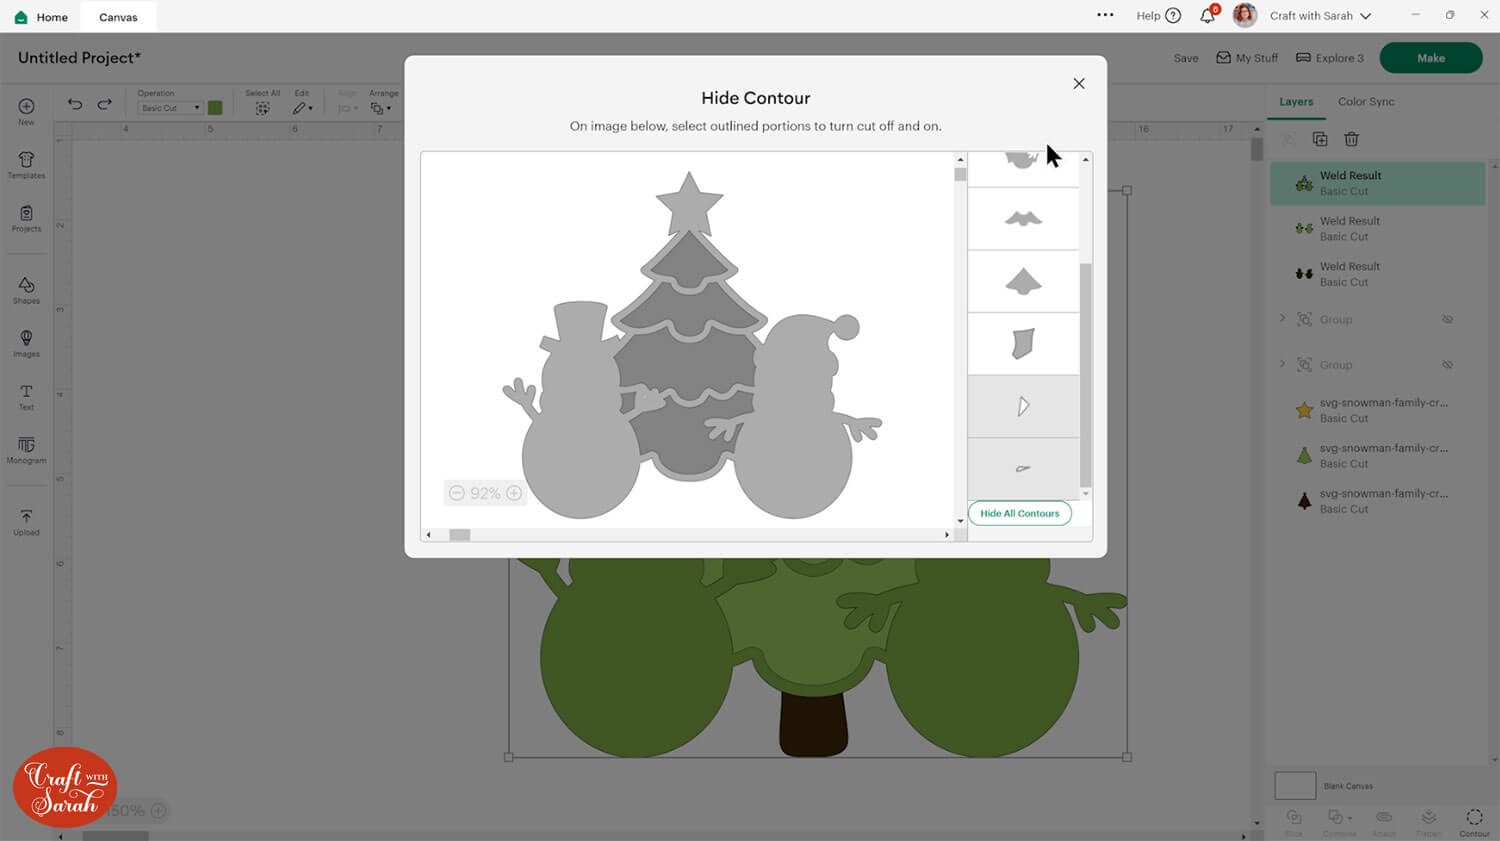
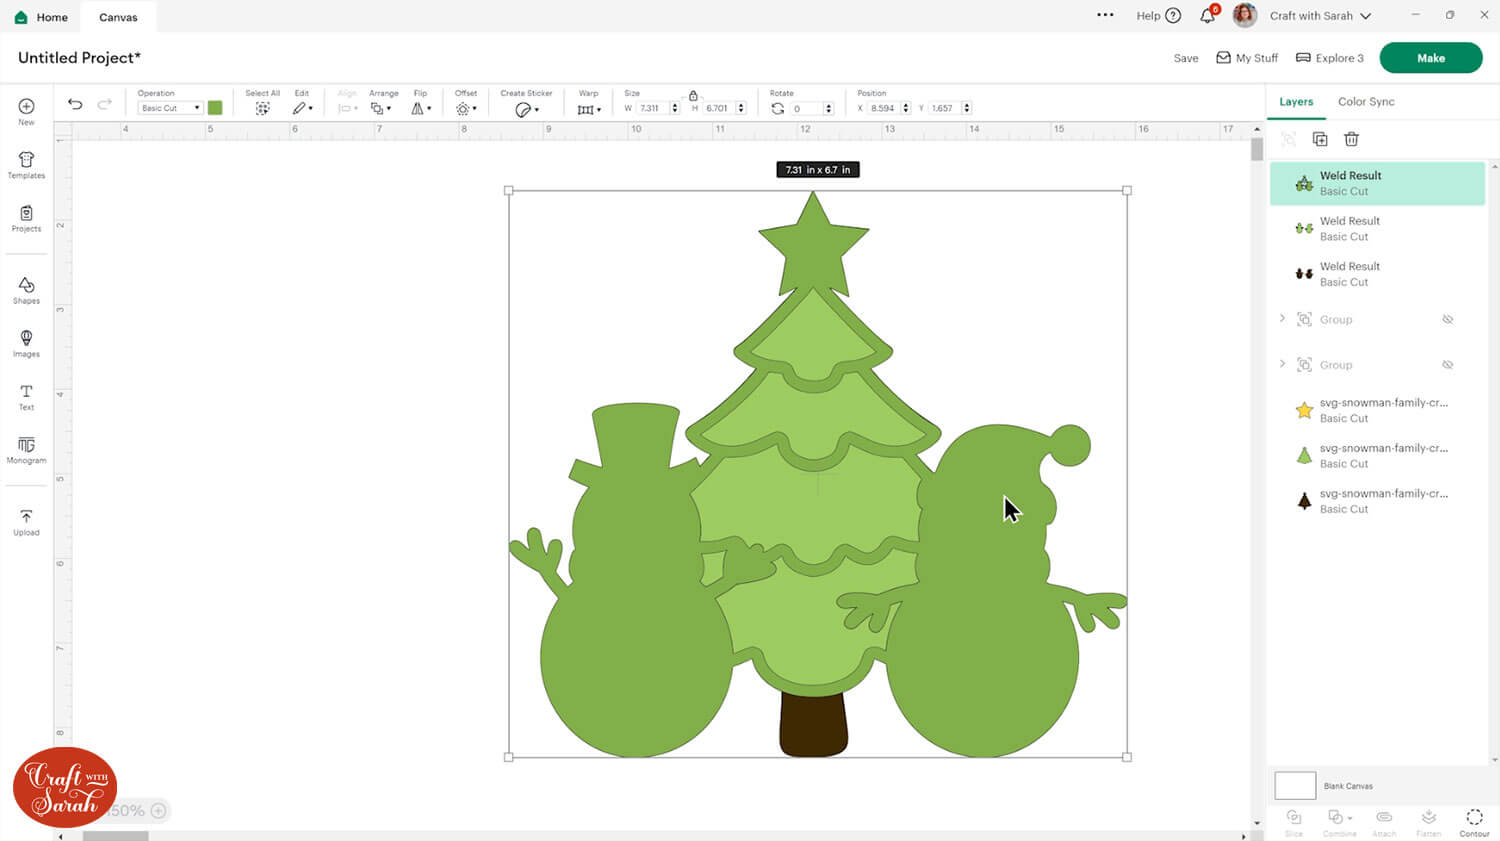
Repeat this for the brown layers and the light green pieces and move them into the correct position in the layers panel so that they are underneath the main snowman groups.
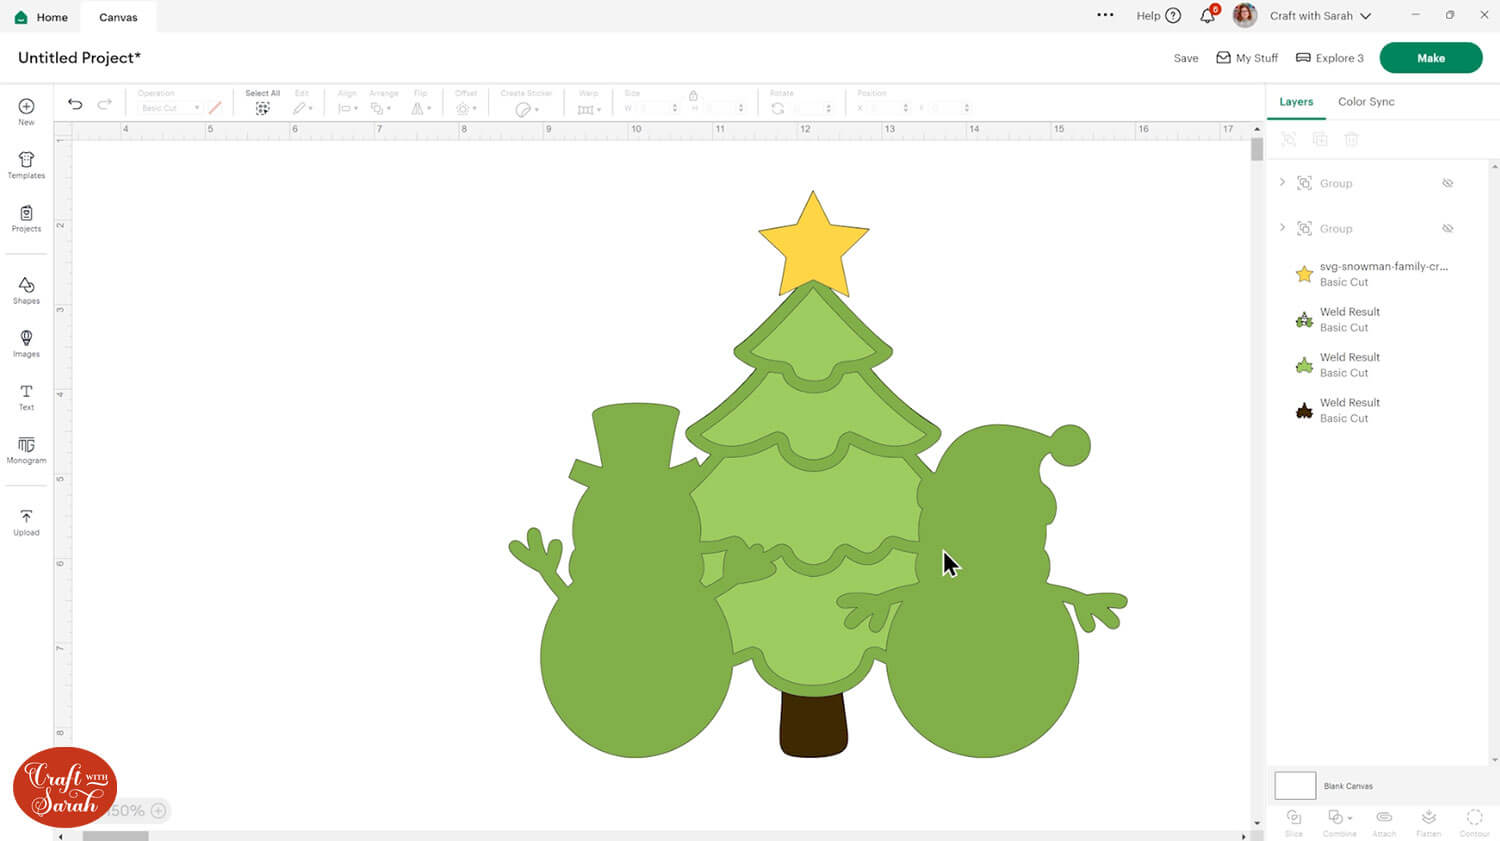
Turn the snowmen back on, and your layout is finished!
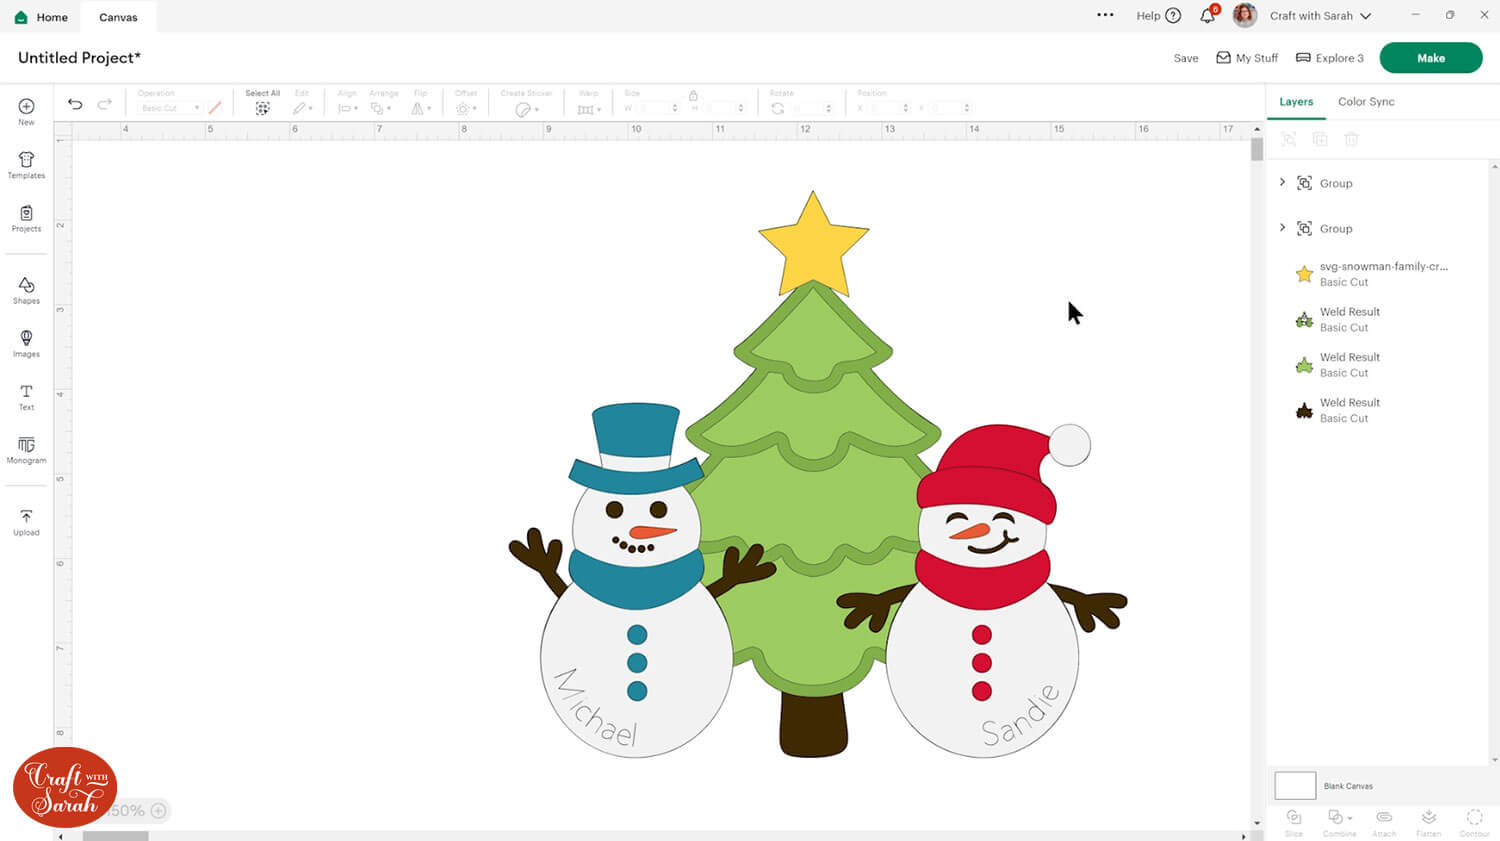
Be sure to save your project so that you don’t lose all your hard work!
PART TWO: Creating a hanging decoration
If you want to use your snowman family as a Christmas tree decoration then you will need to add a circular hole in the top of the tree to thread some ribbon through so that it can be hung.
If you’d rather make a greetings card instead of a decoration, scroll down to PART THREE instead.
Hover your mouse over the yellow star layer in the layers panel and click the eye icon that appears to hide it from view.
Click into “Shapes” and choose a circle. Resize it so that it fits inside the star shape.
Don’t go too close to the edges of the star, otherwise the cardstock will get weak and prone to tearing if the edges are too thin.
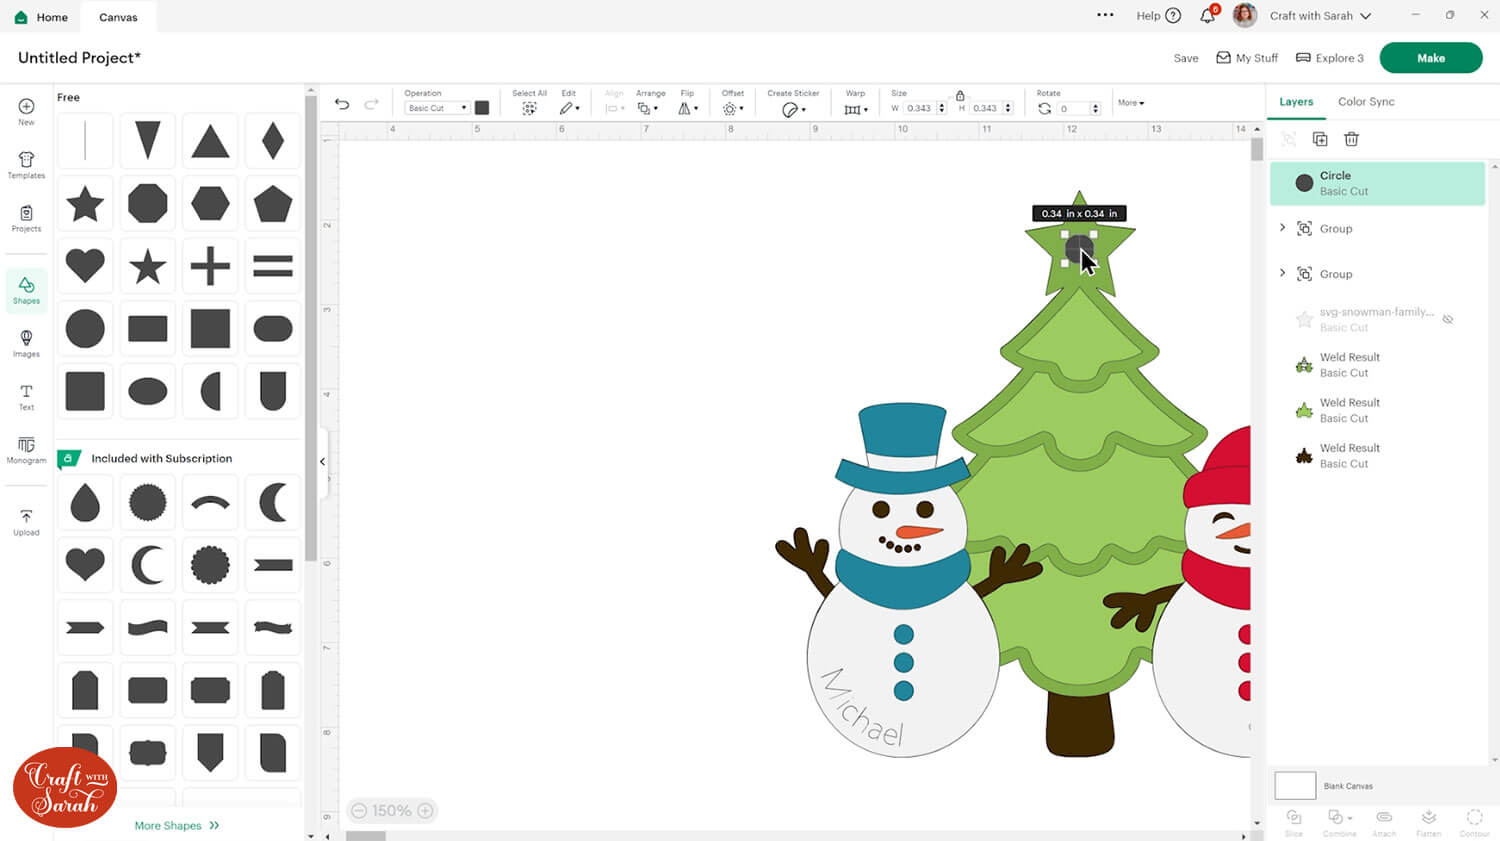
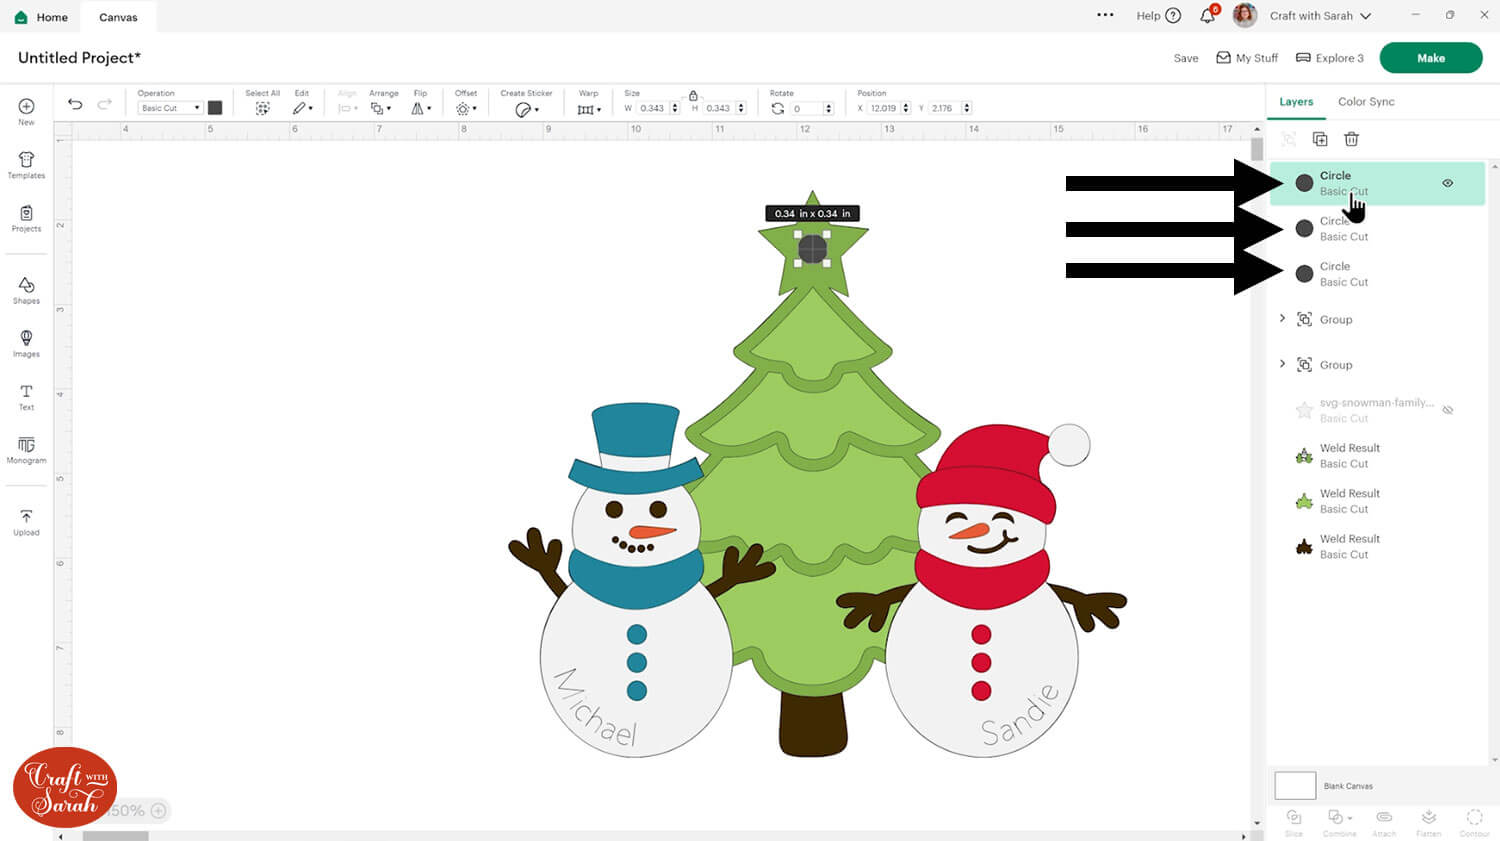
Use the Alt/Option and click trick to duplicate the circle twice, so you have three in total.
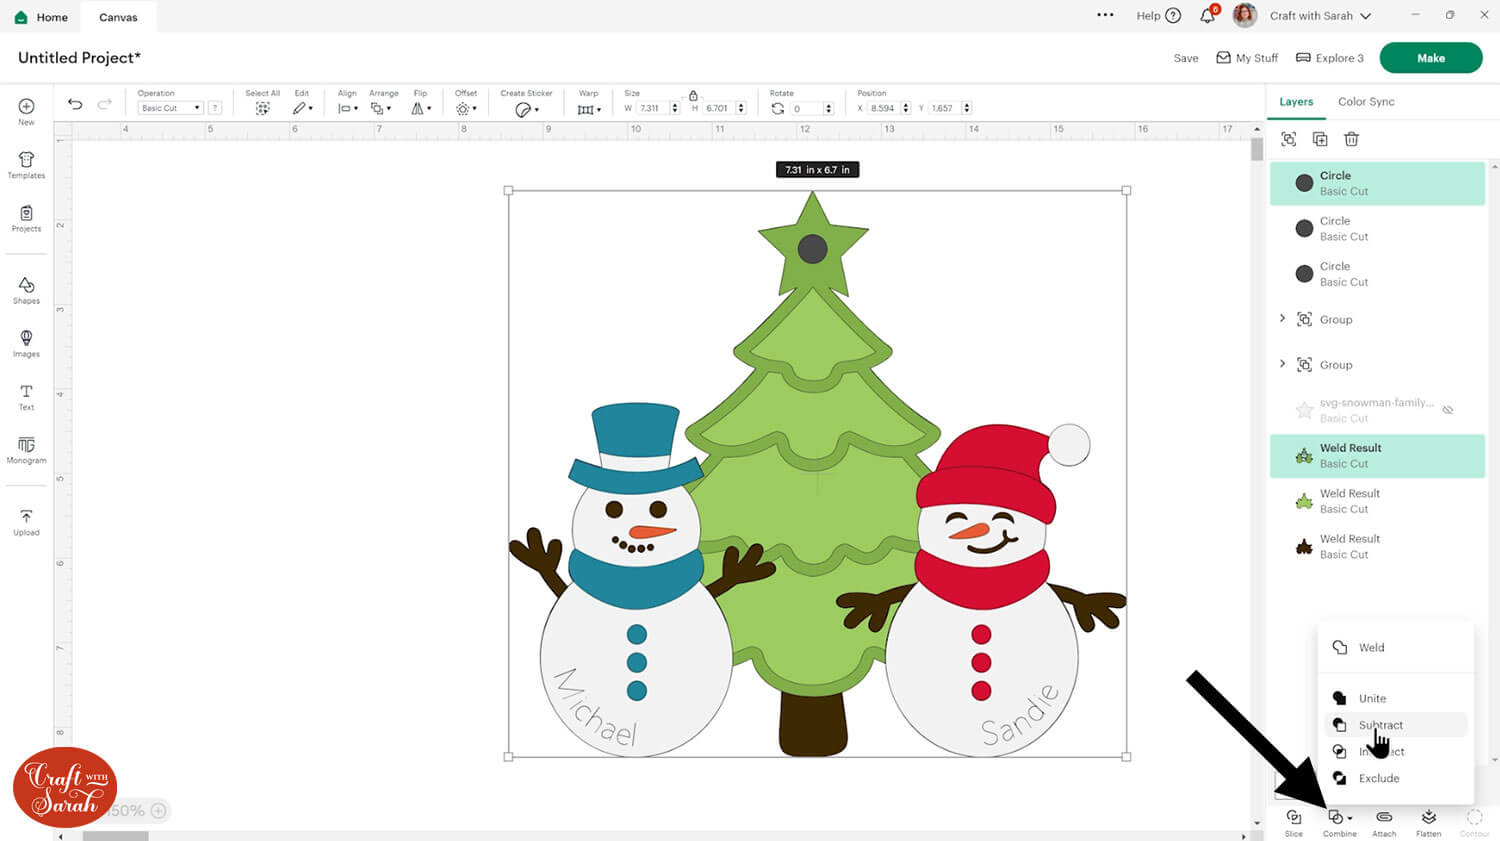
Select one of the circles and the dark green tree layer and press “Combine > Subtract”. That will cut the circle out of the tree layer.
Subtracting layers moves them to the top of the layers panel. Click-and-drag it back into its correct position, then repeat the Subtract process for the light green tree layer and the brown tree layer.
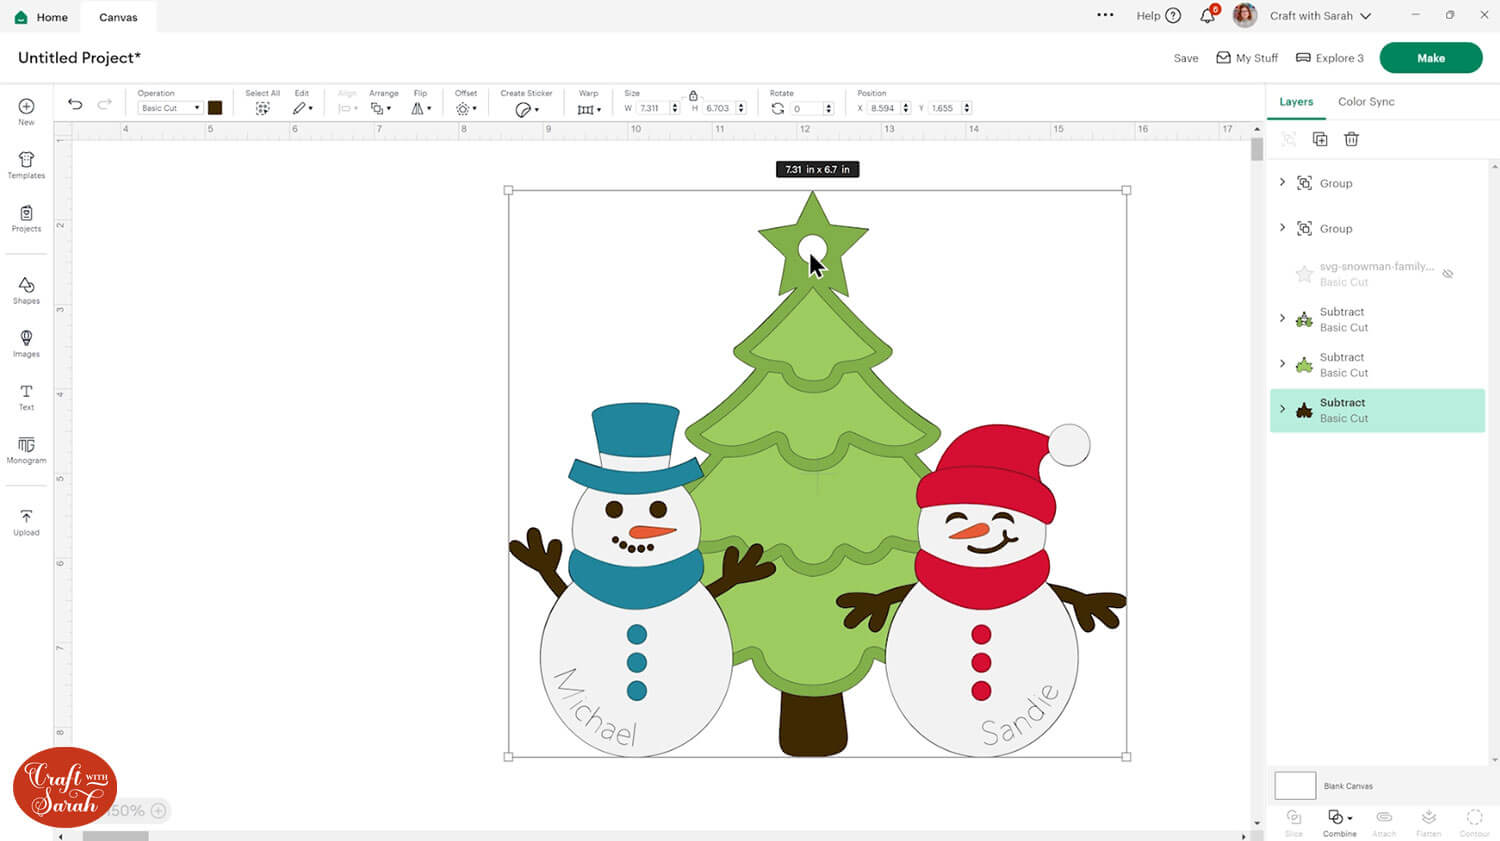
Turn the yellow star back on.
Press “Select All” and then “Group” to join all the pieces together.
Resize the design to the size that you want to cut it. I did mine at 4 inches wide.
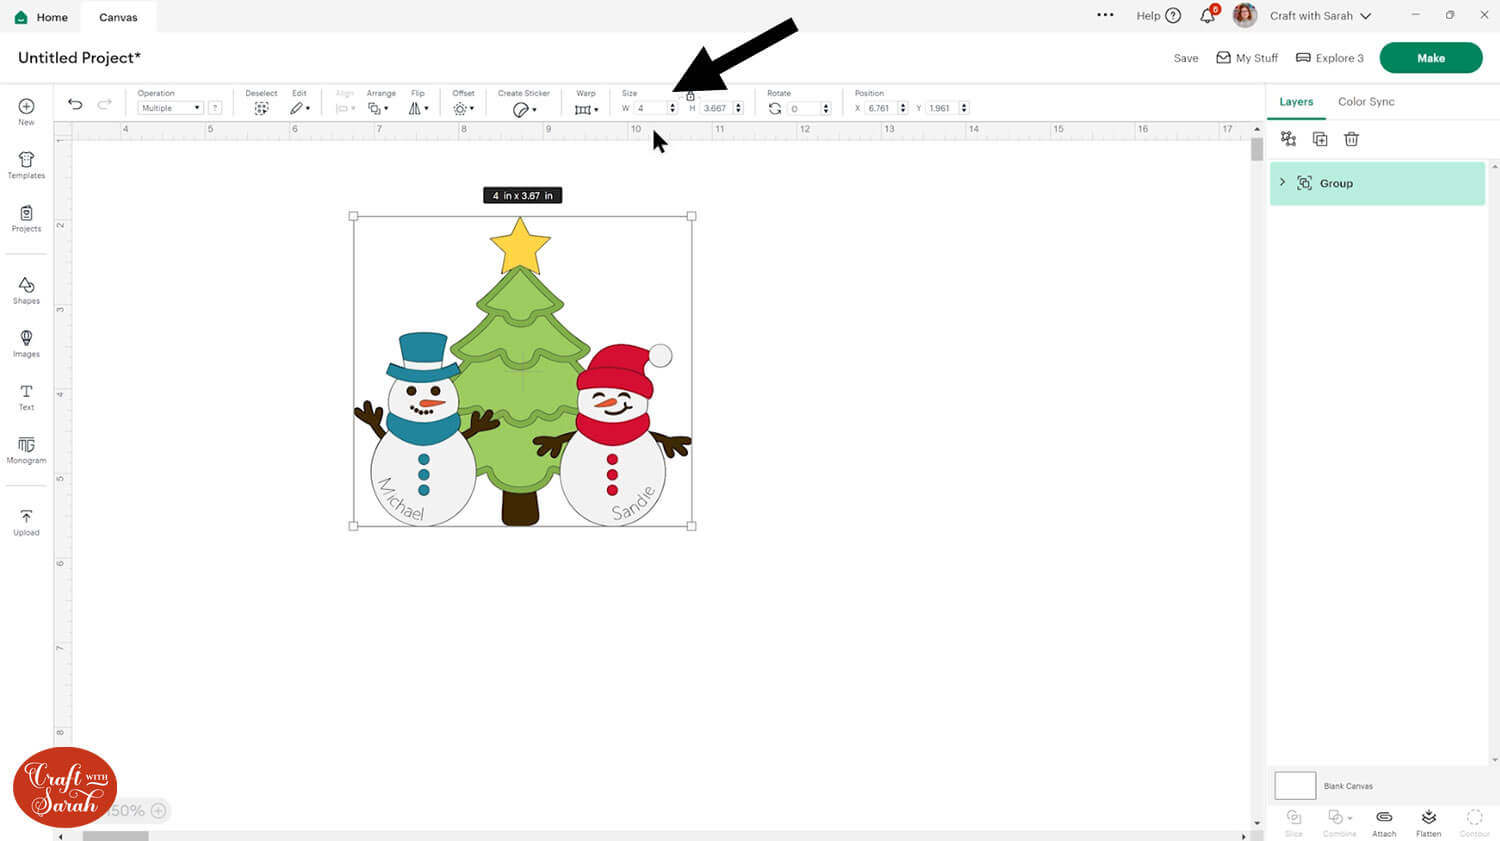
Save your project again, then move to PART FOUR to see how to cut it out and how to stick all the pieces together.
PART THREE: Making a greetings card
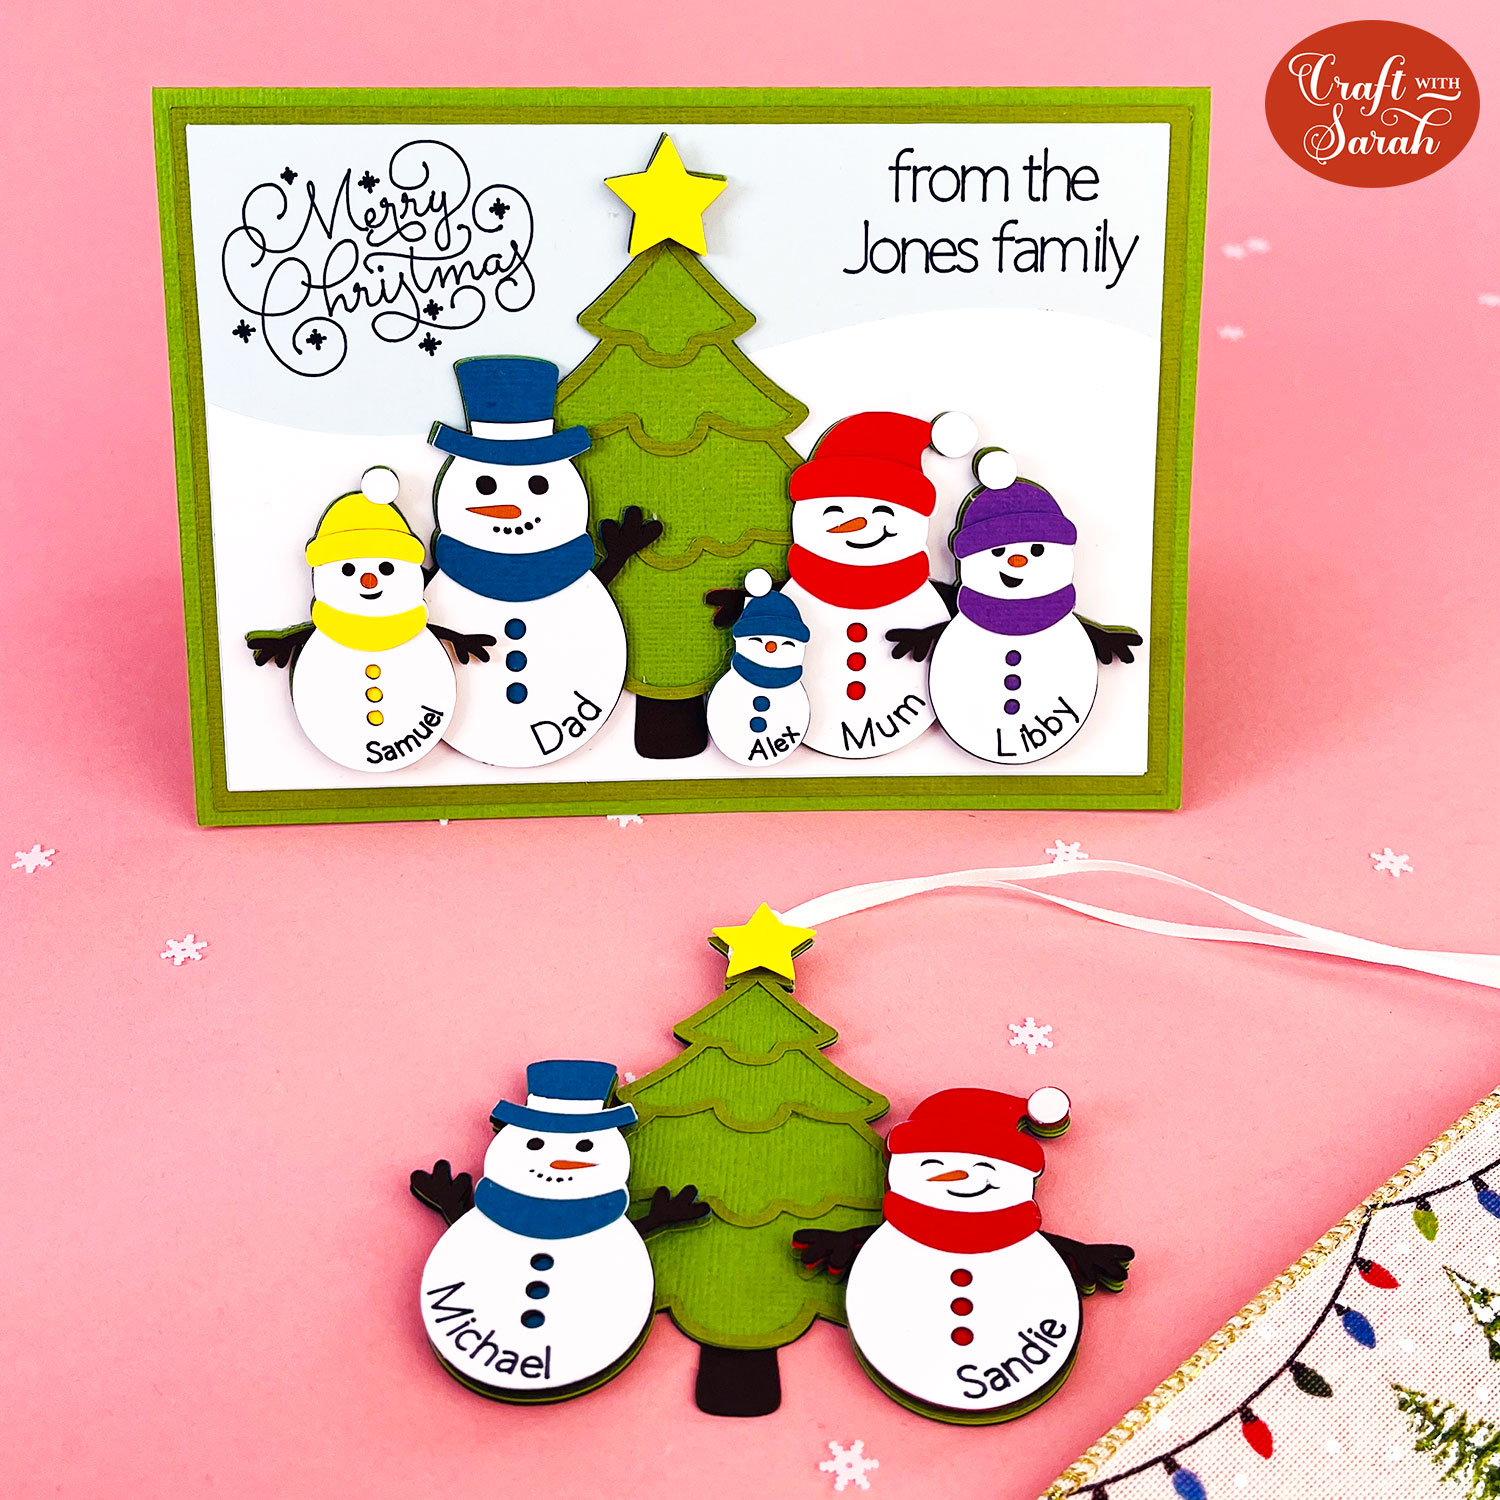
Here is the snowman family that I will be adding to the front of a greetings card:
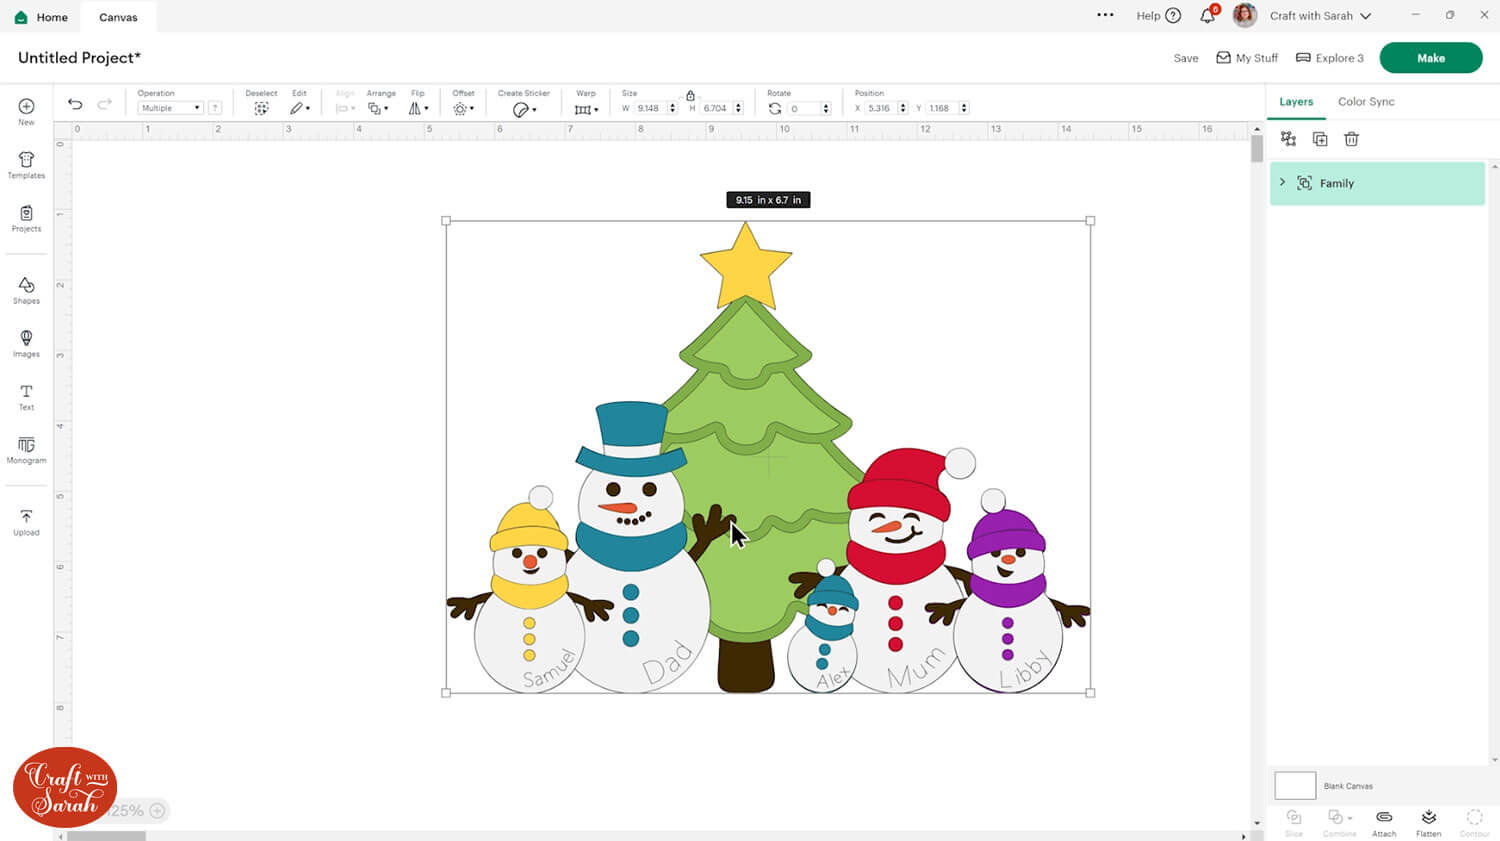
Group the snowman family together and hide it in the layers panel.
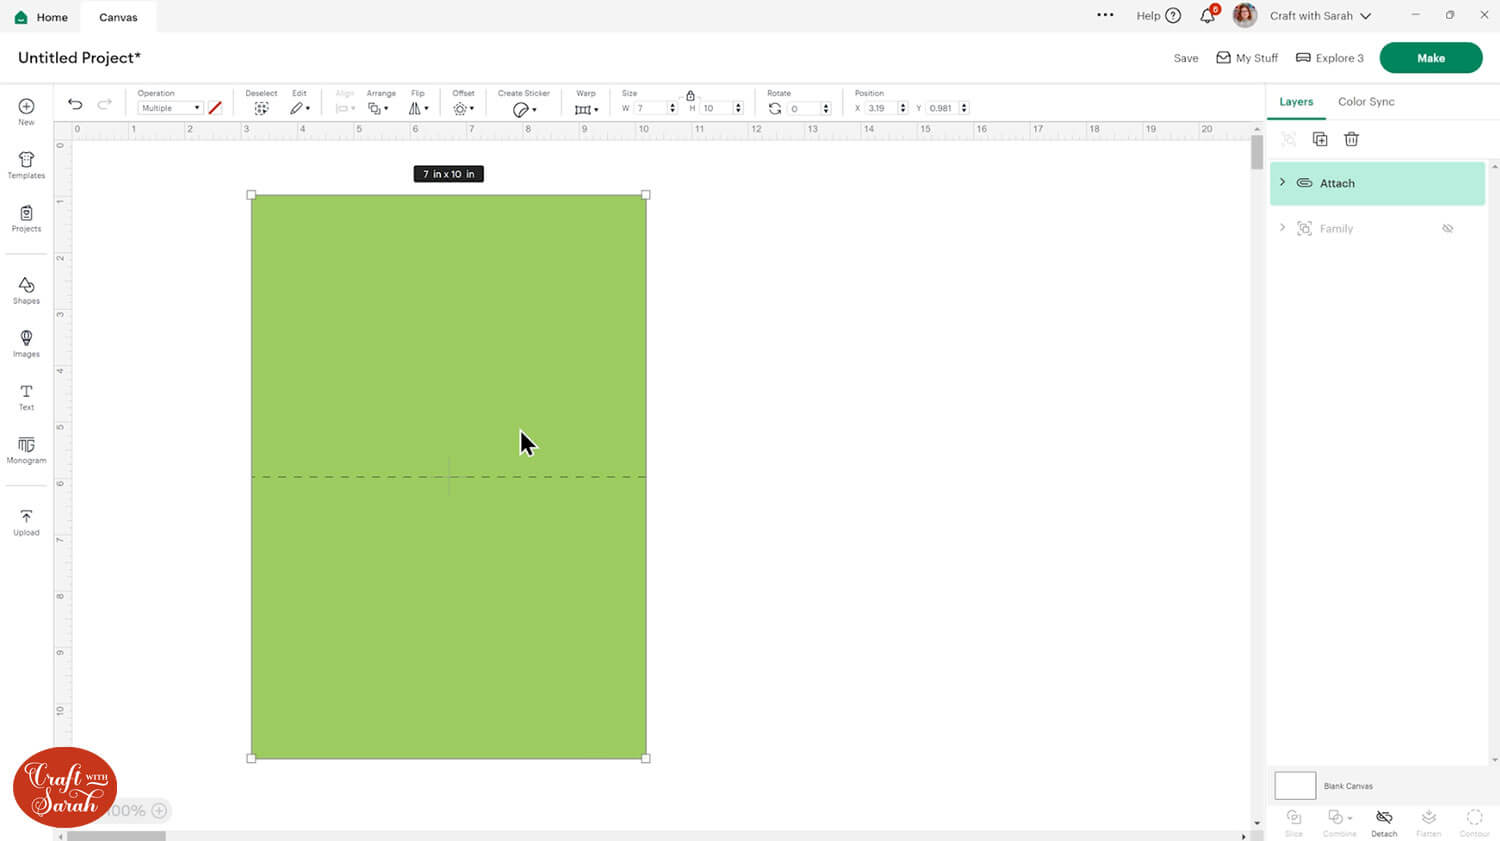
Click “Shapes” and insert a square. Resize it to the size of the card you want to make.
I am making a 5×7 inch card so I made the square into a rectangle that’s 7 inches wide and 10 inches tall.
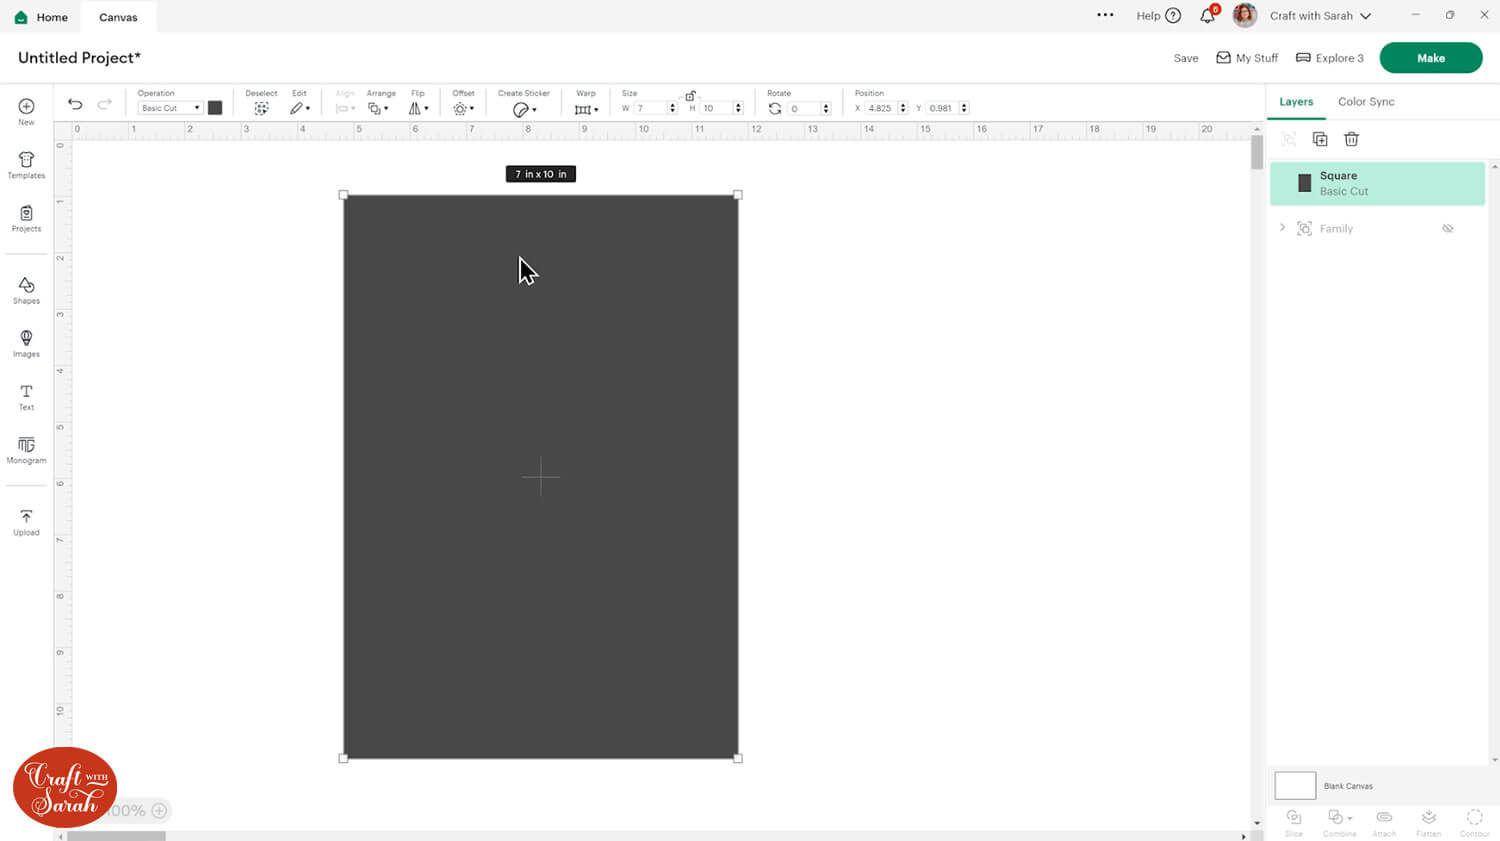
Re-colour the rectangle to match your card. I’ve chosen the same light green as the tree.
If you have a scoring tool or stylus for your Cricut then add a score line to the card to make it easier to fold.
Click “Shapes” again and choose a Score line.
Make it the same size as your card. For me, that’s 7 inches. You may need to rotate the score line by 90 degrees depending on the orientation of your card.
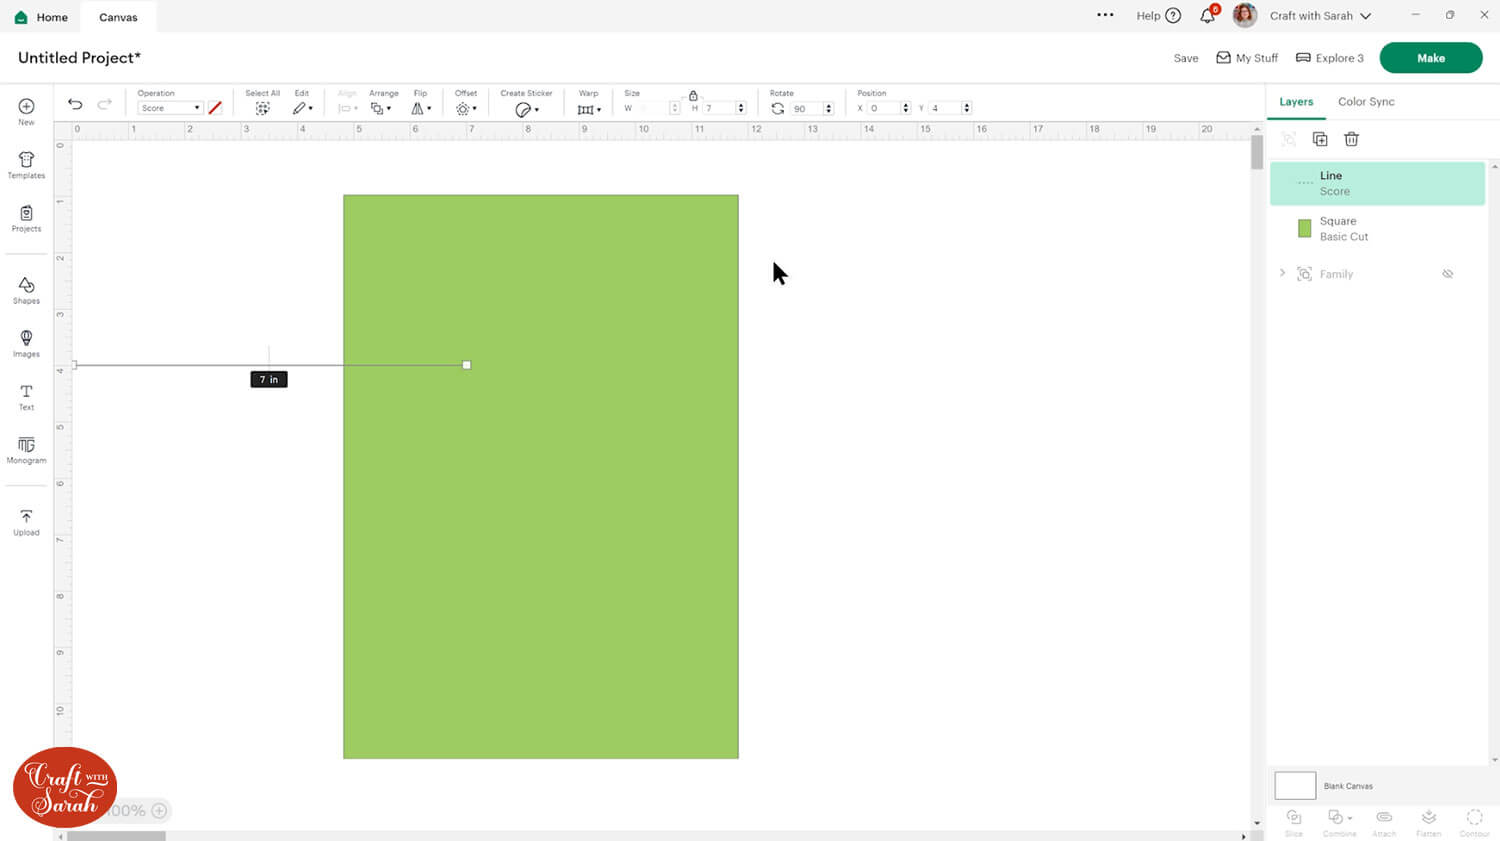
Select the score line and rectangle and press “Align > Center” to put the score line exactly in the middle of the card.
Press “Attach” to join them together.
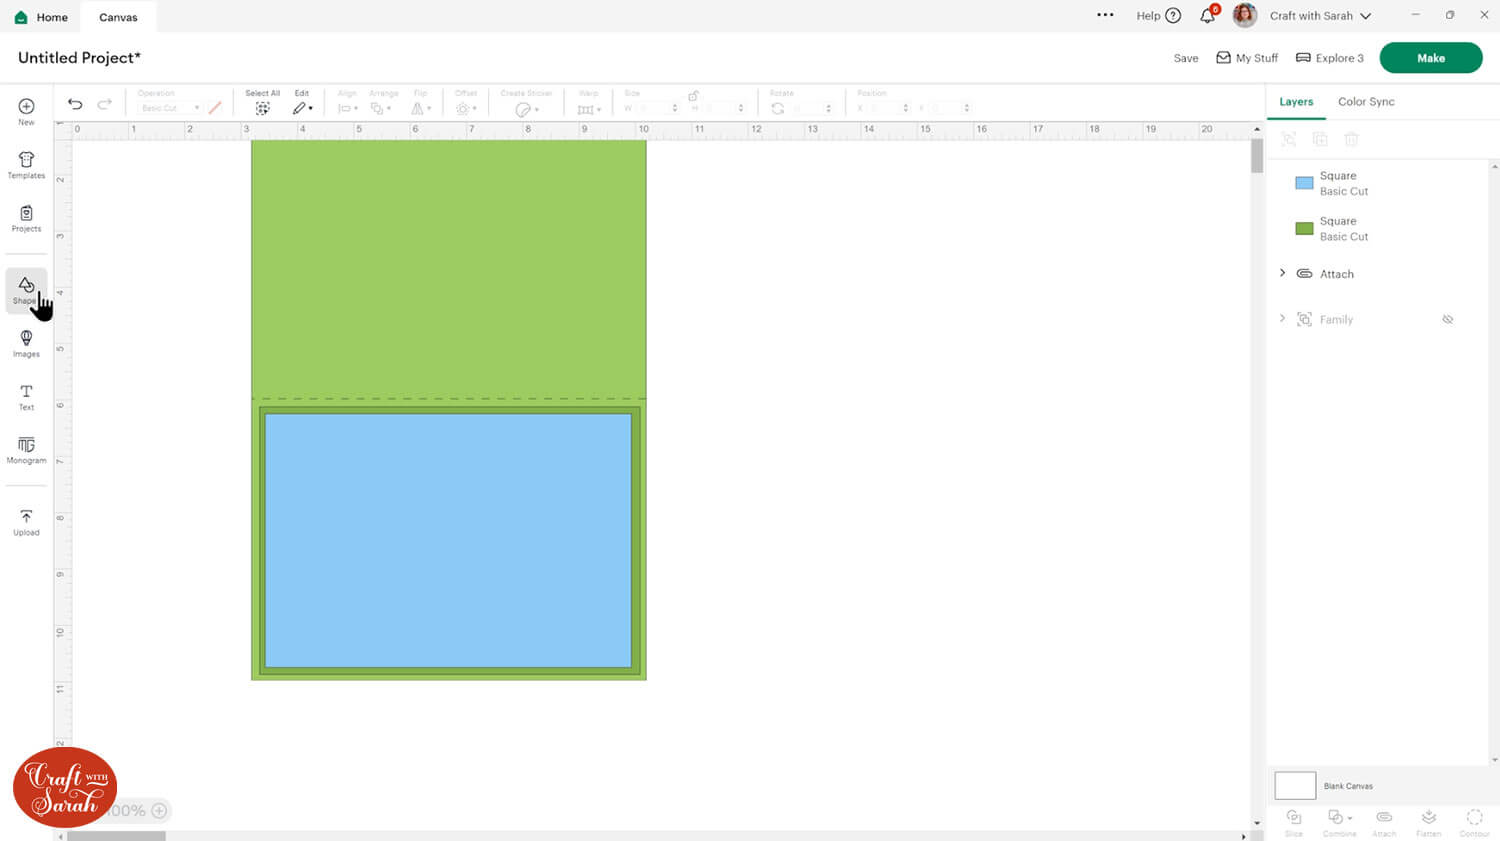
Build up some layers with two more rectangles along the front of the card.
Mine measure 6.75 inches wide and 4.75 inches tall for the larger one and 6.5 inches wide and 4.5 inches tall for the smaller one.
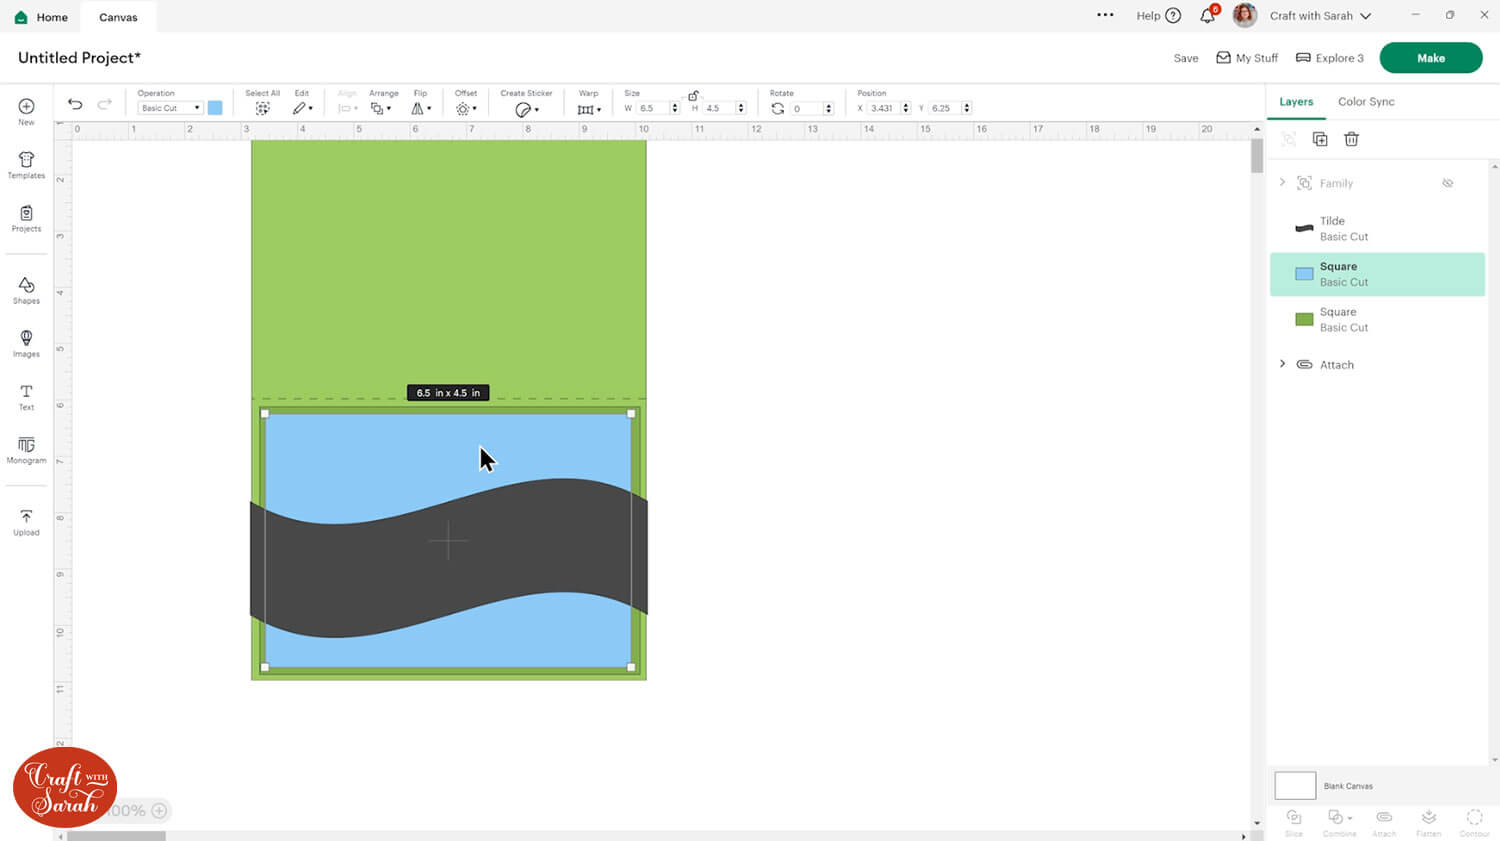
To add a snowdrift effect to the card, click “Shapes” and choose an oval or another suitable shape.
Position it onto the card.
Duplicate the blue rectangle in place using the Alt/Option and click trick, then change the colour to white.
Select the white rectangle and the new shape and press “Slice”.
This will give you several “Slice Result” layers in the layers panel.
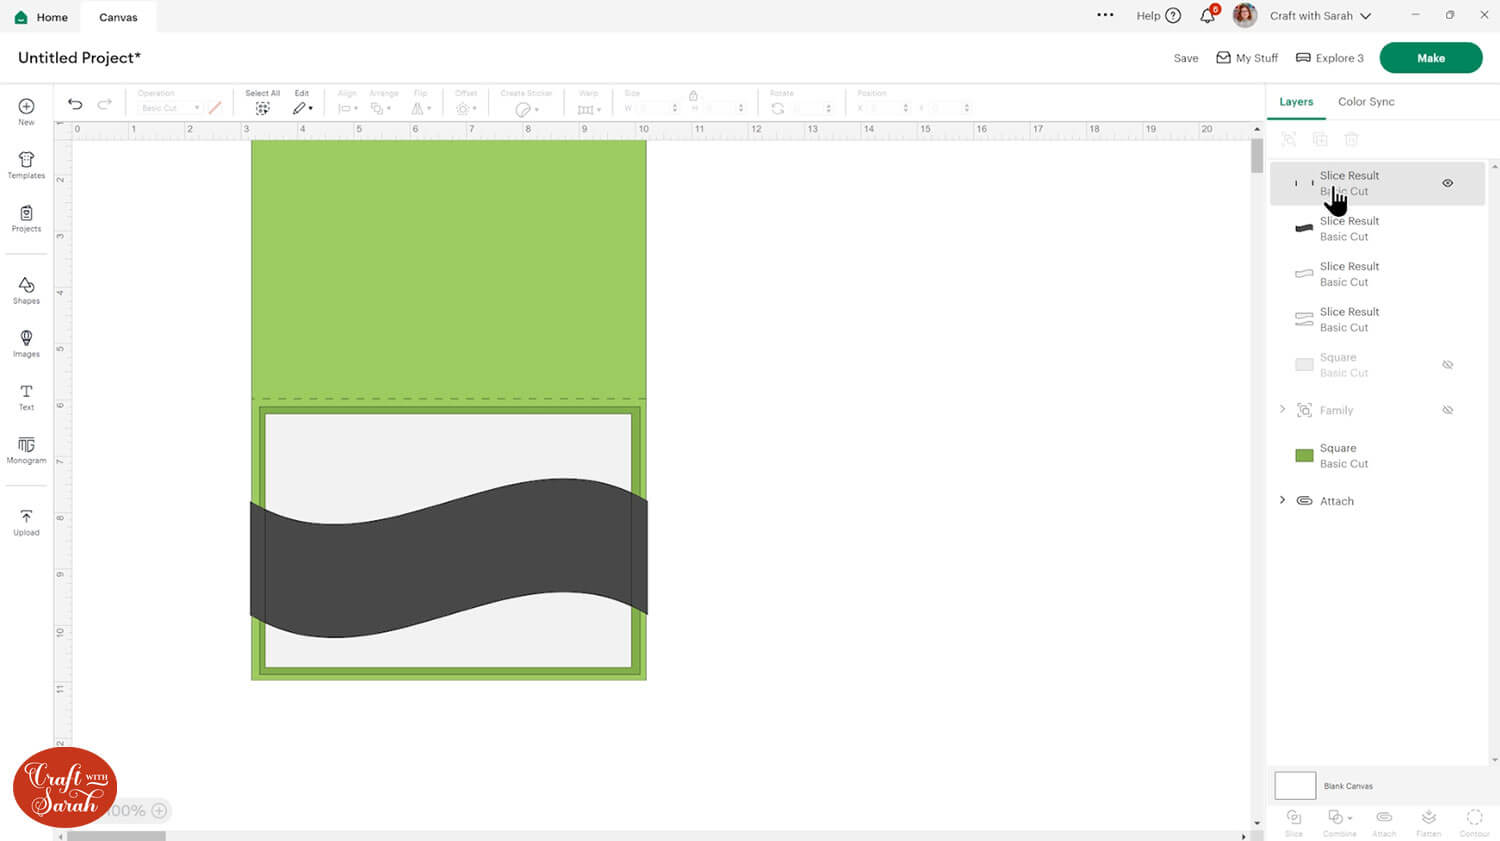
Delete the offcuts of the shape and use Contour to hide the top white part so that you end up with the layers as shown below.
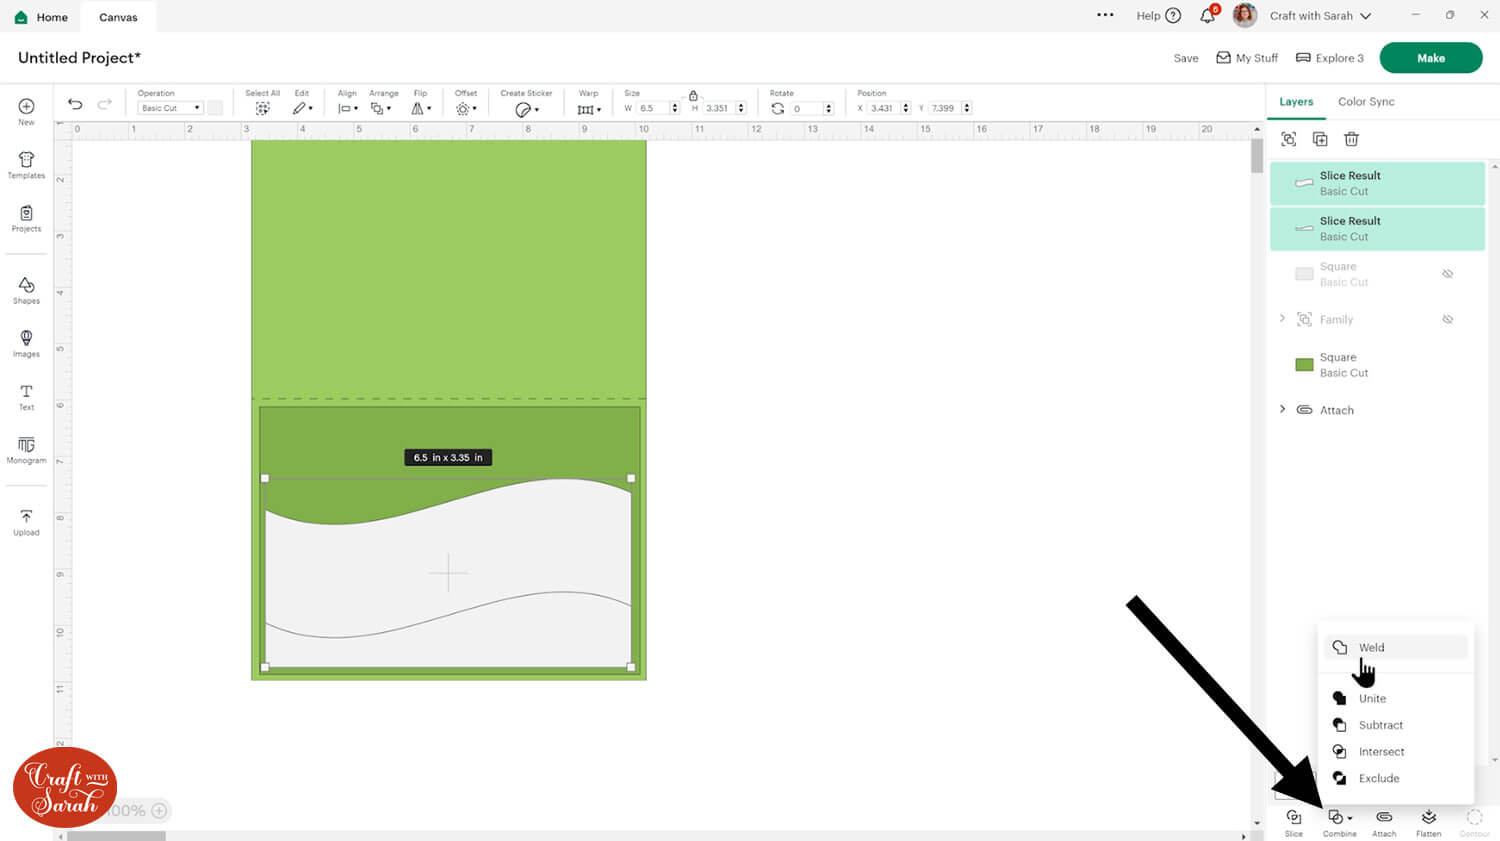
Select them both and press “Weld” to join them together.
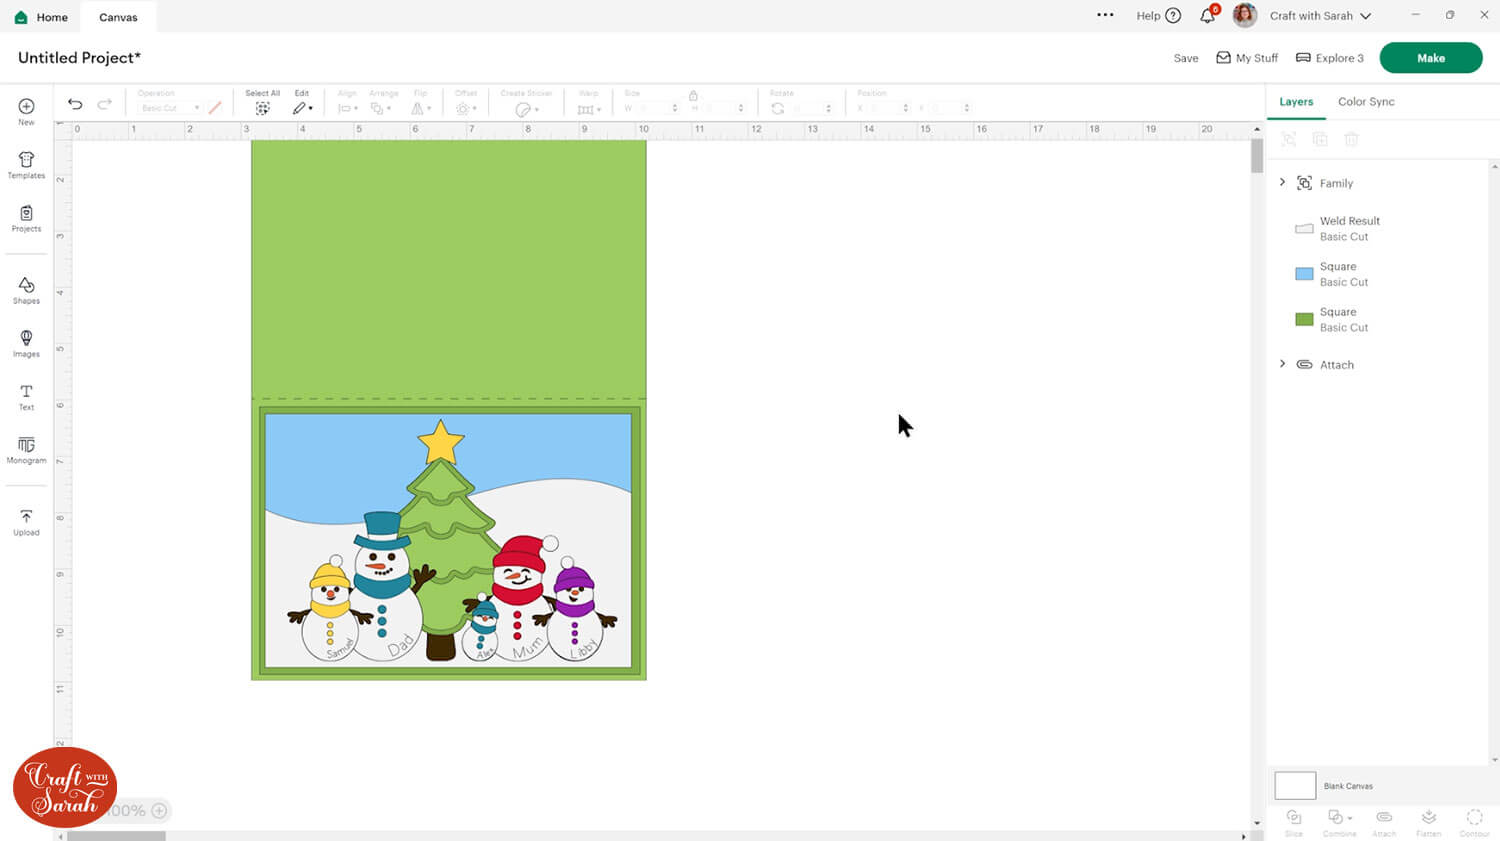
You can add extra decorations by searching under “Images” for “Merry Christmas” and selecting “Draw only” in the filters of the image search.
Choose a pretty sentiment to add to the sky.
Add some extra text to the right side of the sky if desired.
Select any new Draw layers and the sky and “Attach” them together, then move the sky layer back in the correct place in the layers panel.
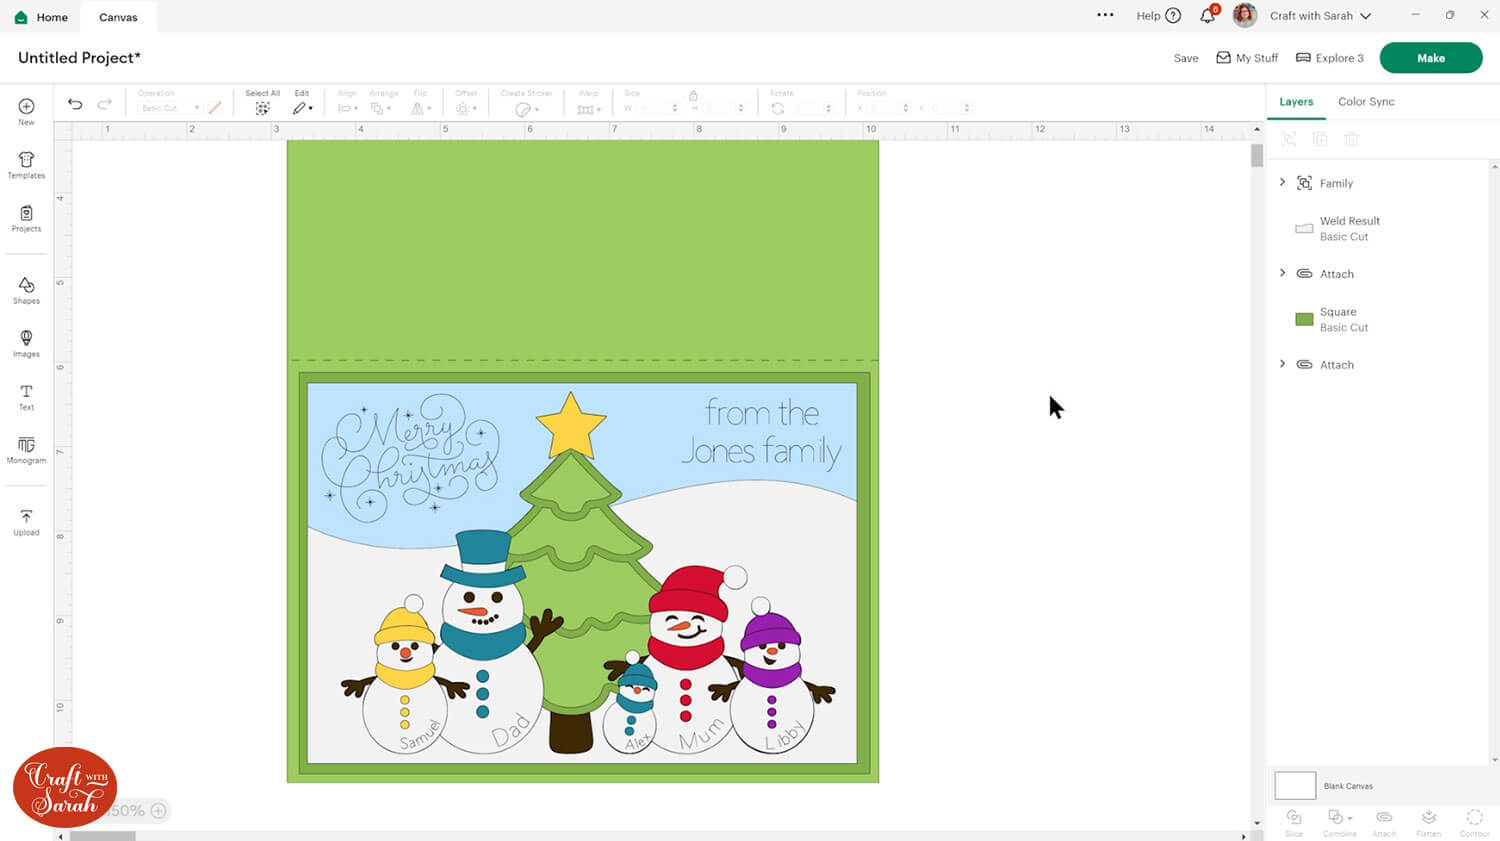
Save your project again, then move to PART FOUR to see how to cut it out and how to stick all the pieces together.
PART 4: Cutting and assembling the snowman family
That’s all the Design Space work done! Now it’s time to cut and stick the snowman family.
Step 1) Cut out all the layers
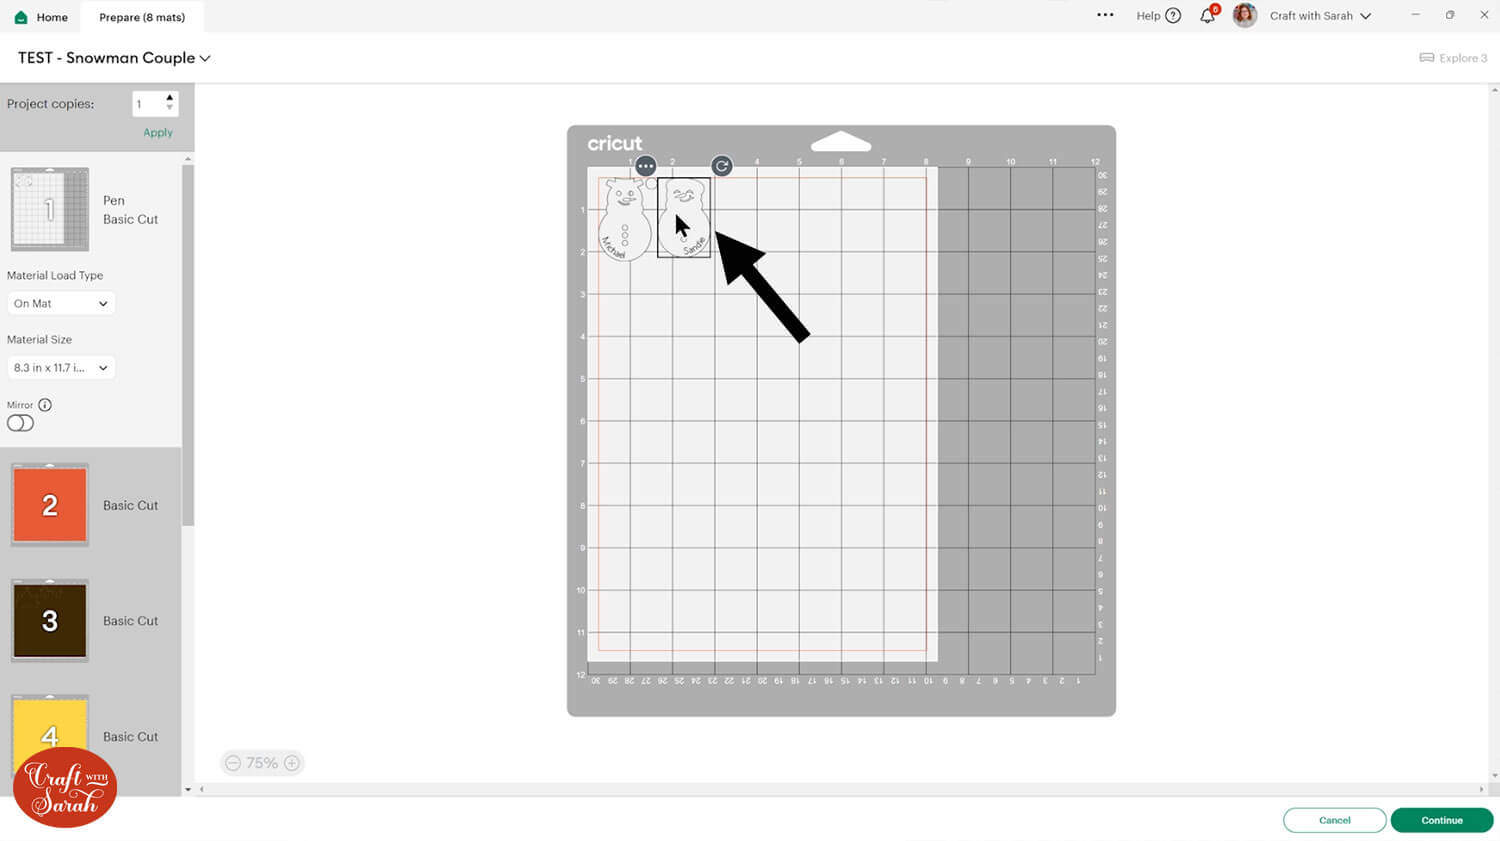
When you’re happy with how the project is looking in Design Space, click “Make” and follow the instructions on-screen to cut out all the pieces.
To change the paper size, go into the dropdowns over on the left side of the screen and choose the paper size that you want to use. You need to change it for every single colour.
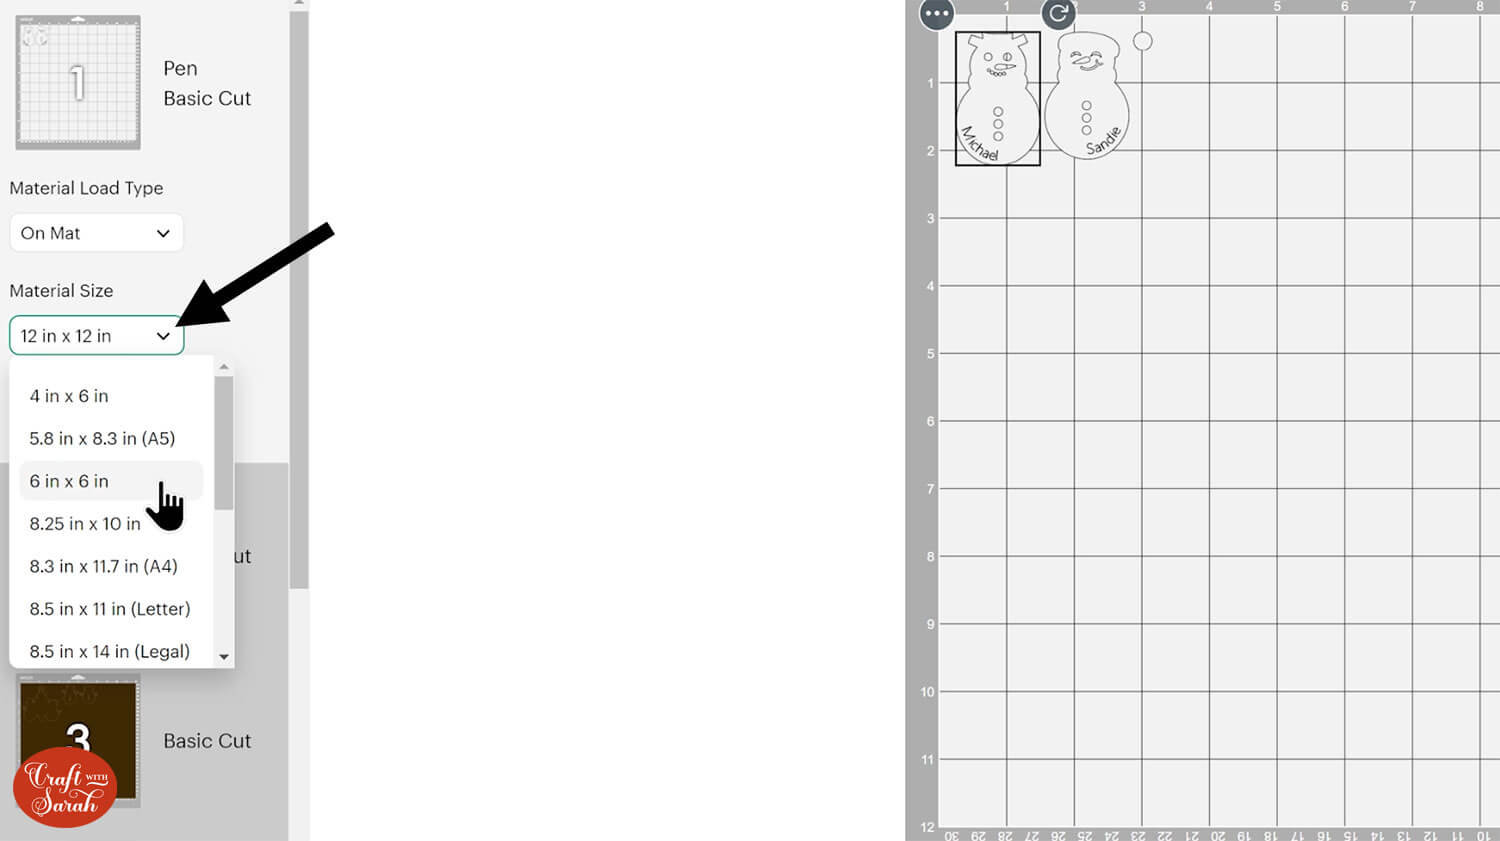
To save space on your cardstock, you can move things around by clicking and dragging. Make sure when you’re moving things about that nothing overlaps because otherwise, it won’t cut out properly.
TIP: New to cutting cardstock with a Cricut? Check out this in-depth tutorial which goes through every step of the process, including tips for getting the best quality cuts from your Cricut.
Step 2) Glue the snowman characters together
Glue the three tree pieces together.
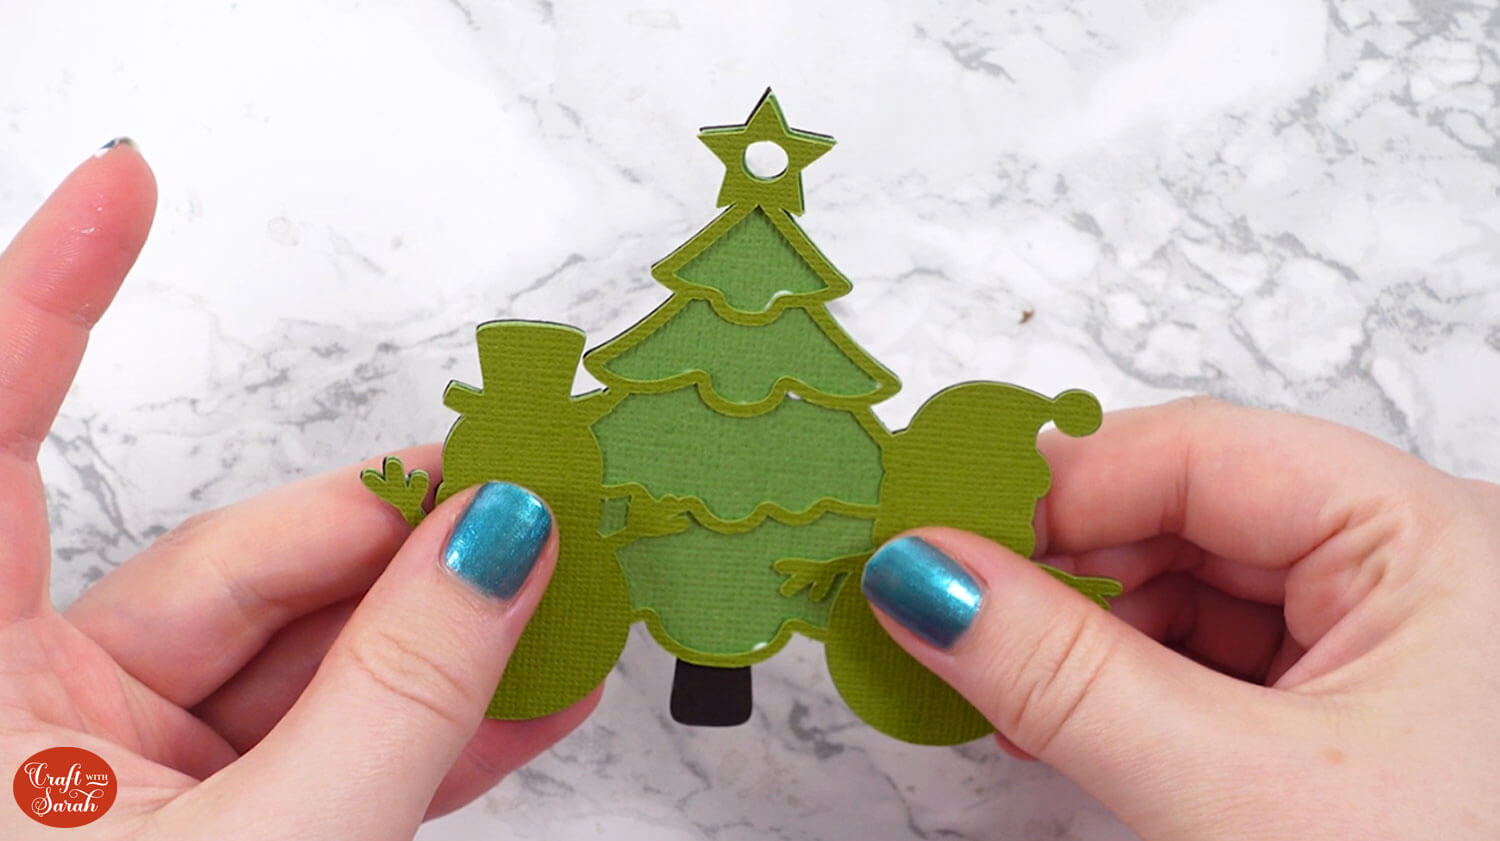
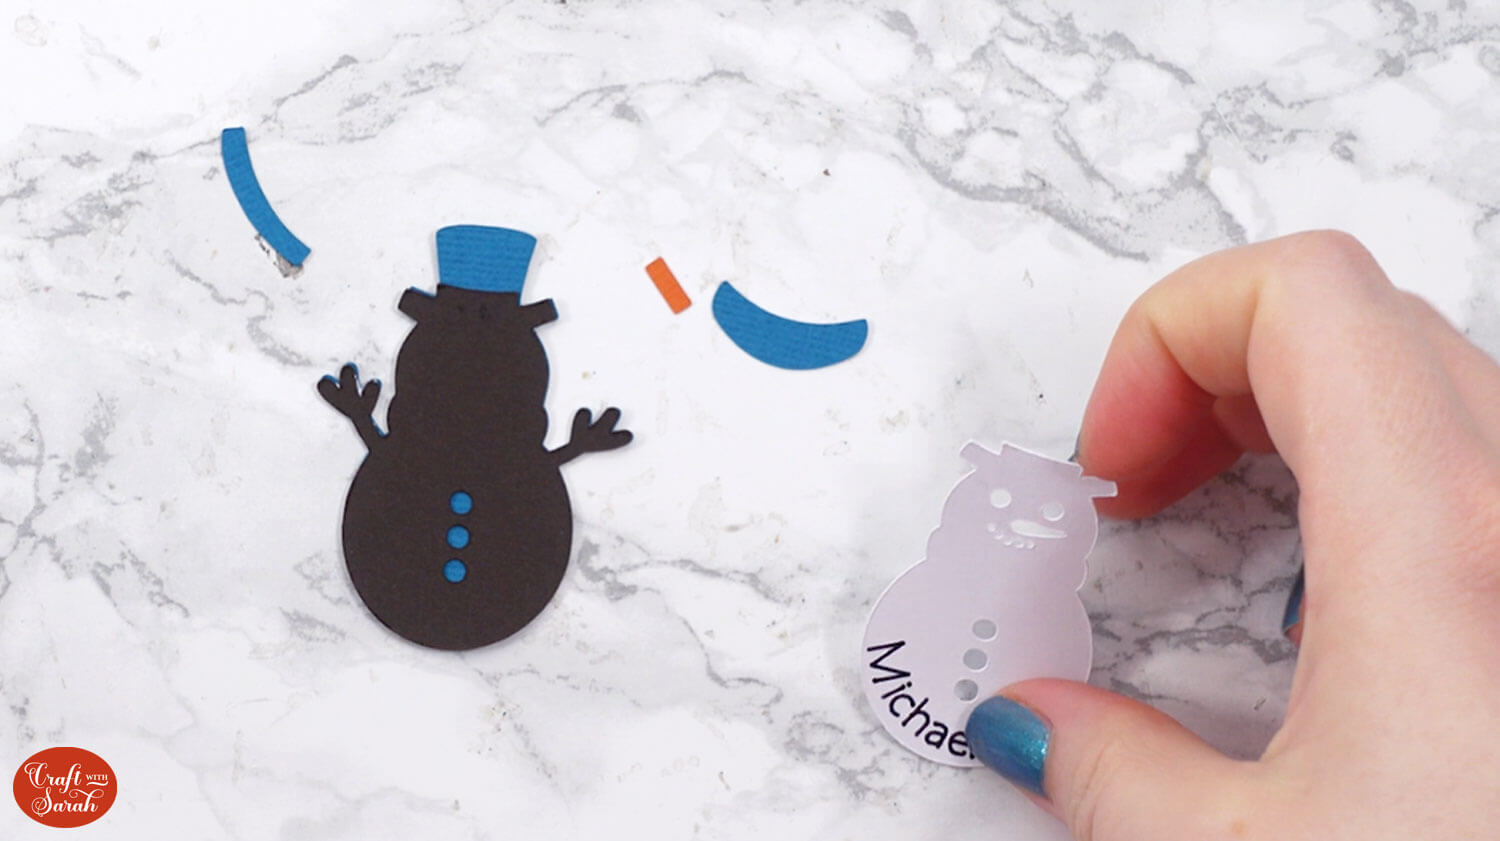
Glue all the pieces of the snowmen characters together but do not add them onto the tree yet.
Step 3) Finish the decoration or card
Use foam squares to attach the snowman characters to the tree.
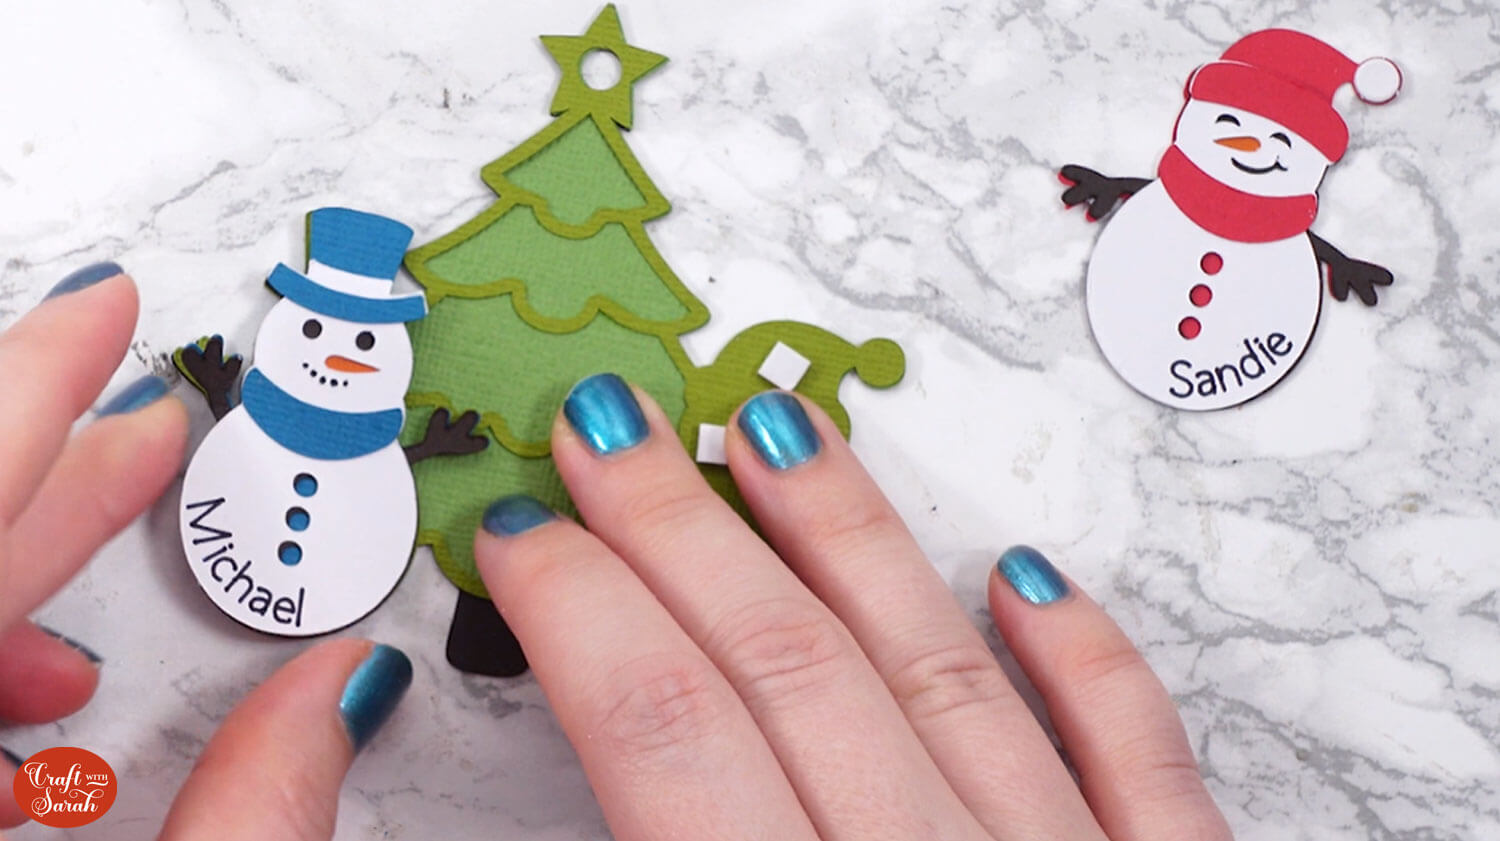
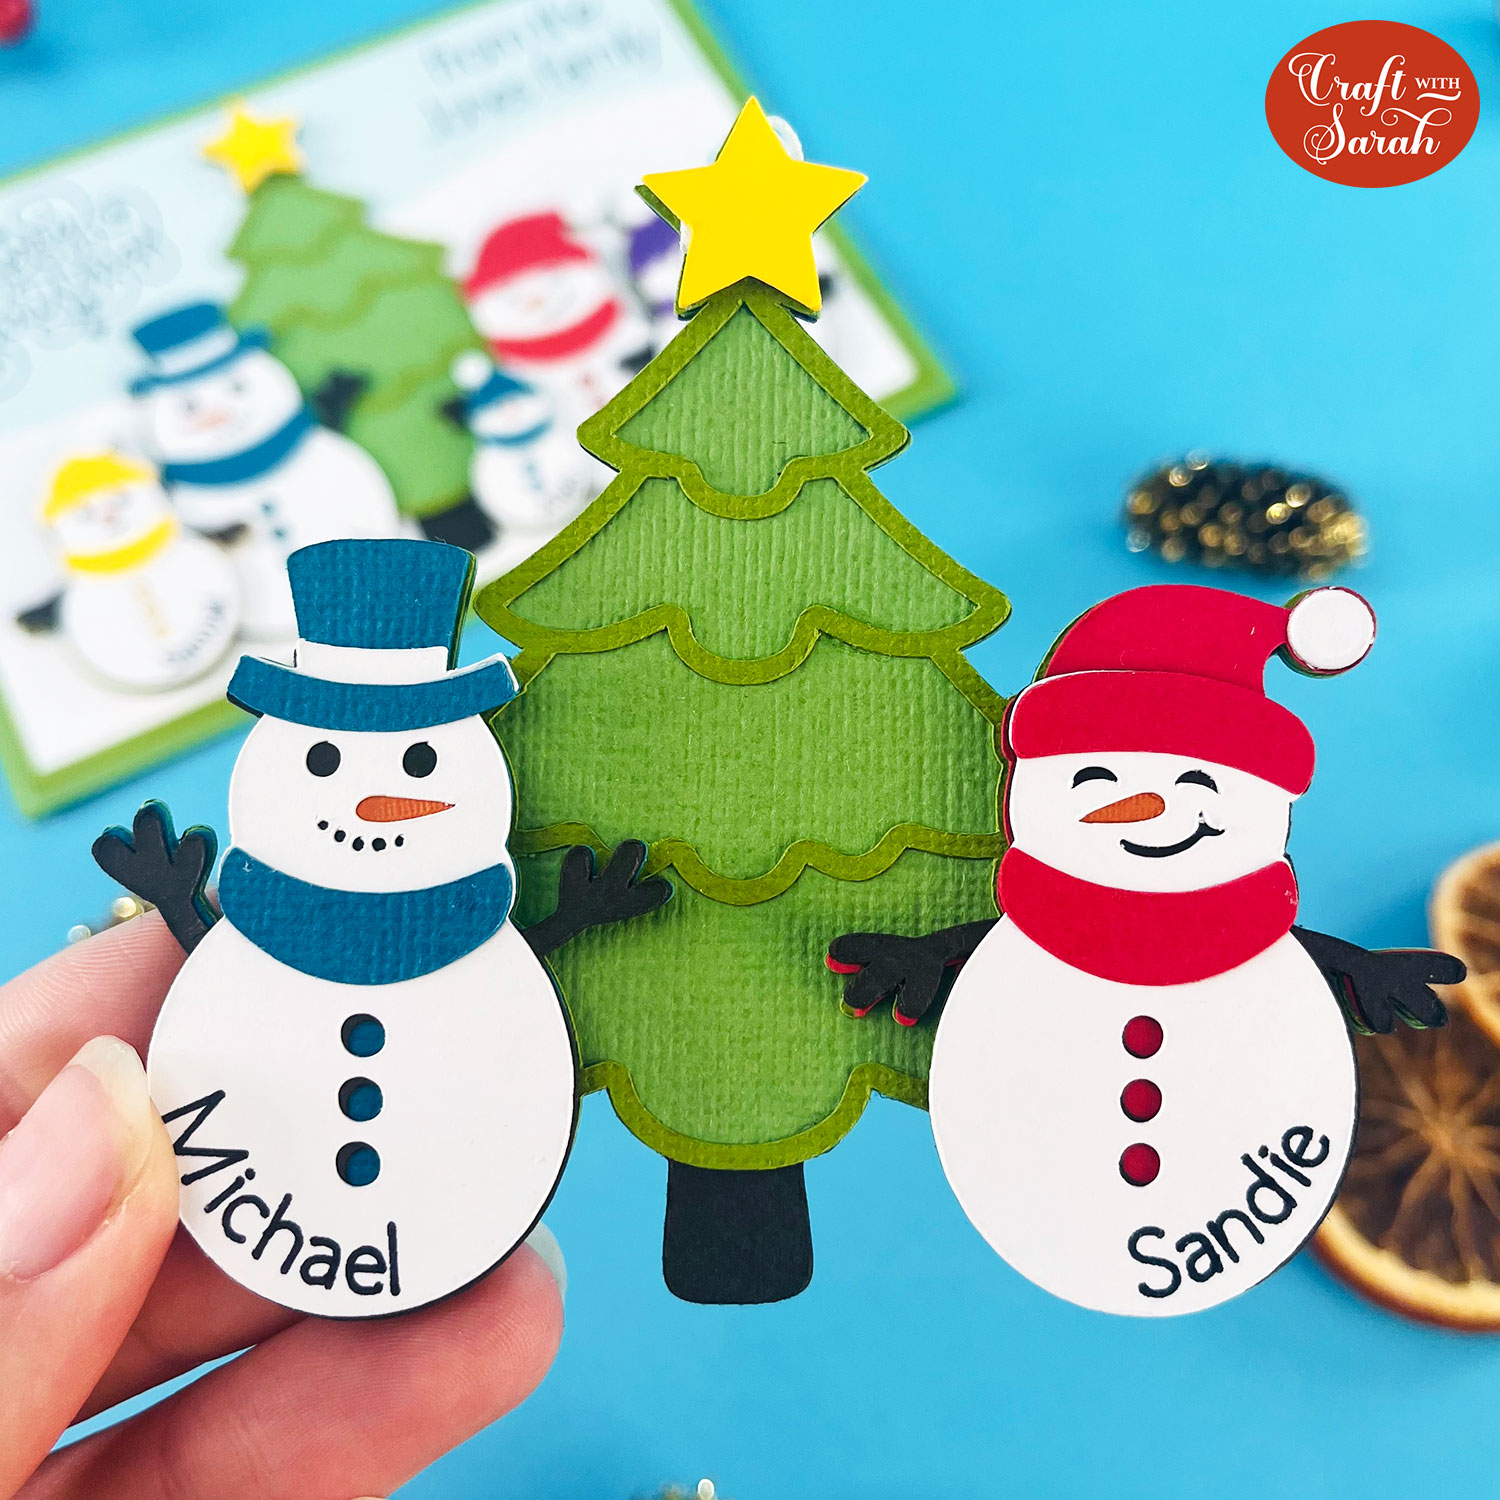
If you are making the hanging ornament, thread some ribbon through the hole in the top of the tree and then use foam squares to attach the yellow star on top.
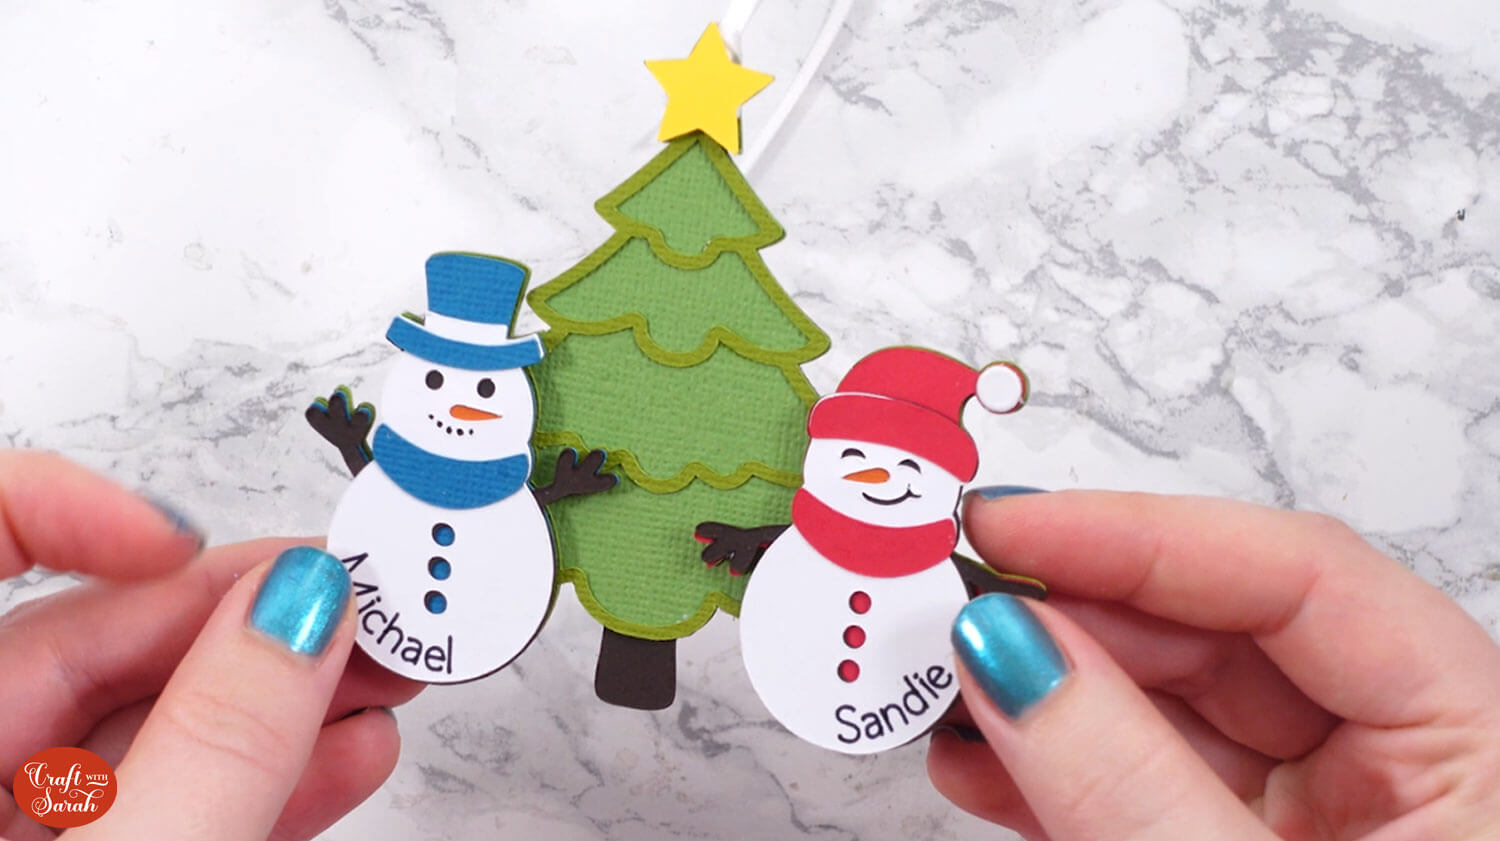
If you are making the greetings card, glue all the background pieces of the card together.
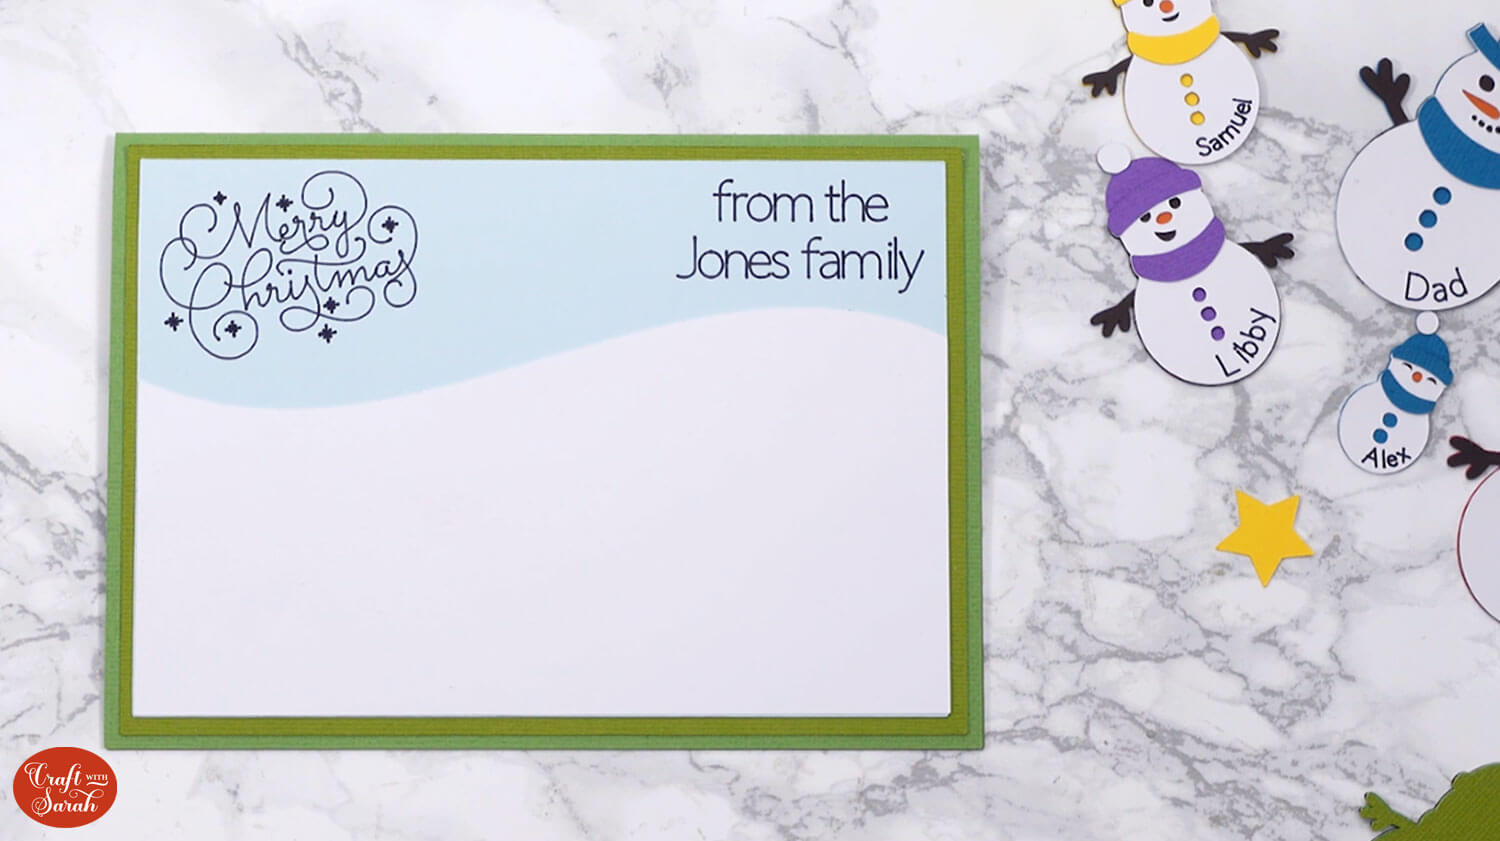
Use glue or foam squares to attach the tree to the front of the card.
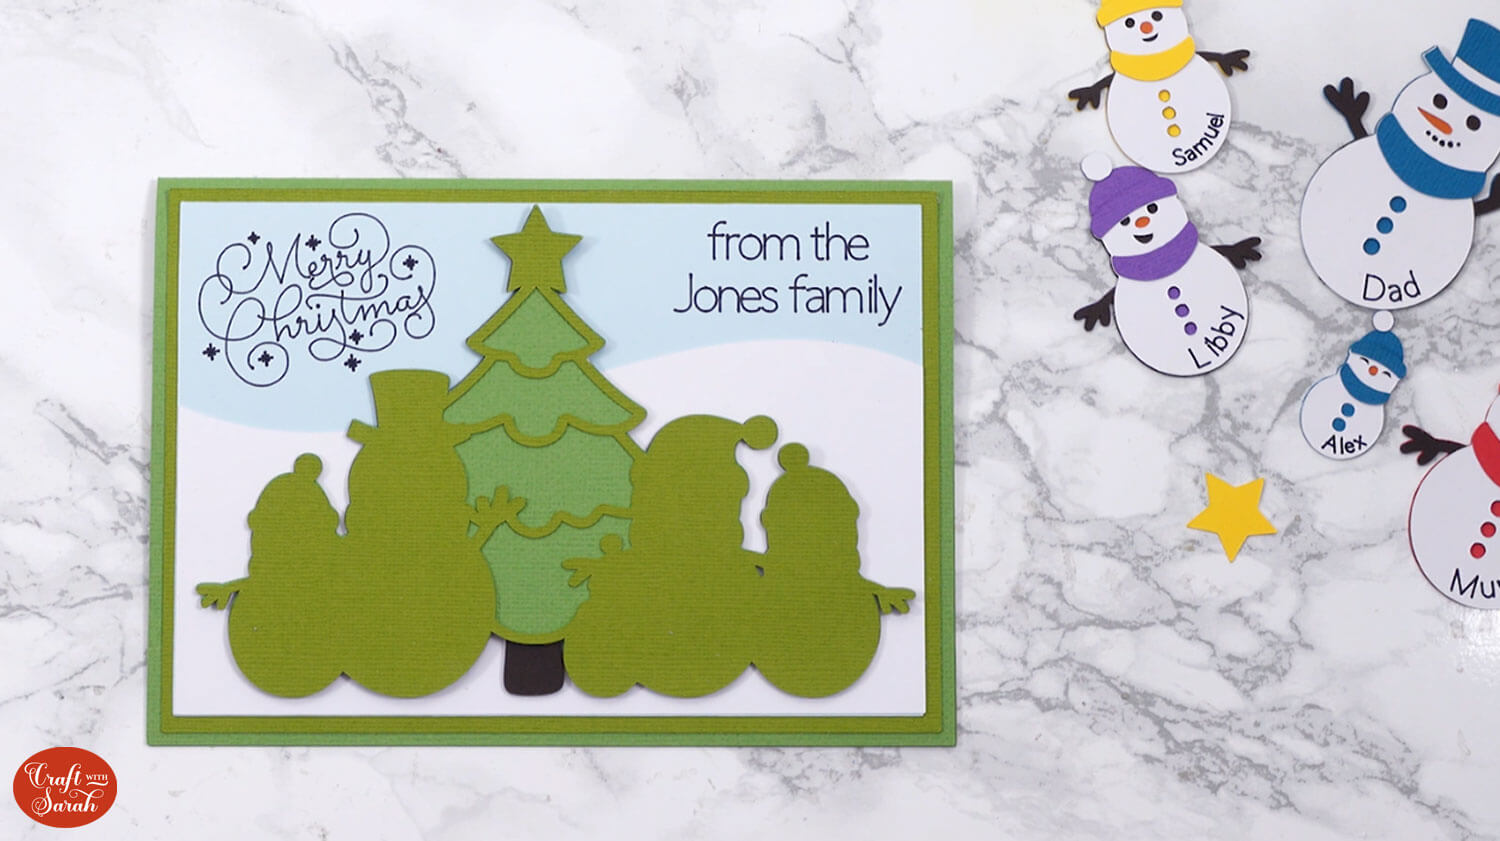
Use glue or foam squares to add the snowman images.
If you have snowmen that are “overlapping” each other then it looks best if you glue on the snowmen at the “back”, then use foam squares for the “front” snowmen to give them some depth.
So, I glued on my parent snowmen:
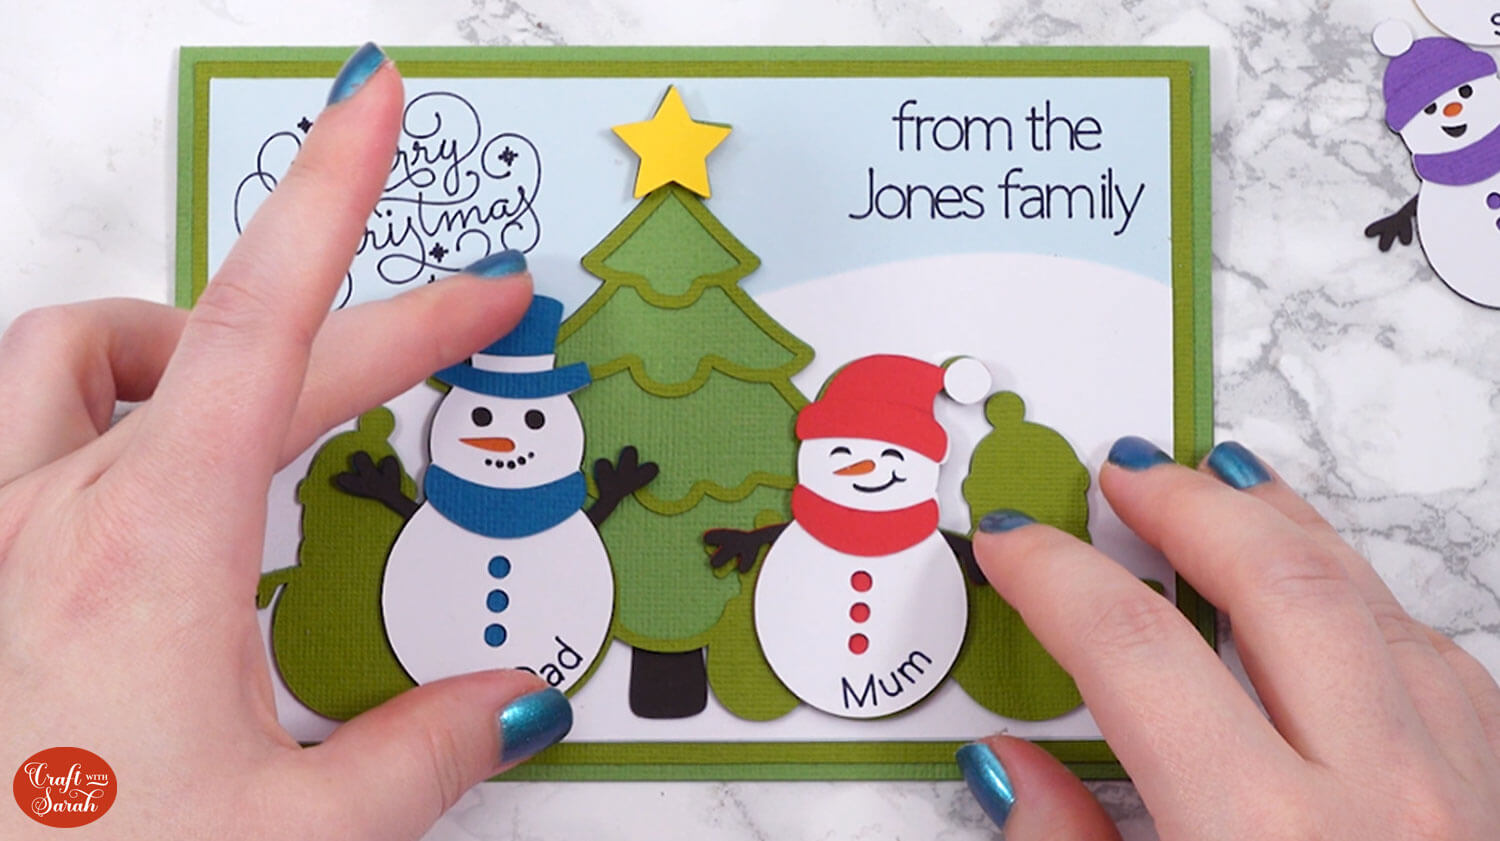
And then used foam squares for the children snowmen so it looks like they are stood in front of the parents.
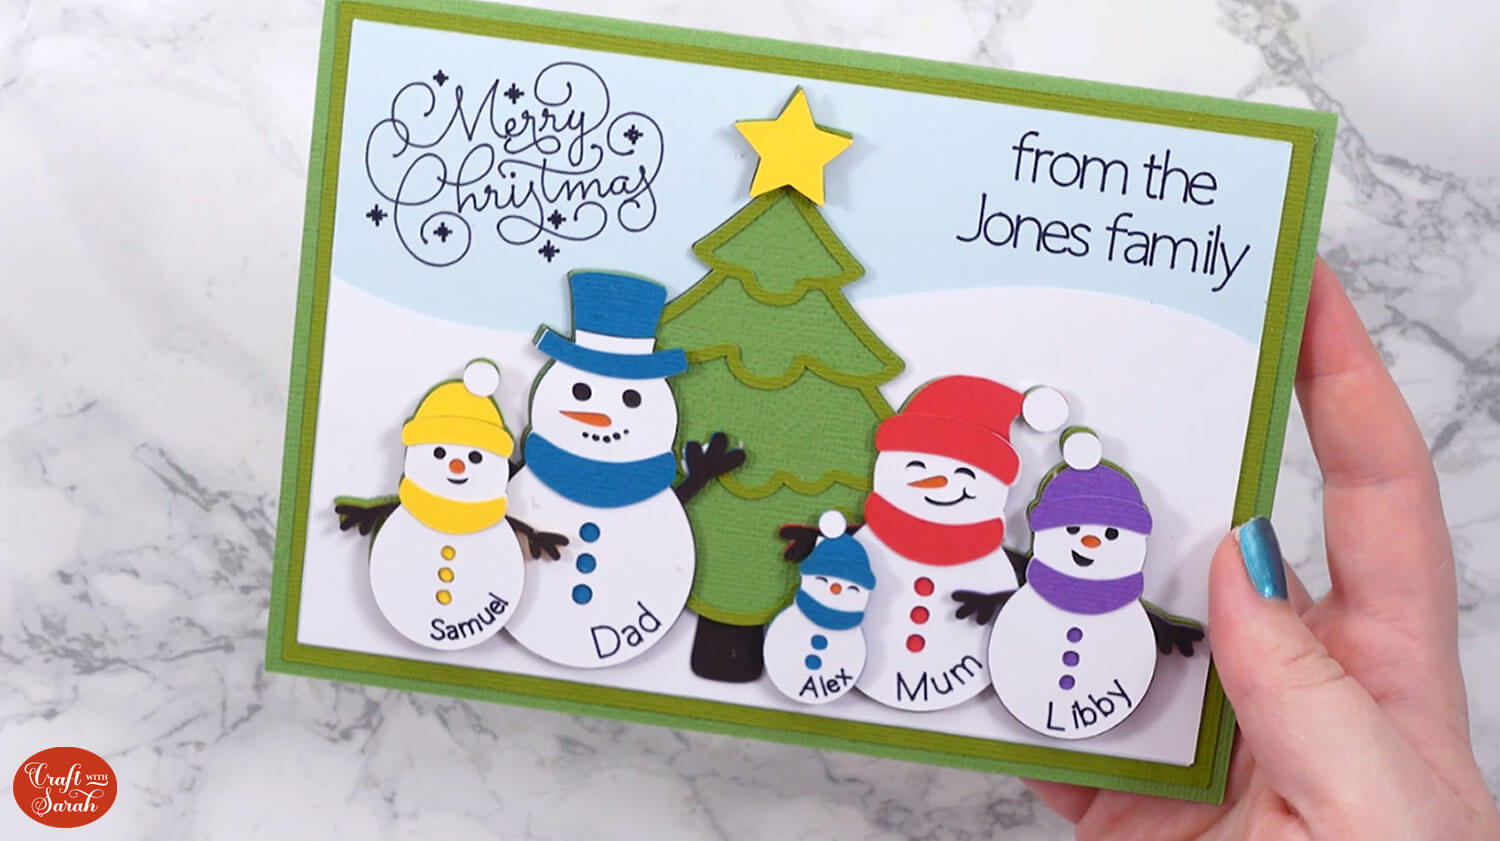
Snowman family custom papercraft design
After sticking all the pieces of card together, your snowman family portrait is all finished!

These little snowman collections are so cute, and a lovely way to make a custom, personalized Christmas gift.
Happy crafting,
Sarah x

