FCC 2024 Day 12: Rolled Paper Flowers
Welcome to day twelve of the Floral Craft Countdown, where I’m sharing 14 flower themed Cricut papercraft projects in 14 days.
Rolled flowers are huge in the Cricut world, so I wanted to make sure there were some included in the Floral Craft Countdown!
Included in today’s project are five different rolled flower cut files, plus the template to make a beautiful flower shadow box with leaves and greenery.
There are so many different ways you can use these flowers but they do look especially nice in shadow boxes. You can also use repeated cuts of the same flower to make a whole shadow box background in different shades which would make a lovely gift.

This Project was part of the Floral Craft Countdown
Materials supply list
Here is a list of the materials that I used to make this project.
Please note that some of the links included in this article are affiliate links, which means that if you click through and make a purchase I may receive a commission (at no additional cost to you). You can read my full disclosure at the bottom of the page.
- Cricut machine
- Light blue Cricut cutting mat
- Coloured card (thin card works best)
- Hot glue gun and glue sticks
- Square shadow box (optional)
This project is suitable for the following types of Cricut machine: Explore Air 2, Explore Air 3, Maker, Maker 3, Venture, Joy Xtra and Joy. You will need to make the flowers smaller to cut on the Joy.
Foundation learning
If you're new to crafting with your Cricut, you may find the below links helpful.
They teach some of the skills mentioned throughout this tutorial.
- How to upload SVG files into Design Space
- How to make 3D layered Cricut projects
- The BEST way to frame papercraft projects
- How to mount multiple designs in the same frame with magic guides
- How to score with a Cricut (even without scoring tools)
- Print then cut tutorial
- Design Space tools (Combine, Attach, Slice, Weld, Flatten, etc.)
- Pattern fill tutorial (for making backgrounds & cutting images to a specific shape/size)
- Free envelope SVGs that can be sized to fit any card
- How to write inside cards with Cricut pens
- How to cut layered designs at a small size
- Design Space tips & tricks
- Cricut pens tutorial
Video tutorial
Watch the video below to see how to make this project. Keep scrolling for a written tutorial.
Written tutorial (with photos!)
Here’s how to make rolled paper flowers using a Cricut machine.
Step 1) Download the cutting file & upload to Design Space
Download the files using the box below.
Purchase the File(s)
This cut file is available as part of the Instant Access Bundle.
Or, purchase this design individually here
Before you upload the SVGs to Design Space, you need to unzip the download folder that they come in.
- How to unzip a folder on Windows computer
- How to unzip a folder on a Mac
- How to unzip a folder on an iPad/iPhone
- How to unzip a folder on an Android device
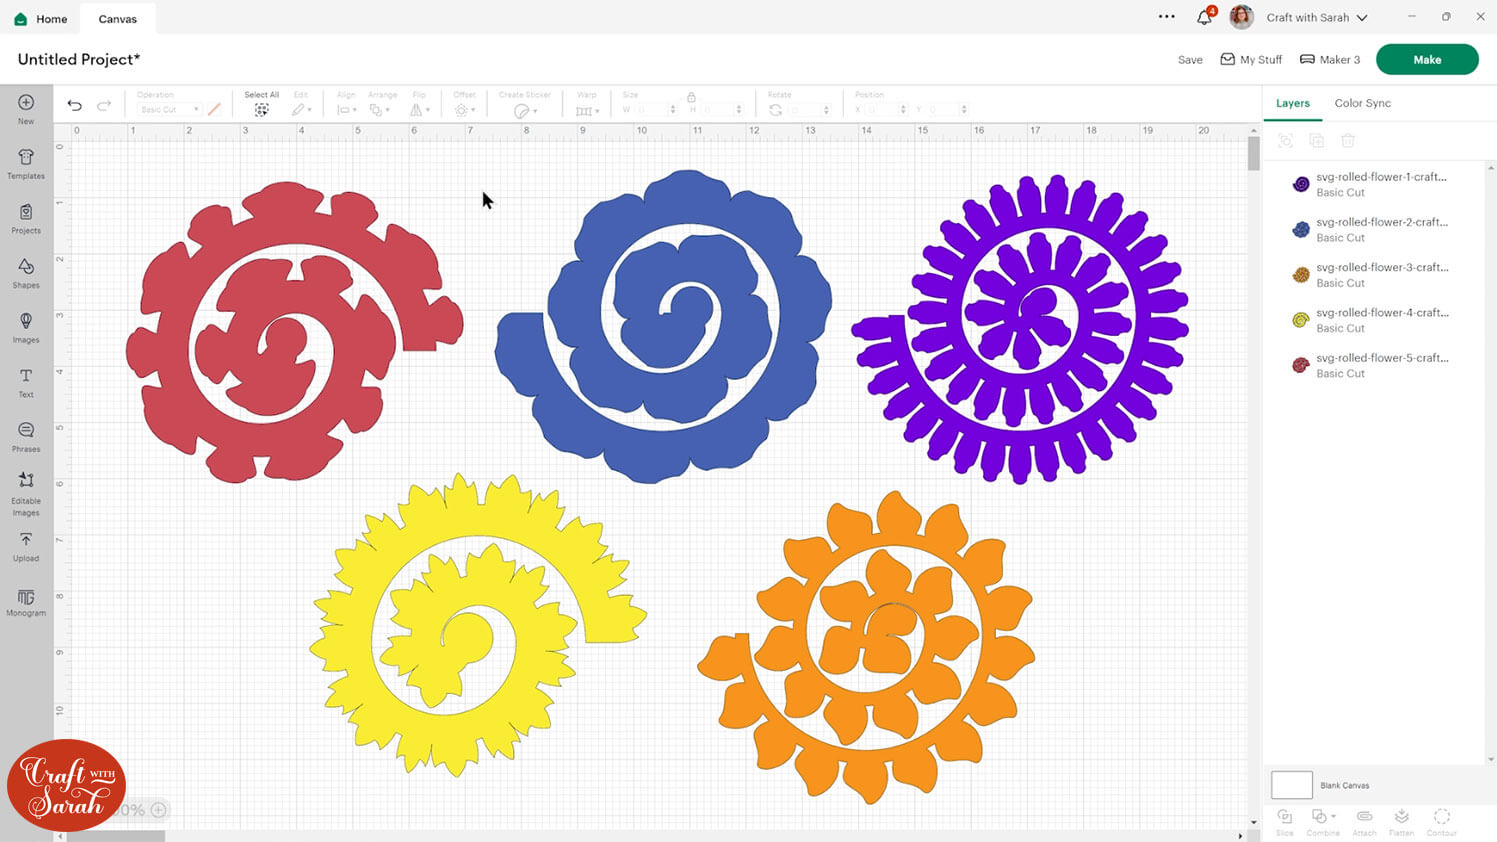
After unzipping, upload the SVG files into Cricut Design Space. These are the files that start svg- in the filename.
Not sure how to do this? Here’s how to upload SVGs to Cricut Design Space. Make sure you upload the file which starts svg- in the filename!
Each rolled flower comes as a different SVG files, so you will need upload them all individually.
Step 2) Size the flowers
The rolled paper flowers load into Design Space at 6 inches wide.
They make finished flowers that are approximately the following sizes (but it will vary a little bit based on how tightly you roll them):
- Flower 1 (purple): 2.2 inches
- Flower 2 (blue): 2.2 inches
- Flower 3 (orange): 2.2 inches
- Flower 4 (yellow): 2.3 inches
- Flower 5 (red): 2.3 inches
For a more realistic look, cut them a little bit smaller as they do tend to work a little bit better.
I would resize them to around 5 in wide if you’re going to be putting them in a shadow box or something similar.
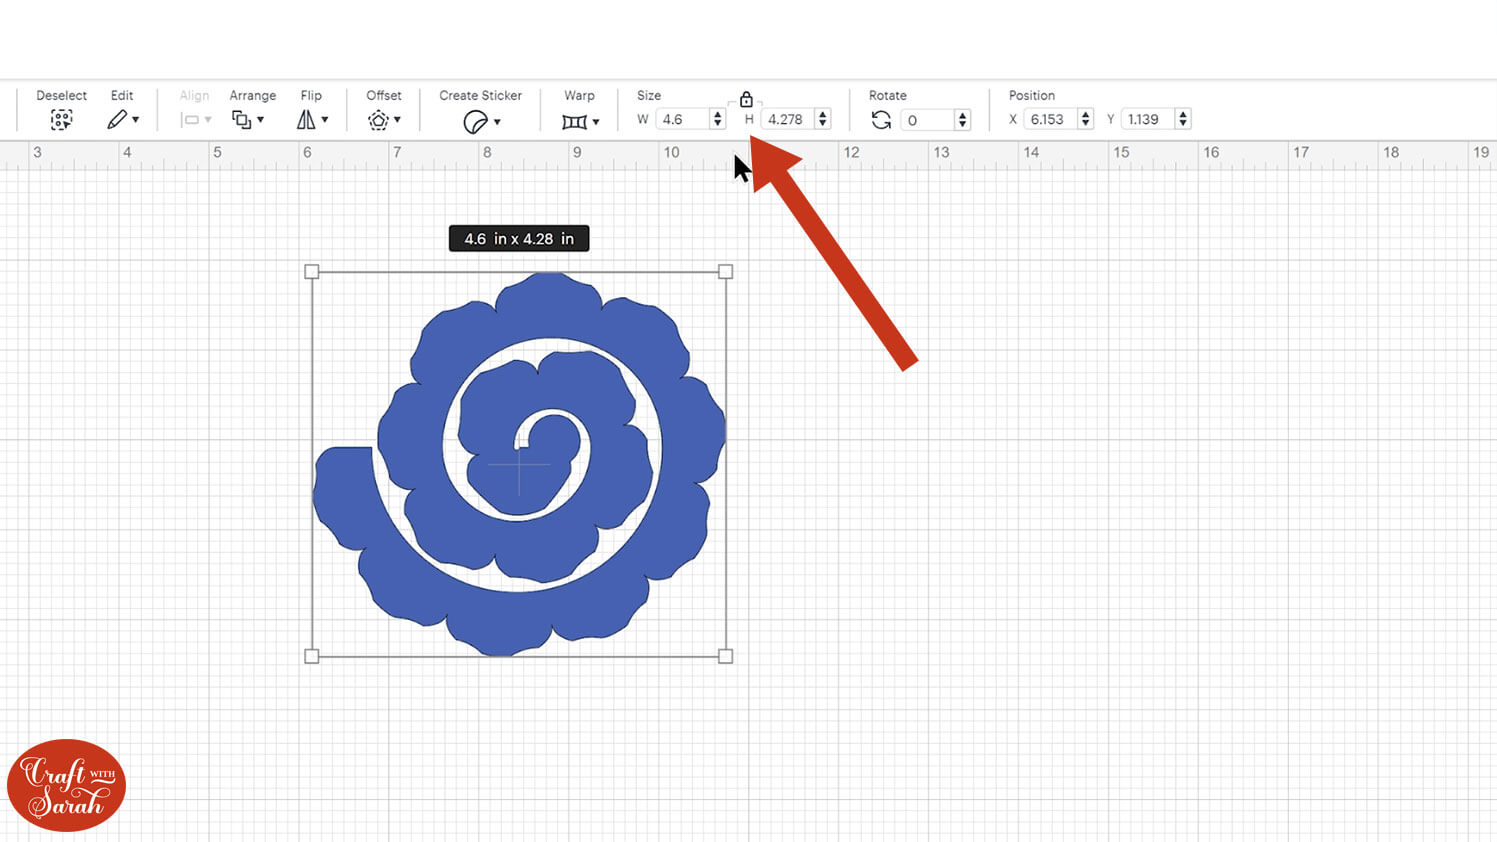
If you are looking to fill a specific shadow box with flowers, such as in the photo below, you can use some maths equations to work out the sizing.
Here’s what I did to work out what size I needed to cut my flowers.
I measured the inside of my frame which was 8.5 inches.
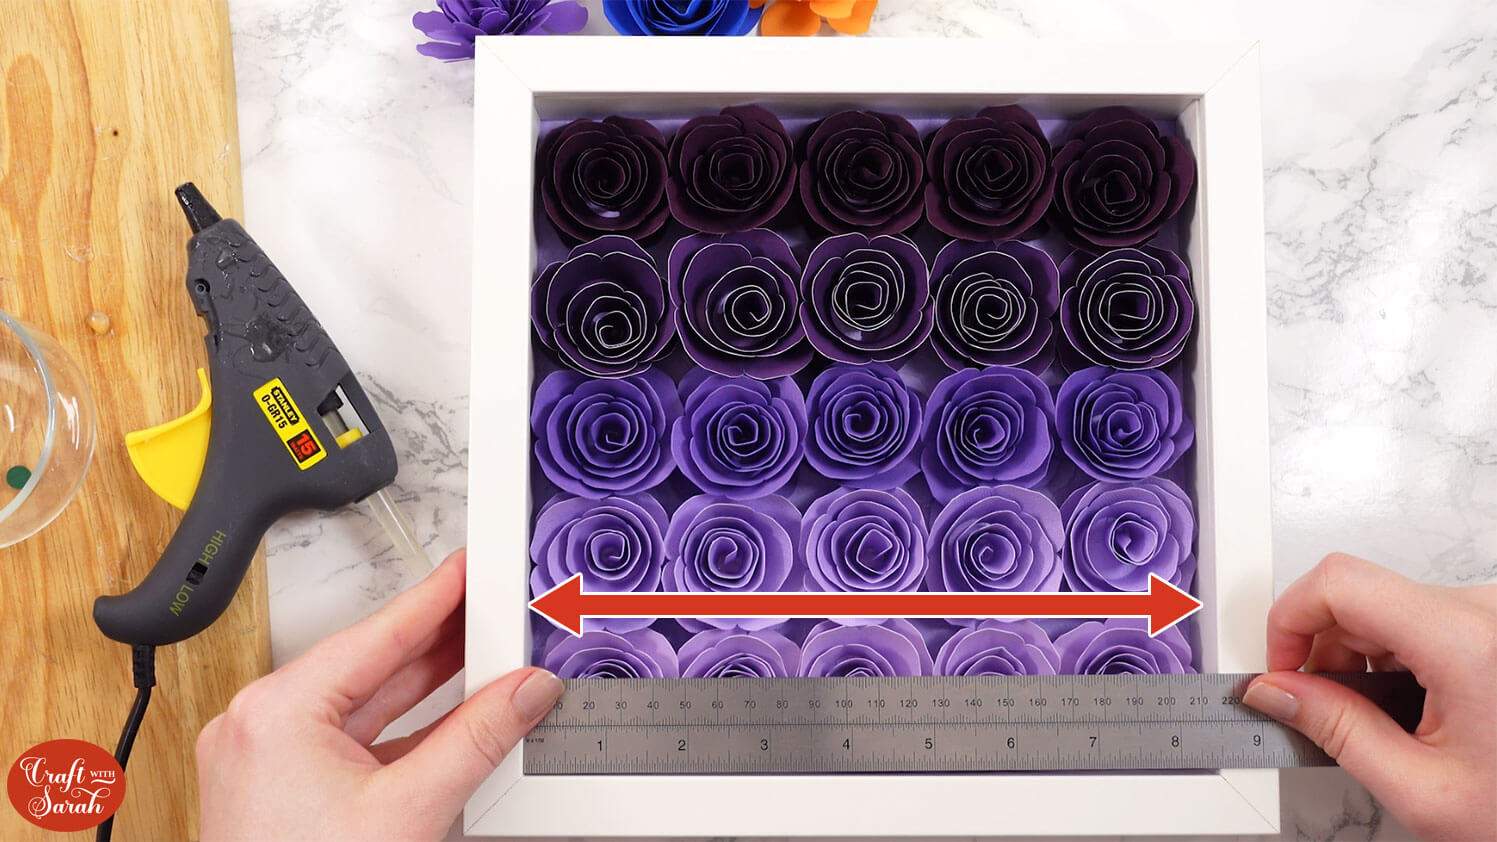
To work out what size I needed the flower templates to be so that I had 5 in each row I divided the measurement of my frame (8.5) by 5 which gave me 1.7.
This meant that my flowers needed to be 1.7 inches when rolled.
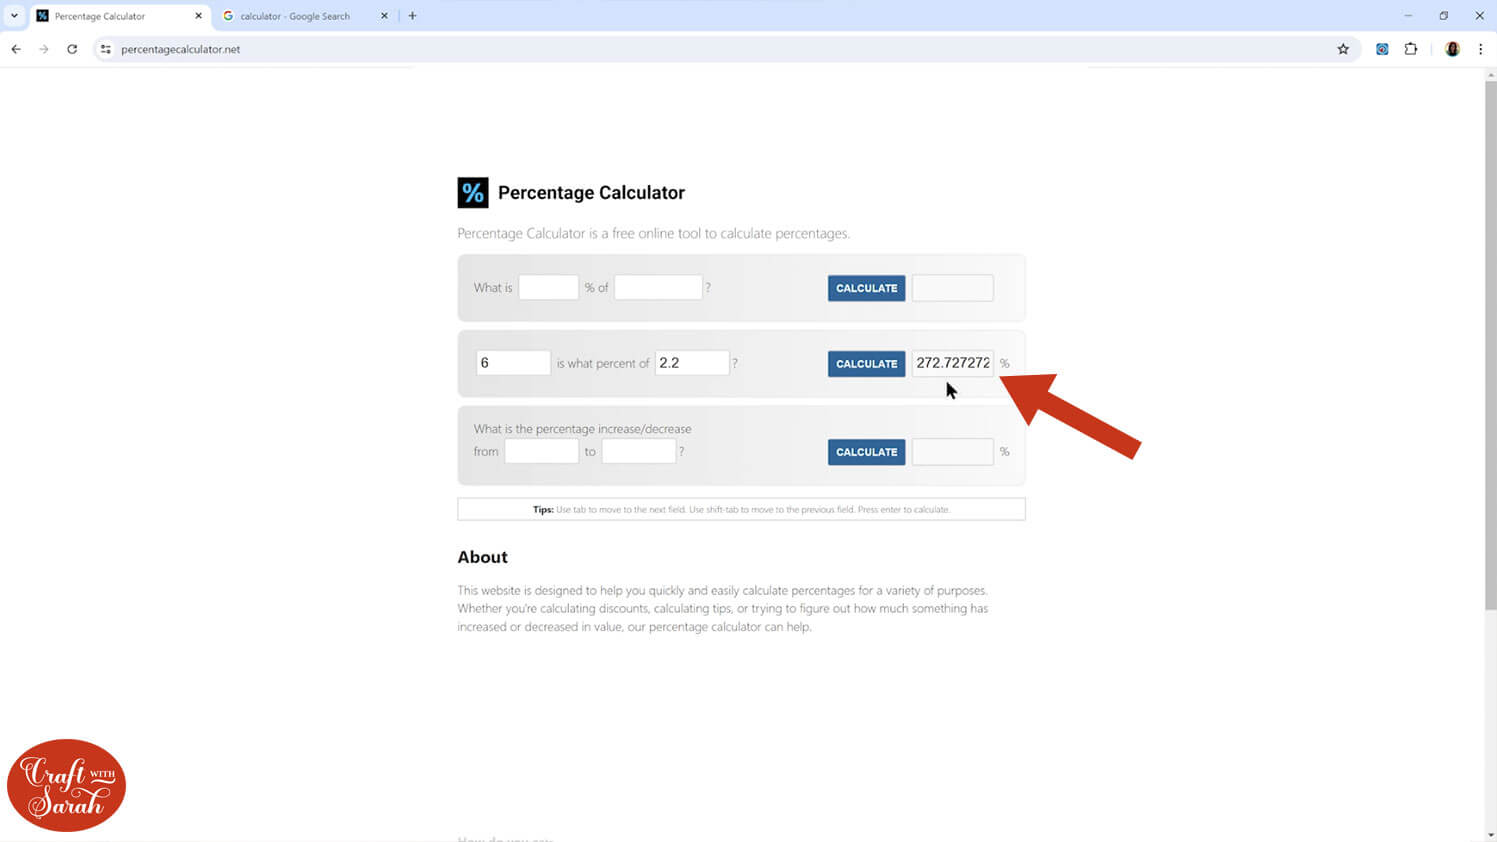
To work out what size the SVG needed to be for a 1.7 inch flower when finished, I needed to use a percentage calculator.
The size of the original finished flowers was 2.2 inches when the template was 6 inches in Design Space.
I then calculated 6 percent of 2.2 which was 272.72%.
Then I calculated what 272.72% of 1.7 was.
This gave me a really long number so I rounded it to one decimal point, which was 4.6.
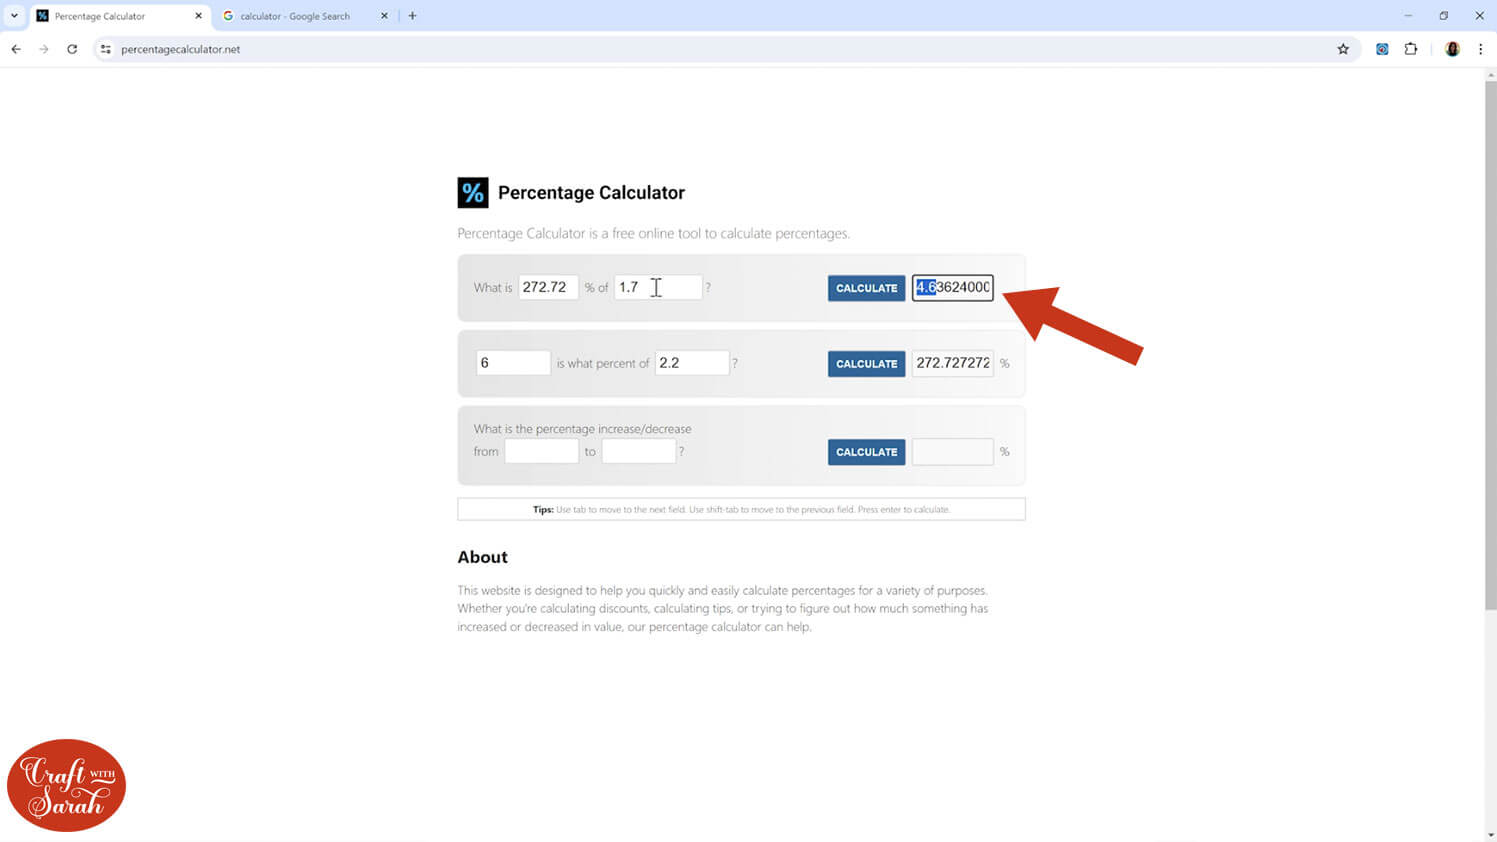
So if I want to make 1.7 inch flowers, I need to make the SVG 4.6 inches in Design Space.
When you change the size, make sure the padlock icon is closed so that it changes in proportion.
Alternatively, you could just do a test flower, stick it together and measure it to see if you end up with one that is near enough to 1.7 inches.
Once you’ve sized your flower exactly how you want it, then you can cut out the other ones in the same size.
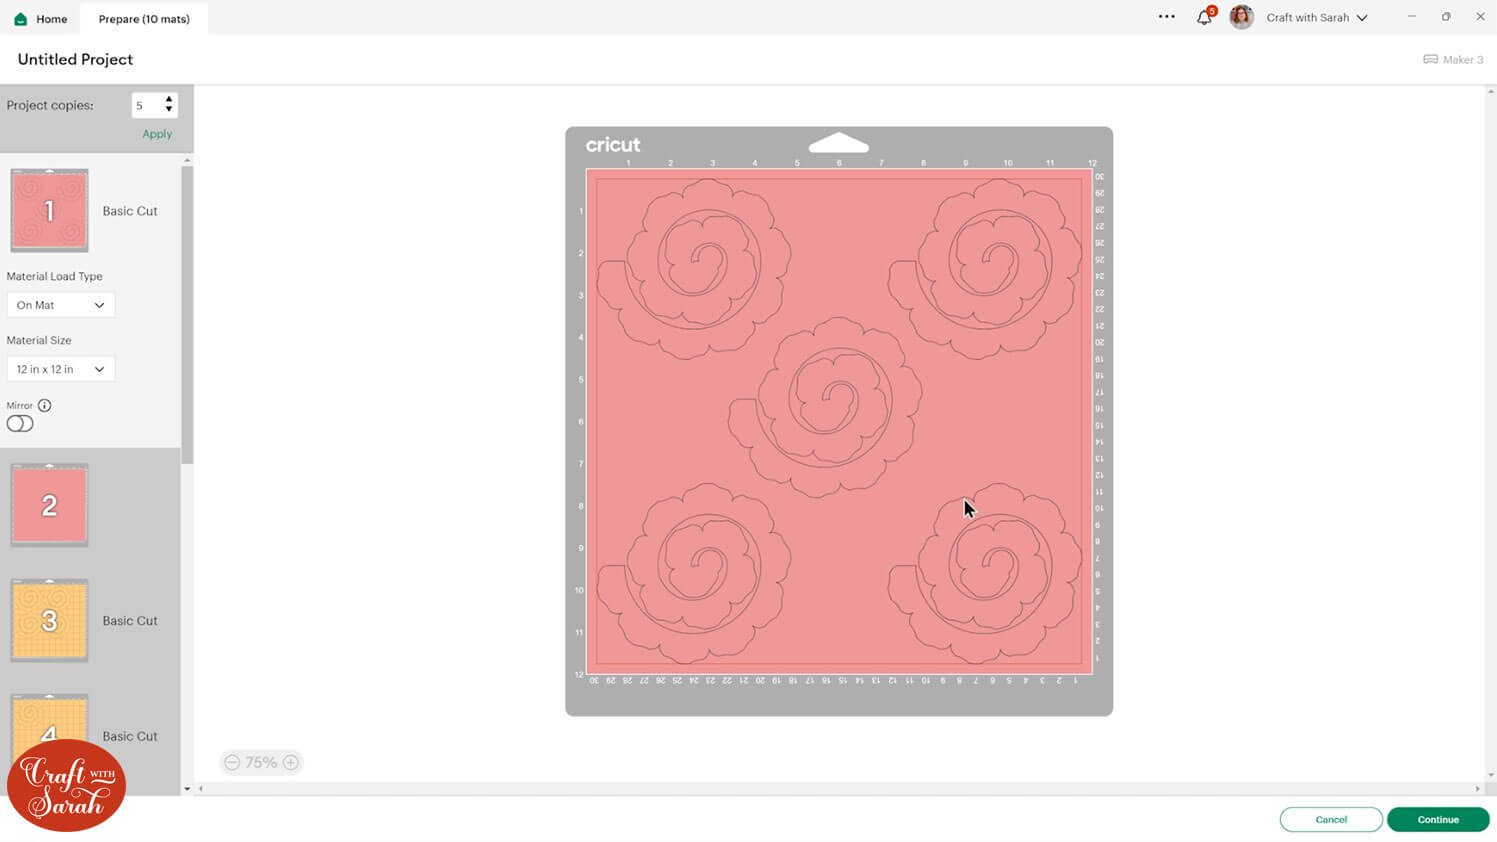
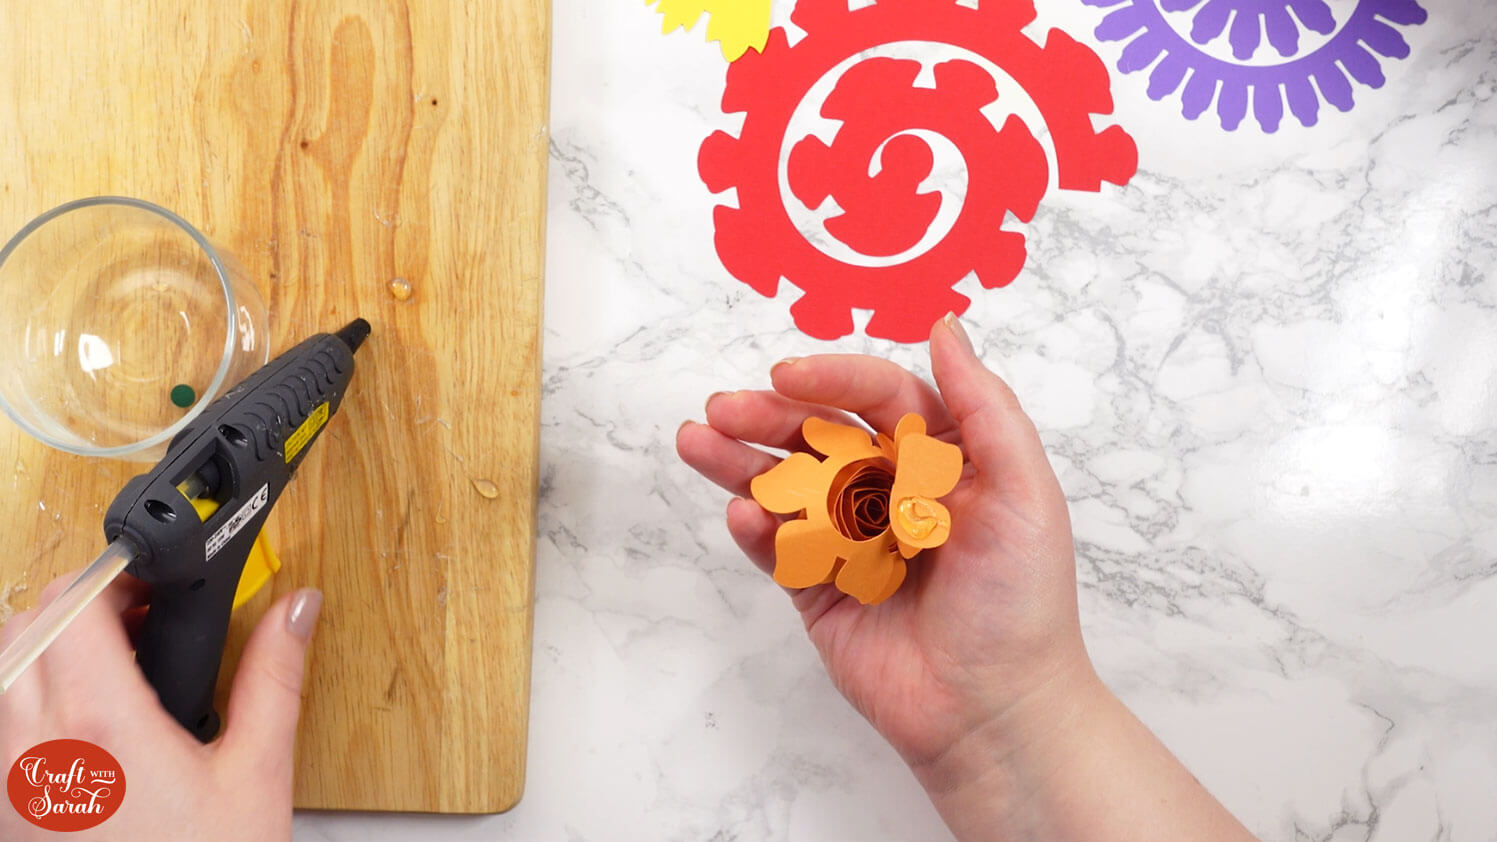
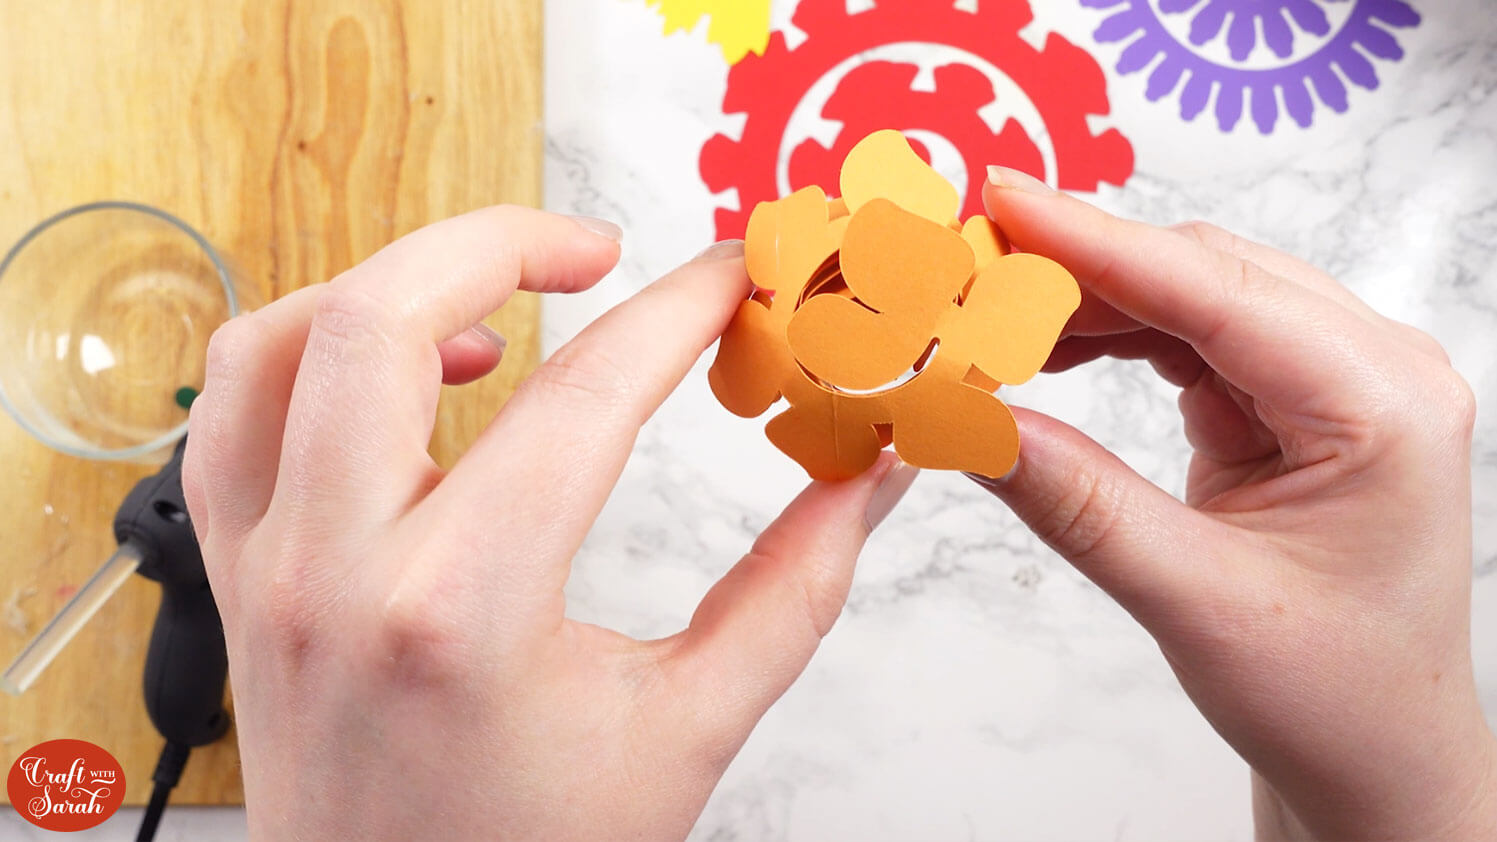
Step 3) Cut the flowers from cardstock
Once your flower templates are sized as you’d like them, get them cut out from the cardstock you’ve chosen.
You might want to play about with these to work out what is the best kind of cardstock for you to use with them.
I found that a lightweight card seems to work best and a card that is coloured all the way through (solid core) rather than a white core cardstock.
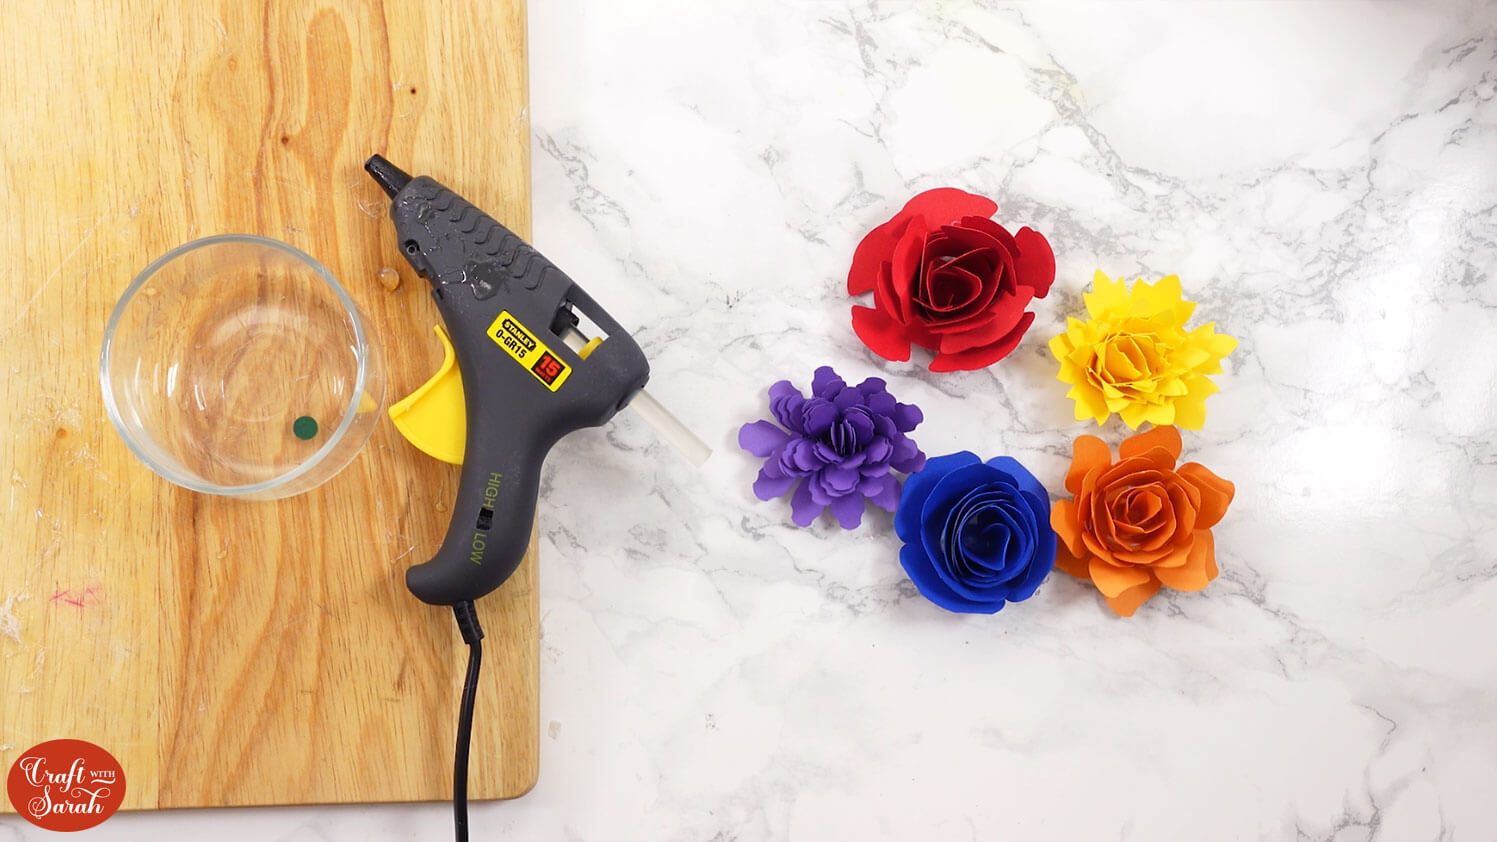
Here are my five flowers all cut out and I’ve cut them in the same colour that they appear in Design Space so it’s easy to see which flowers create which patterns.
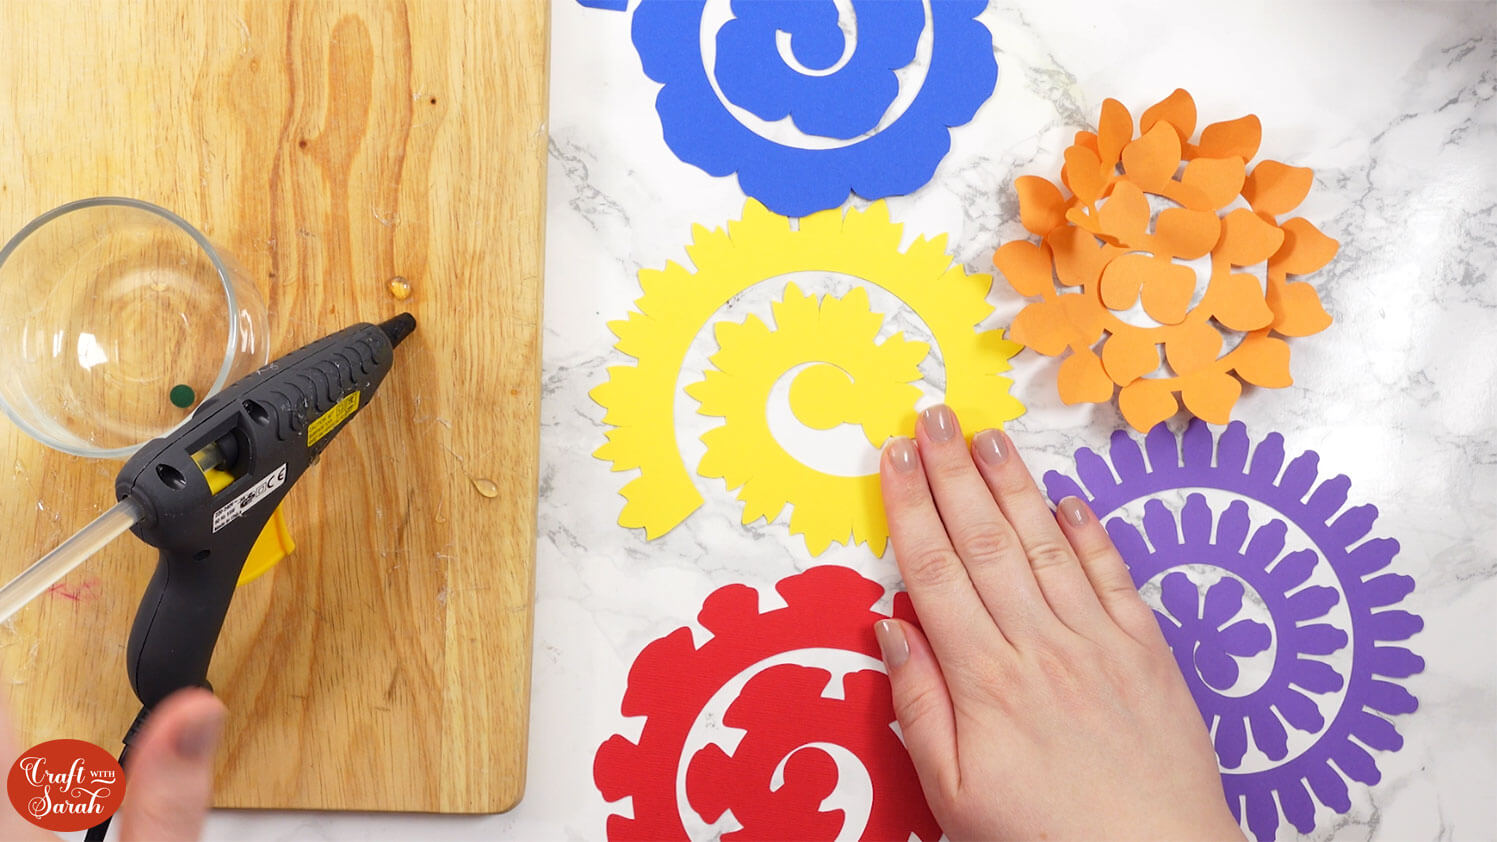
Step 4) Stick the flowers together
Take the outside end of the spiral and then start the middle of the flower by rolling quite tightly just for that very middle of the flower.
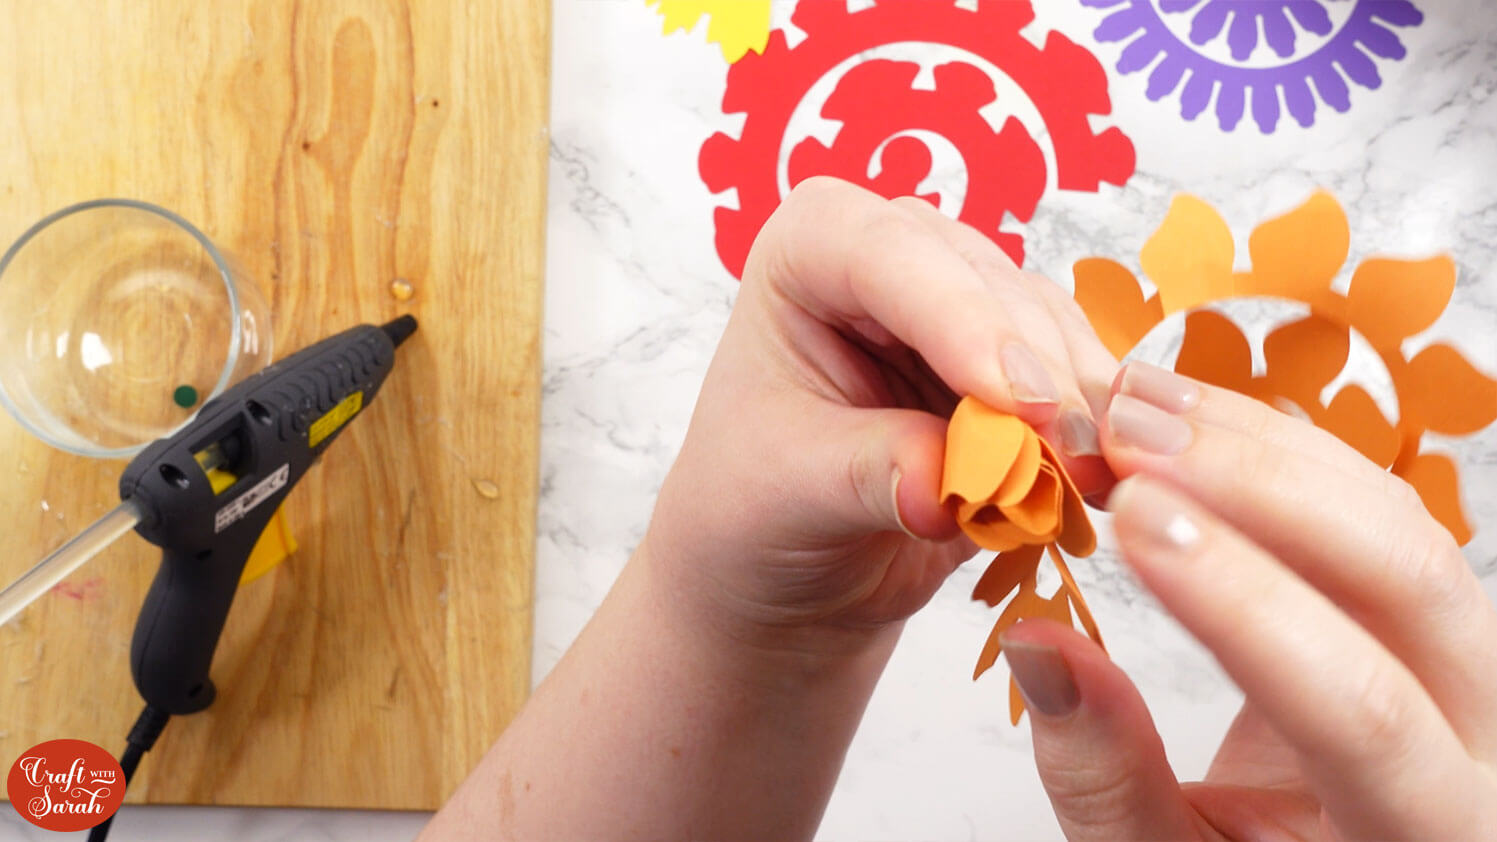
Continue rolling the template. You don’t need to roll it quite so tightly as you keep rolling. Loosen the roll as you go so that the card comes apart a little.
If you roll it all too tightly then it will be thin and won’t look quite right.
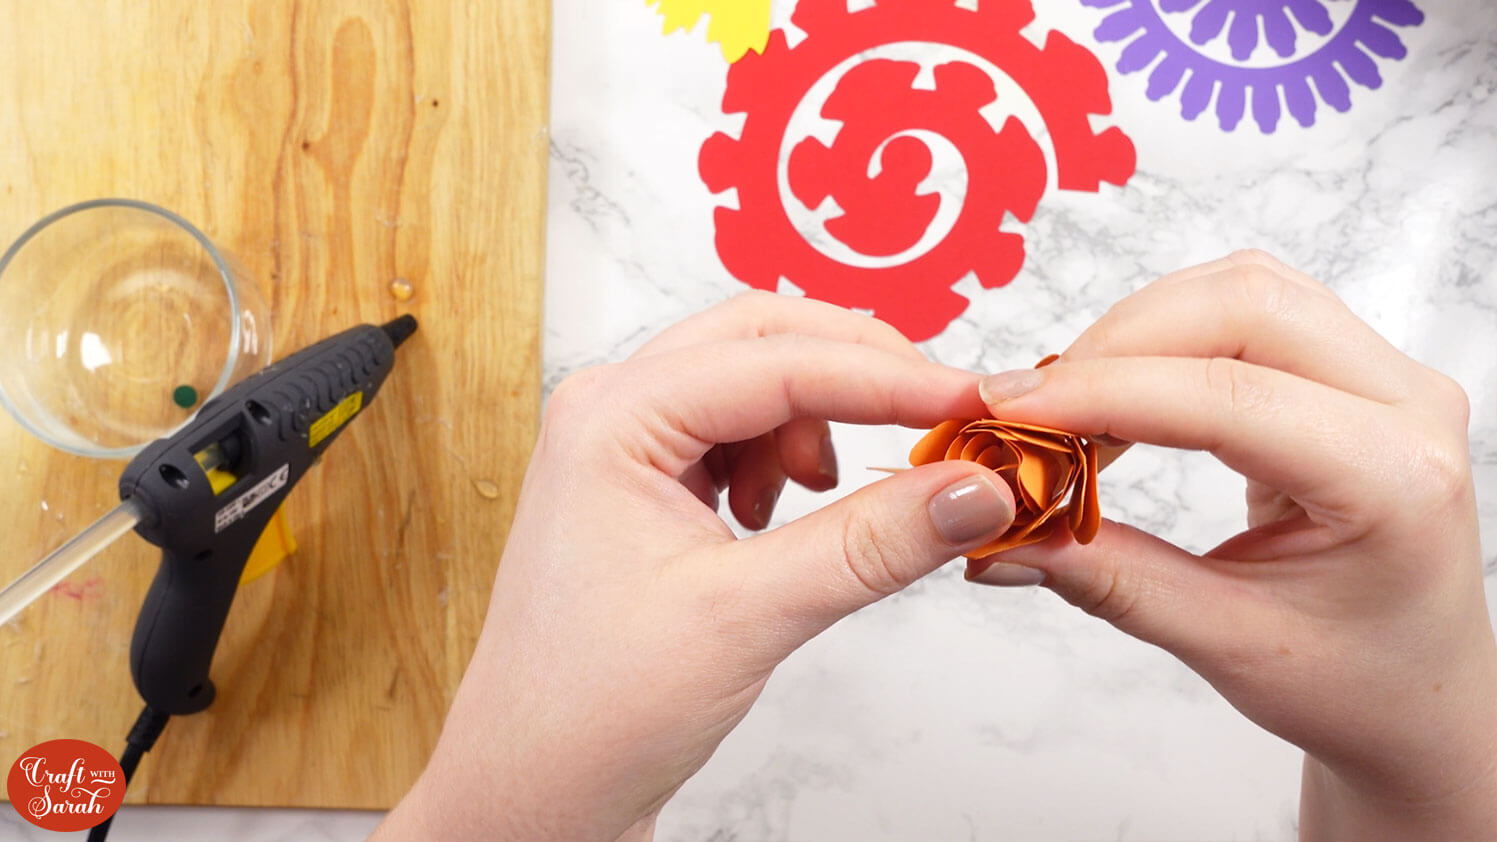
Every now and then I let go a little bit so it opened up and then gently rolled it round.
Try and keep the bottom of your flower level so that you get a level spiral.
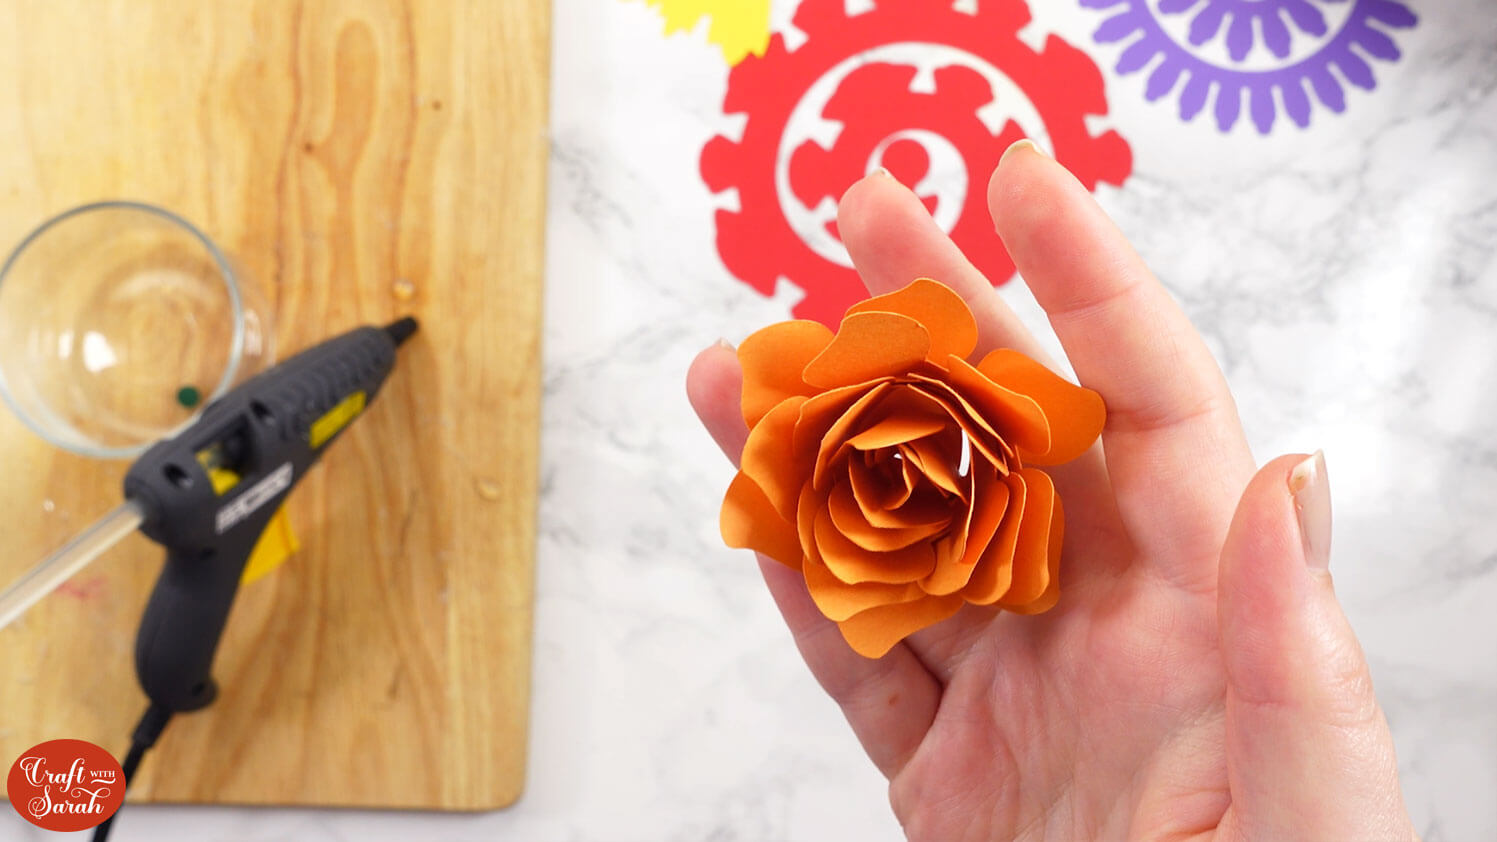
When you get to the end you will end up with a little circle.
Add hot glue to that circle.
Push the circle down so that it covers the swirls of the flower. It won’t quite touch them but it will stick quite a lot of them which will hold it in place.
You can bend some of the petals outwards to make it look more realistic.
Use the same technique for each of the flowers.
Once you have mastered folding these and getting them all stuck together then you can move on to using them in your craft projects.
Idea for using rolled paper flowers in craft projects
Here are some ideas for how you can use your rolled flowers.
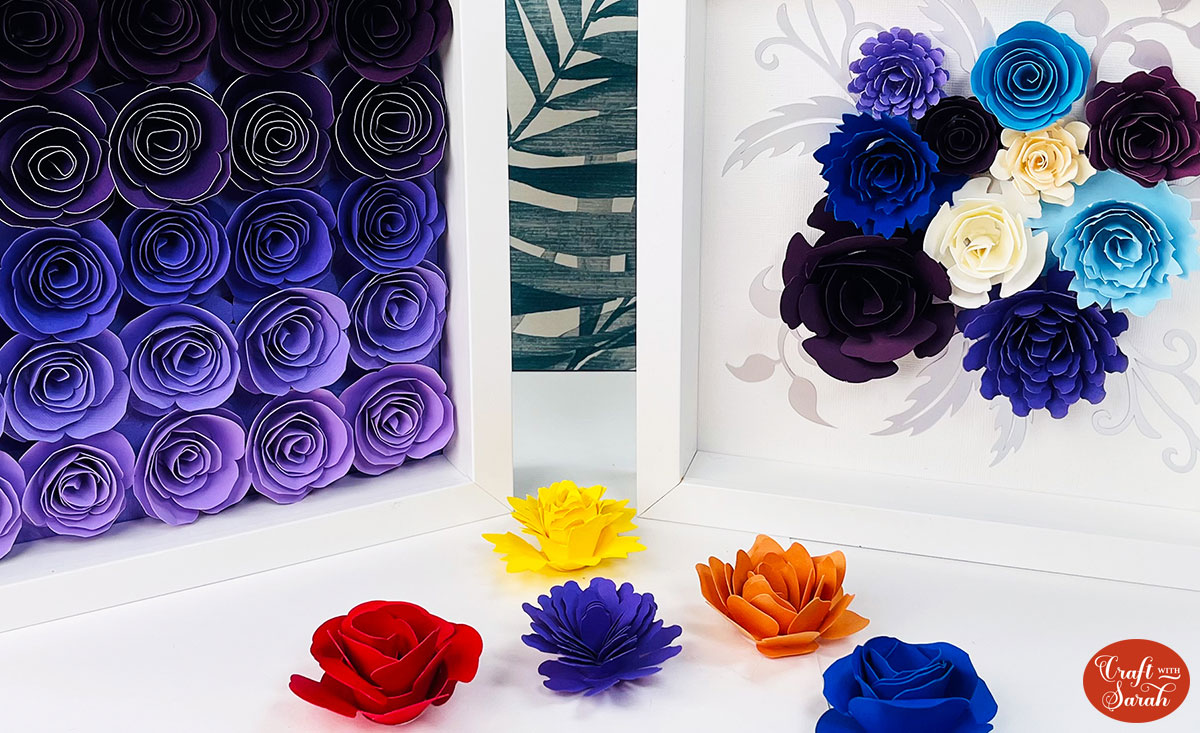
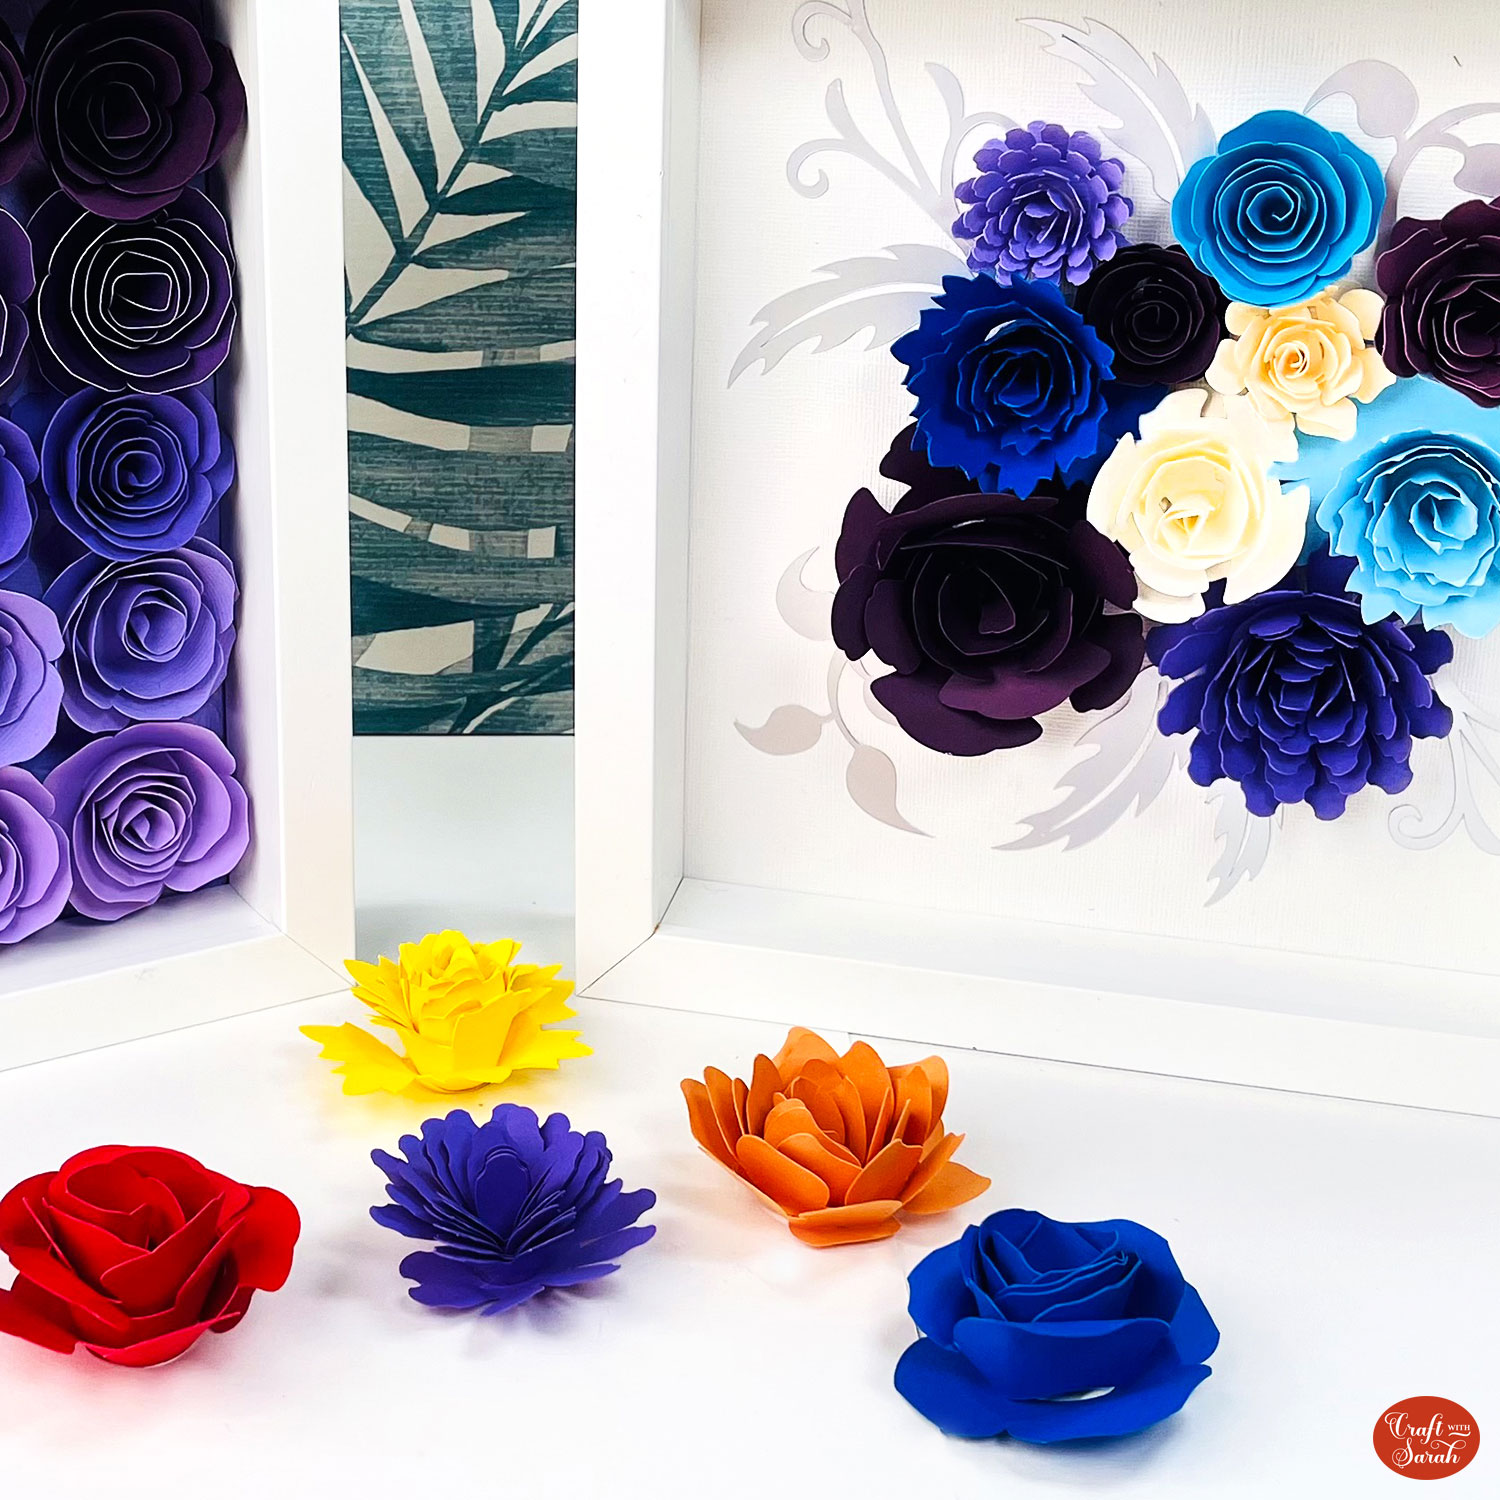
Here is a shadow box frame containing lots of different rolled flowers in different sizes with silver leaves in the background.

The design is included as a standalone SVG with all the pieces already sized so that you can make the exact design if you’d like to.
The completed shadow box design is the file called svg-flower-shadow-box-craftwithsarah.svg
You’ll just need to make sure that you size it to fit in your frame.
It’s best to roughly place all the flowers into position in the frame before you started gluing them down to the base cardstock. That way, you know for sure everything is going to fit!
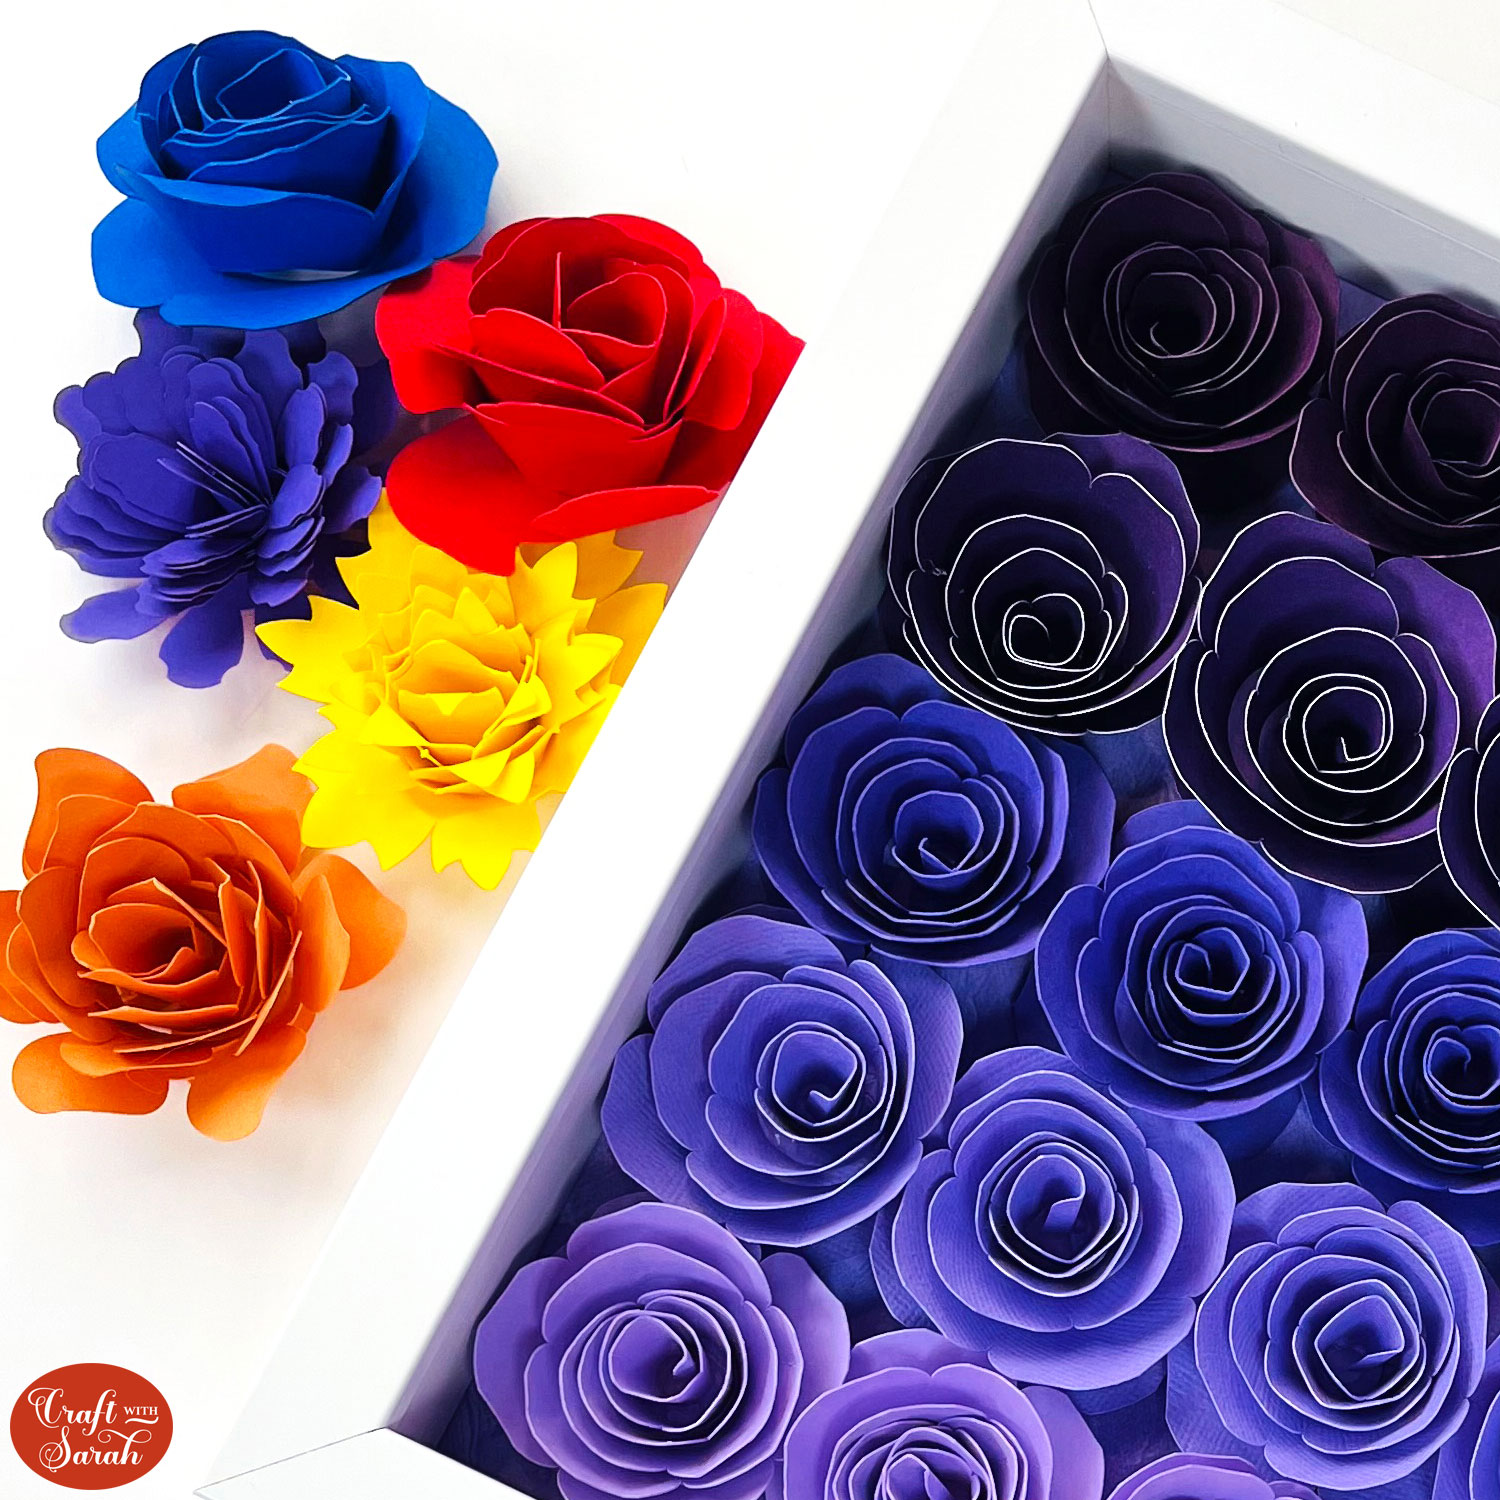
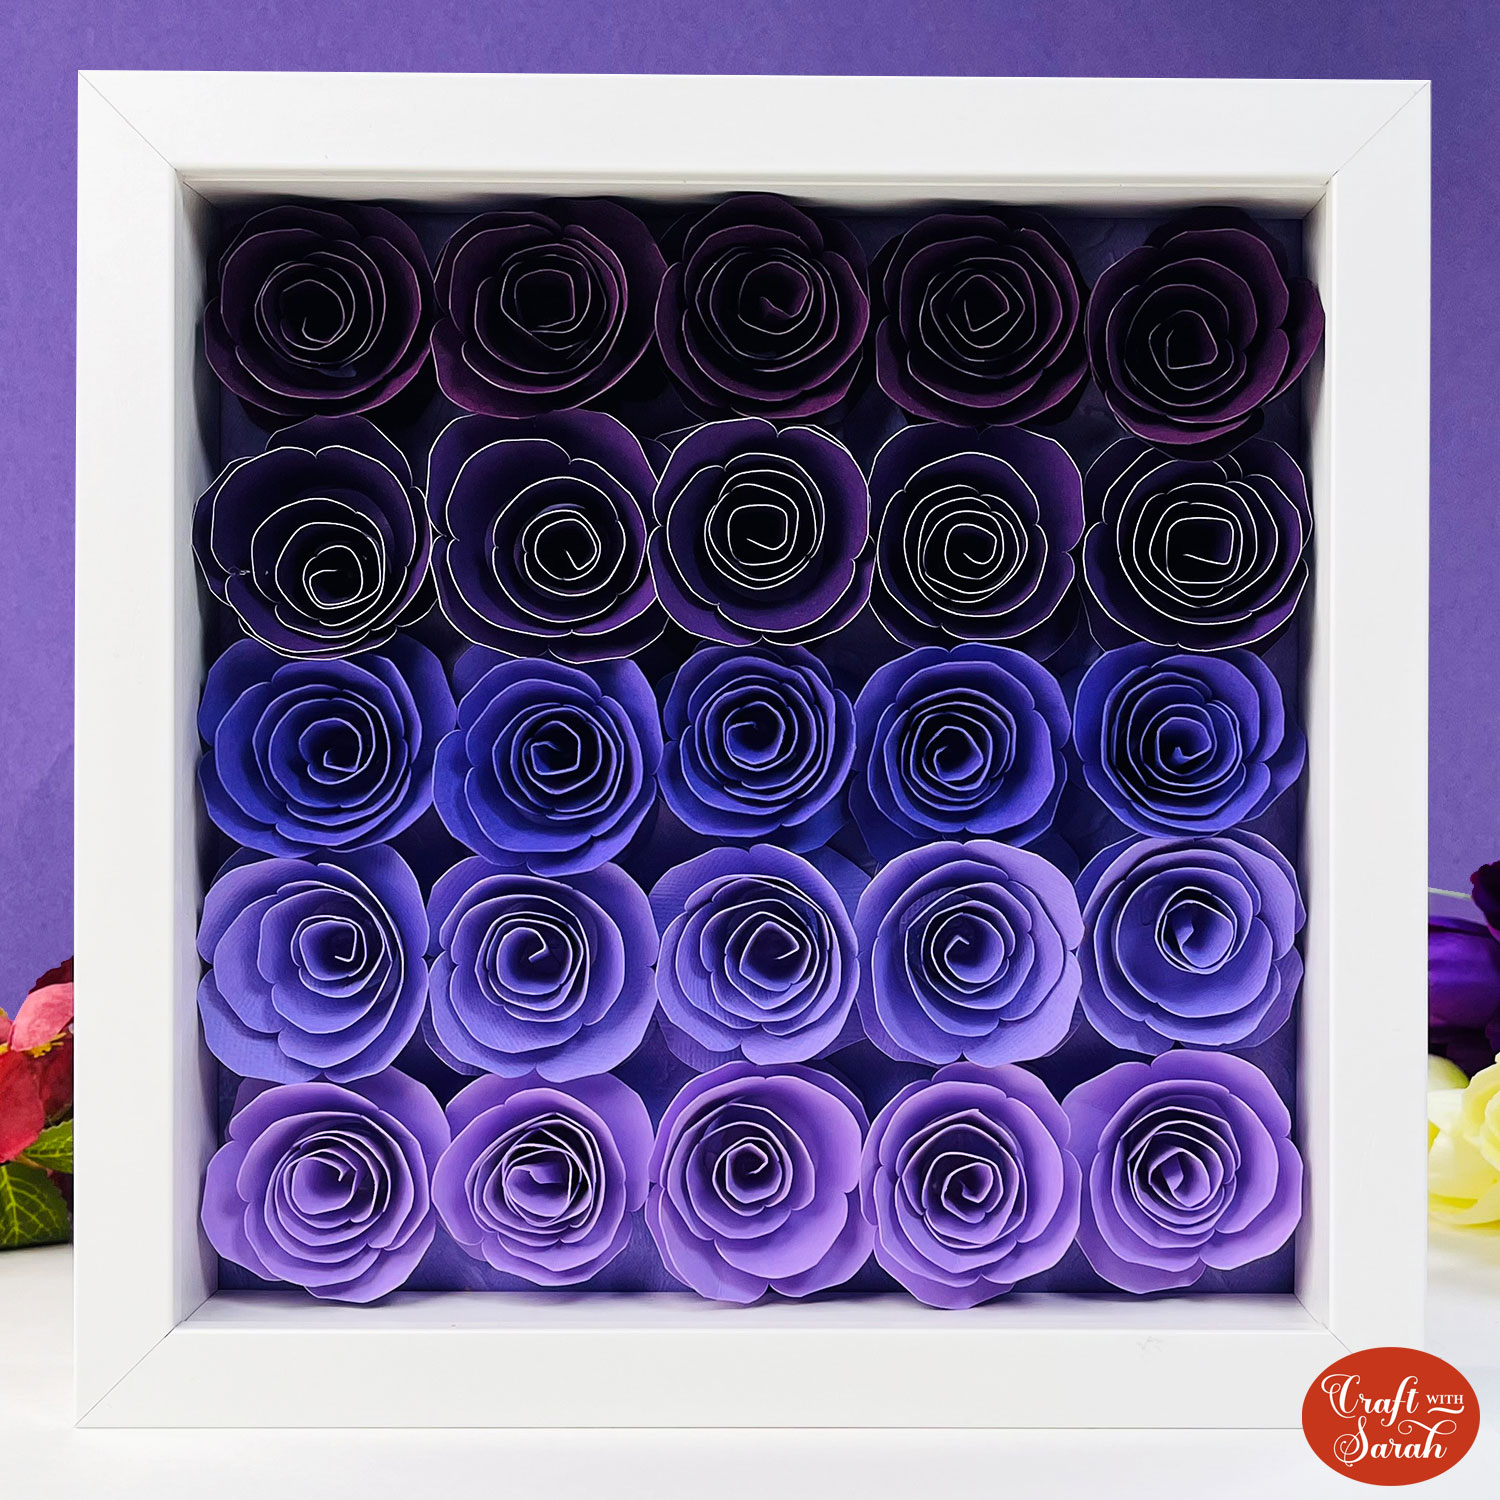
Another thing you can do is to cut lots of the same flower in different shades of the same colour so that it ends up looking something like this.
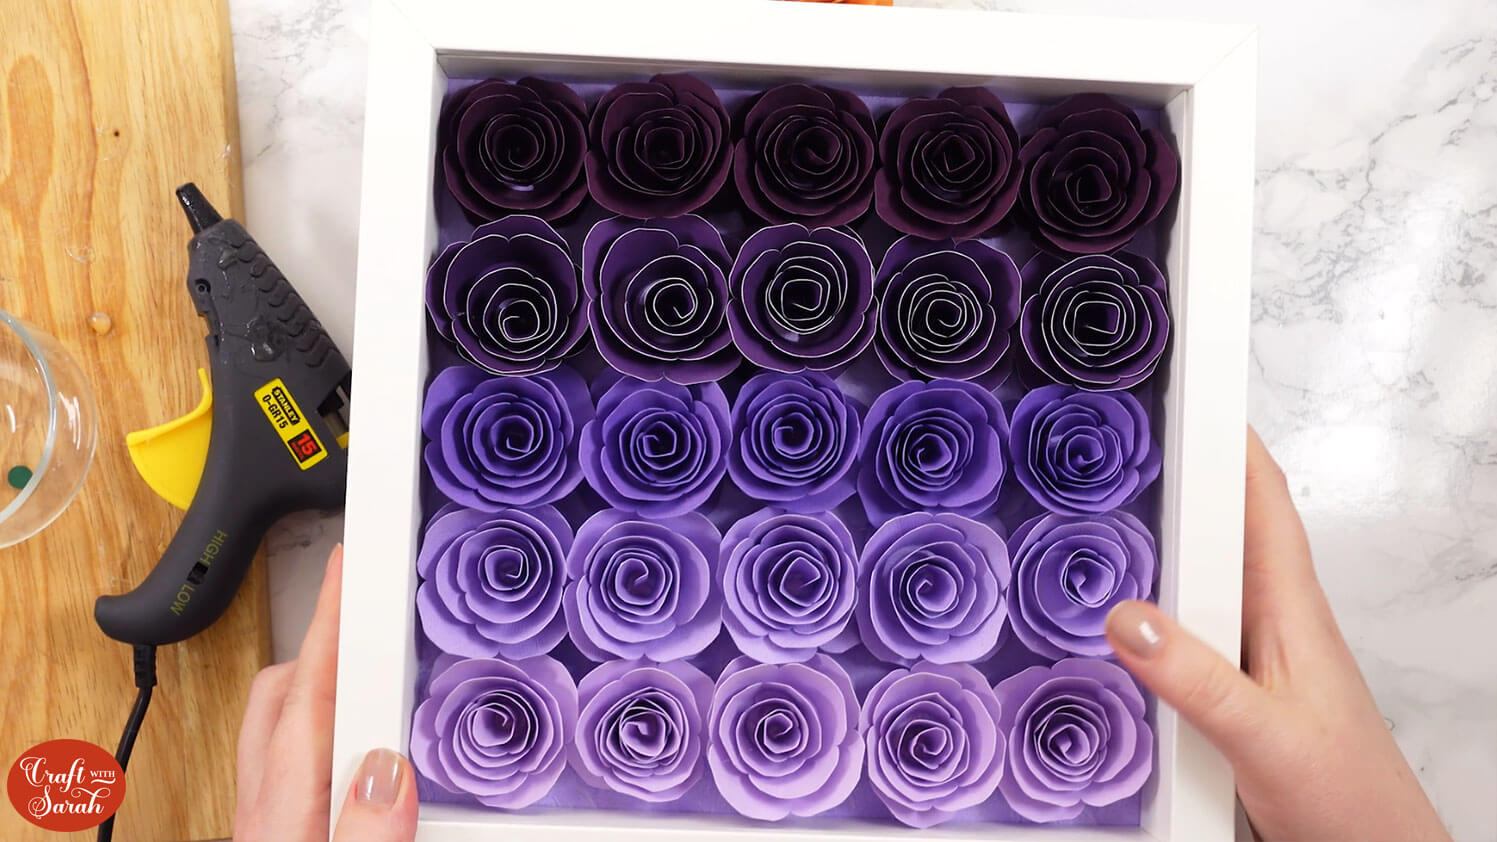
This is the same flower cut 25 times (five times in each colour) and then I’ve just glued them to a square piece of card and mounted it into a shadow box.
There’s purple card behind the flowers which you can’t really see, but it fills in the gaps nicely and fits with the purple theme.
When your shadow box is full of flowers, you could add a vinyl design to the glass from adhesive vinyl.
I can imagine a white, silver or gold vinyl looking beautiful on the front.
Use the maths equations at the top of this tutorial to figure out the size to make the flowers.
Remember that you can overlap them when you’re lying them together in the shadow box frame, so if they end up a little bit too big then that’s fine, but try not to make them too small otherwise you will see gaps between them which won’t look quite as good.
Paper flowers with a Cricut
I hope that you enjoyed this tutorial on how to make rolled paper flowers with your Cricut.
I can’t wait to see all the different things you make with your rolled flowers and I’m excited to try some new things myself.
Happy crafting,
Sarah x

