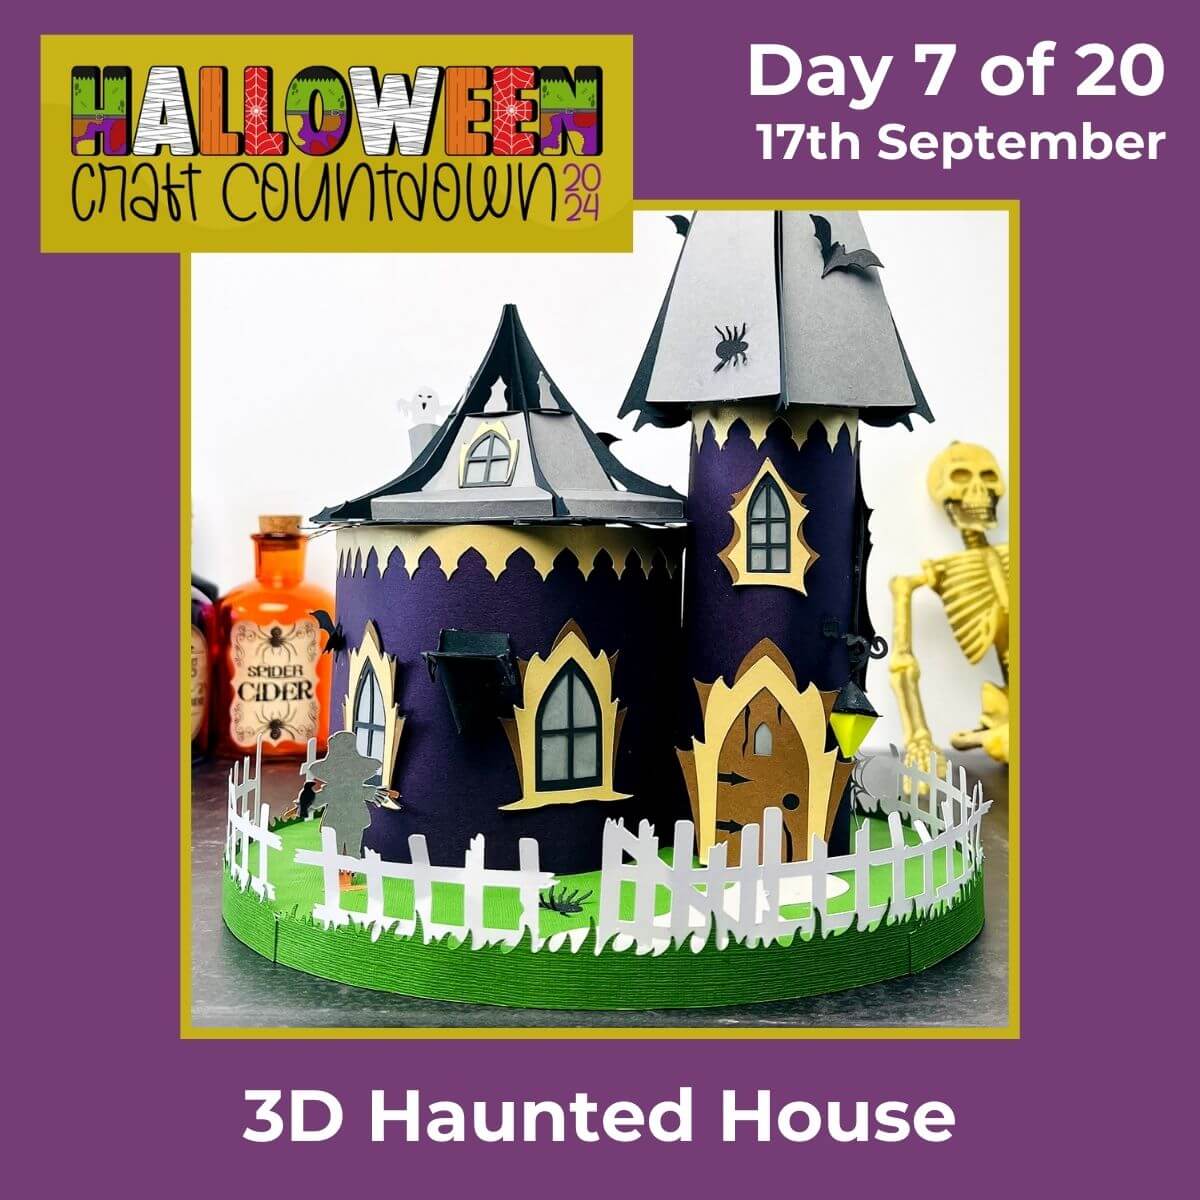
HCC 2024 Day 07: 3D Haunted House
Welcome to day seven of the 2024 Halloween Craft Countdown, where I’m sharing 20 spooky themed Cricut papercraft projects in 20 days.
In this Halloween craft tutorial, you’ll learn how to create an impressive 3D haunted house using your Cricut machine.
This spooky centerpiece is built on a sturdy cake board for stability and features two towering sections with roofs that slot together to form unique pointed shapes.
To complete the eerie scene, we’ll finish off the design by decorating the edge of the board with grass and a picket fence.
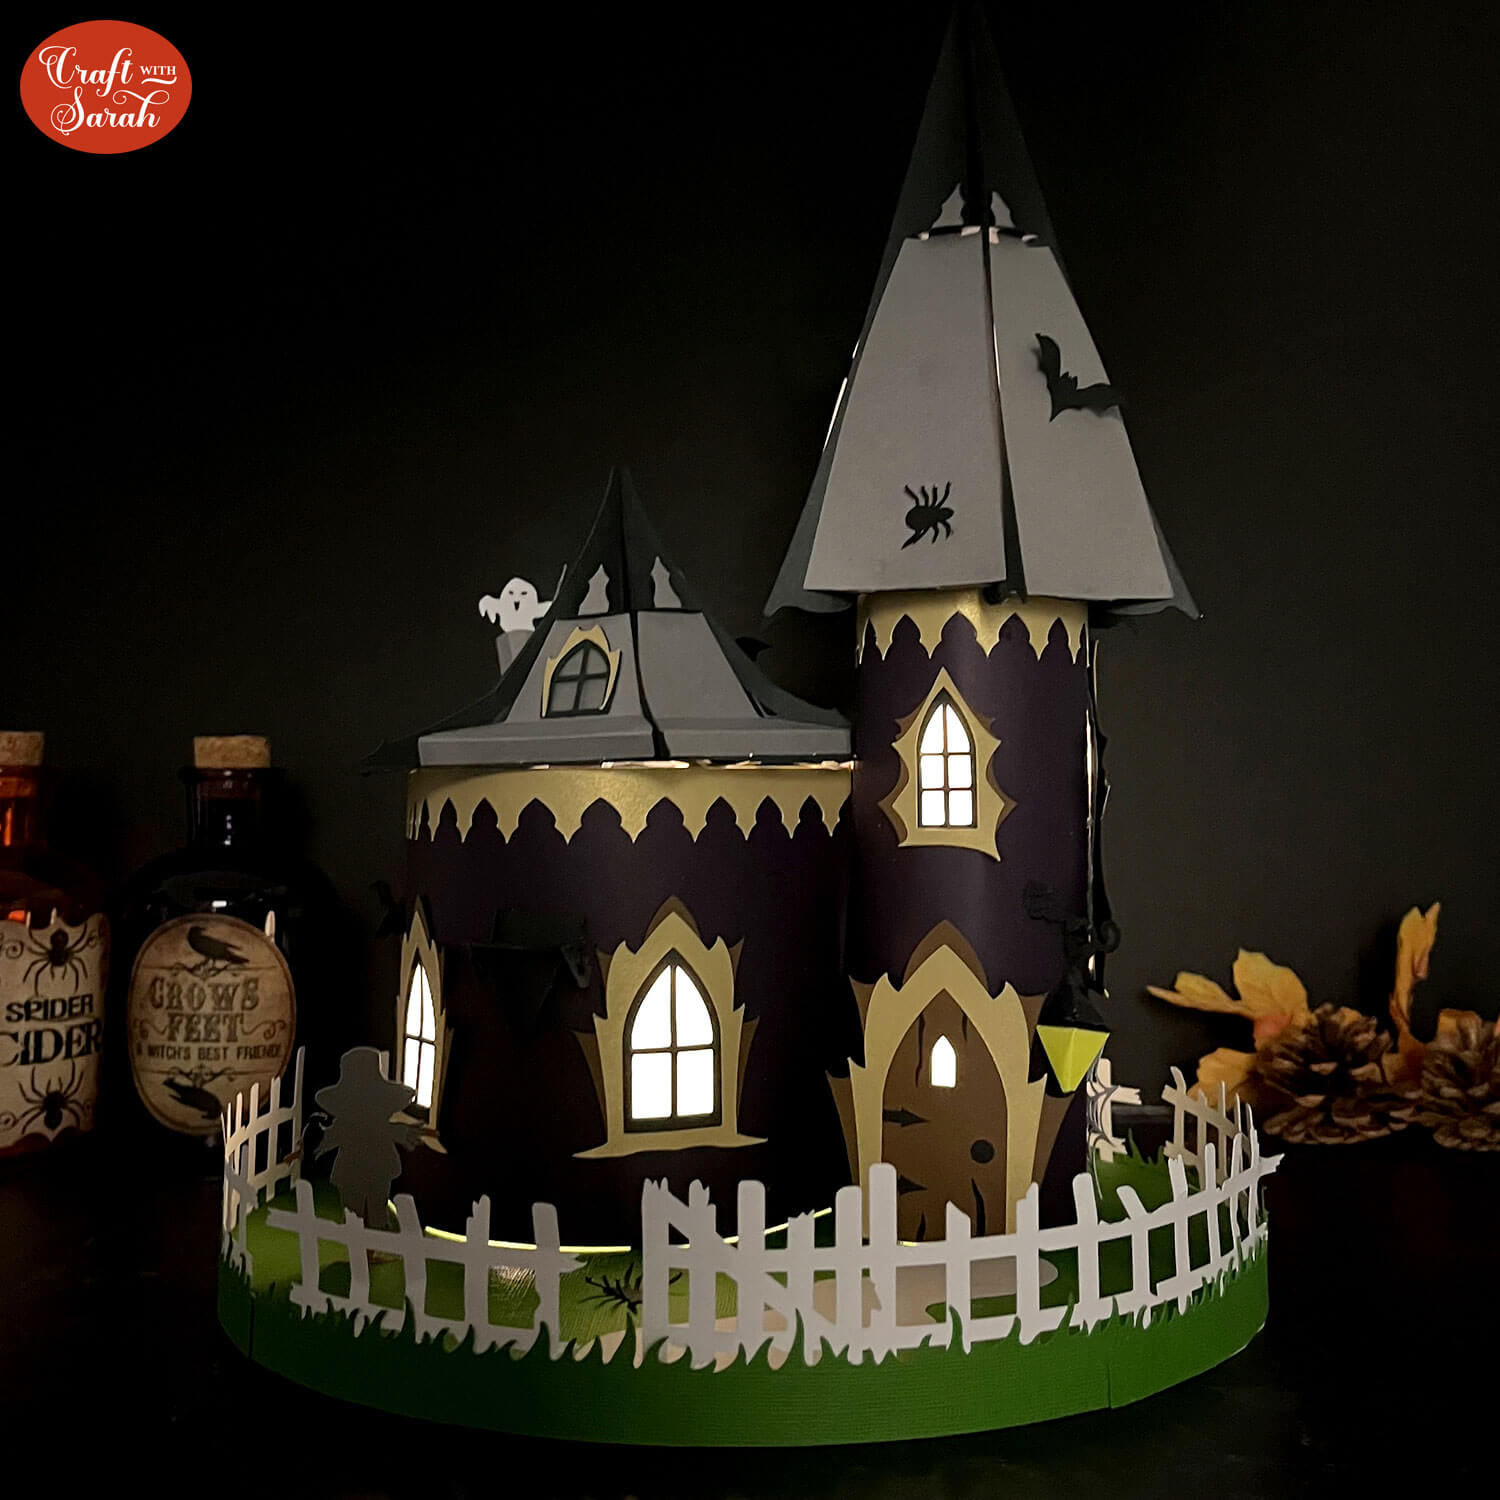
Oh, and it lights up too! 😁
Whether you’re using it as a centerpiece or a fun decoration, this 3D haunted house is sure to make a statement this Halloween. Let’s get started!
This Project was part of the Halloween Craft Countdown 2024
Materials supply list
Here is a list of the materials that I used to make this project.
Please note that some of the links included in this article are affiliate links, which means that if you click through and make a purchase I may receive a commission (at no additional cost to you). You can read my full disclosure at the bottom of the page.
- Cricut machine
- Light blue Cricut cutting mat
- Scoring stylus or wheel
- Coloured Card
- Translucent material such as vellum or tracing paper
- Glue (I like Bearly Art Glue and Collall)
- Cake board (mine was 10 inches in size) or similar
- LED lights / battery powered fairy lights (optional)
- Paperclips (optional but helpful for holding pieces in place while the glue dries)
This project is suitable for the following types of Cricut machine: Explore Air 2, Explore Air 3, Maker, Maker 3, Venture and Joy Xtra. It is too large to cut with the Cricut Joy.
Foundation learning
If you're new to crafting with your Cricut, you may find the below links helpful.
They teach some of the skills mentioned throughout this tutorial.
- How to upload SVG files into Design Space
- How to make 3D layered Cricut projects
- The BEST way to frame papercraft projects
- How to mount multiple designs in the same frame with magic guides
- How to score with a Cricut (even without scoring tools)
- Print then cut tutorial
- Design Space tools (Combine, Attach, Slice, Weld, Flatten, etc.)
- Pattern fill tutorial (for making backgrounds & cutting images to a specific shape/size)
- Free envelope SVGs that can be sized to fit any card
- How to write inside cards with Cricut pens
- How to cut layered designs at a small size
- Design Space tips & tricks
- Cricut pens tutorial
Video tutorial
Watch the video below to see how to make this project. Keep scrolling for a written tutorial.
Written tutorial (with photos!)
Here’s how to make a 3D Halloween haunted house using a Cricut machine.
Fair warning, this is a big, involved project with lots of steps. It took me around 4 hours to put the house together once the pieces were cut.
Step 1) Download the cutting file & upload to Design Space
Download the files using the box below.
Purchase the File(s)
This cut file is available as part of the Instant Access Bundle.
Or, purchase this design individually here

Before you upload the SVG to Design Space, you need to unzip the download folder that it comes in.
- How to unzip a folder on Windows computer
- How to unzip a folder on a Mac
- How to unzip a folder on an iPad/iPhone
- How to unzip a folder on an Android device
After unzipping, upload the SVG file into Cricut Design Space. This is the file which starts svg- in the filename.
Not sure how to do this? Here’s how to upload SVGs to Cricut Design Space. Make sure you upload the file which starts svg- in the filename!

IMPORTANT – I made some changes to the design AFTER I recorded the video and took the step-by-step images below. The changes were to make it easier for you to create the haunted house. Don’t worry if you see pieces on my screenshots below that you cannot see on yours. You have the corrected, updated version of the file but my images use the older version.
Step 2) Size the haunted house design
The haunted house comes at a size suitable for a 10-inch cake board base, but it’s a good idea to double-check before you start cutting.
Measure the size of your cake board. Mine came to 9.75 inches (even though it was sold as 10 inches) – which is why you should always check!

I’ve included two versions of the “grass” base for the house design. You only need to cut one of them.
If you are using 12×12 inch cardstock for the green circle you can delete the two layers that show the “halves” of the circle.
If you are using smaller cardstock then delete the one single circle and keep the two “halves”.

To resize the design, first click “Shapes” and insert a circle. Make that the size of your cake board. For this demo, I’ve set mine circle to 11 inches.

Click the haunted house design on your canvas and drag the corners until the green circle (or half the circle) is that same size as that new circle. Make sure that ALL the pieces of the house are resizing at the same time.

TIP: Make sure the padlock icon above the width/height boxes is CLOSED before you resize. If it appears “open”, click it with your mouse to close it.
Delete the circle template when you’re happy with the size.
Step 3) Format the score lines
There are quite a few parts of this design that need to be “scored” instead of cut.
If you don’t have a scoring tool for your Cricut, or if you are using the Joy Xtra that doesn’t have compatible scoring tools, check out this tutorial on how you can still do the score lines without a scoring tool.
Click the haunted house design and “Ungroup” all the layers to separate them out.

Look down the layers in the layers panel until you come across the first one that has an “arrow” next to it.

Click the arrow to open up the subgroup.
Within there will be two layers: one “solid” shape at the bottom and one “single line” layer on top.
Click the single line layer to select it.

Change this to “Score” in the Operations Dropdown.

Click the title of the subgroup (the line that has the arrow on it) to select the solid layer and the score layer.
Press “Attach” at the bottom of the layers panel. This is what tells the Cricut to do the scoring on that bottom piece.

Repeat this for ALL the subgroups in the layers panel (i.e. the groups that have the little arrow on the left).
There are lots of score lines in this project, so it may take a while.
Save your project when you are done!
Step 4) Cut the project from cardstock
When you’re happy with how the project is looking in Design Space, click “Make” and follow the instructions on-screen to cut out all the pieces.
I recommend using a translucent material for the blue window pieces, for example vellum or tracing paper. This will allow your fairy lights to shine through the windows.

To change the paper size, go into the dropdowns over on the left side of the screen and choose the paper size that you want to use. You need to change it for every single colour.

To save space on your cardstock, you can move things around by clicking and dragging. Make sure when you’re moving things about that nothing overlaps because otherwise, it won’t cut out properly.

TIP: New to cutting cardstock with a Cricut? Check out this in-depth tutorial which goes through every step of the process, including tips for getting the best quality cuts from your Cricut.
There are lots of little pieces to this project – make sure you don’t lose any!
Step 5) Glue the window pieces together
Place all the window and door cutouts in front of you and put them in order. It might be easiest to look at the screen in Design Space to see how they go together.

Glue all the window and door pieces together. The vellum/tracing paper pieces go on the bottom.

Step 6) Build the tall pointed roof
Take the pieces that make the tall, pointed roof and lay them out in front of you in this order.
It’s important to get the “structure” pieces of the roof in this exact order, otherwise it won’t go together properly.

You will also need the circular base piece that has a small cutout circle in the edge.

There are two smaller circles. You need the SMALLER one for this roof.

Place a tiny amount of glue inside one of the slots for the directional vane that sits on top the roof. Slide the other piece into the gap and hold in place until the glue dries.

Glue it to the back of the first structure piece.

Slide the second structure piece into the slits in the first structure piece.

Hold those two pieces flat against each other and slide in the third structure piece.
It will open up to form a 6-sided shape.

Take the circle shape and slide it into the top of the roof and maneuver it so that the slits in the edge of the circle are pushed into the slits in the roof pieces.
This is quite fiddly and the cardstock is delicate, so be very careful to not tear anything.


The second circular piece for this roof will go into the bottom “hooks” on the roof structure.
The edges of the roof structure “hook” into the rectangles in the circle to hold it place securely – sort of like a coat hanger.

Here’s how it looks from the bottom:

Select the six side panels that are sized for this roof.

Hold the side that is scored away from you, then fold the tab inwards.

Thread the pointed top of the side panel into the top slits in the roof.

Put glue onto the bottom of the tab and then glue it to the base of the roof structure.
It can help to place some paperclips over the pieces of card to hold them in place while the glue dries.

Repeat for the other five sides.
You might find that some of the side panels are a bit of tight squeeze into the structure. This is intentional, to avoid any gaps being on show.

Step 7) Build the short angled roof
Collect the pieces for the second roof and place the structure pieces in this order:

Slot them together in the same way as you did for the previous roof.

Slot the circular piece into the top of the roof structure, and the larger piece into the bottom hooks.


The remaining tabs along the bottom will go into the diagonal slits in the large black piece of card.

Slide all the tabs in.

Secure the tabs with sticky tape.

Gather the side panels. One of them has a piece of vellum to stick behind the window shape (unless you have already glued it to the window, which is fine if you have).

Take one of the side panels that does not have any cutouts.
Valley fold the top score line. Mountain fold the second score line. Leave the third (bottom) score line unfolded as that’s easier to do when the side panel is inserted into the roof structure.

Position the roof structure so that the piece with the semi-circle cutout is on the right. The first side panel will be going onto one of the sides that touch this cutout.
Thread the pointed edge of the side panel into the slit in the top of the roof. Thread the tabs at the bottom through the matching holes in the roof.

Look at the base of the roof. Fold the tabs inwards to secure them, then stick firmly with tape.

Repeat for another one of the side panels that has no cutouts. Place it next to the first one so that you now have both sides of the semi-circle covered.

Glue the window decorations around the cutout on one of the side panels.

Add the rest of the side panels in this order. Leave the one with the chimney shape cutout for now.

Select the chimney piece.

Hold it so that the scored side is facing up towards you, then roll it up into a circle shape with the score lines on the inside. Glue in place. Make sure the tabs are equal distances apart from each other.

Glue the small black oval to the back of one of the ghost shapes to “fill in” the facial expression.
Glue the other ghost to the back.

Thread the chimney shape through the gap in the remaining side panel. Glue the tabs in place and hold until the glue is dry.

Add a small amount of glue down both sides of the ghost. Thread it into the chimney and hold in place until the glue is dry.

Add the chimney side panel into the roof.

Step 8) Build the tall thin building
Select the building piece that does NOT have square cutouts in the bottom tabs.

Fold down the score line and brayer to get a strong, crisp fold.
Glue the windows in place.

Wait for the glue to fully dry before rolling up the building.
Roll the building up like a toilet roll tube and glue the tab.
You may need to squish it about a bit to make it cylinder shaped.

Some of your windows/doors might fall off during the rolling process. If they do, glue them back on when the building is complete.
Select the gold/yellow edging piece that does NOT have tabs on it and glue it to the top of the building, around 1cm from the top.

This is what will hold the roof in place.

Step 9) Build the short wide building
The second building has two pieces to it.
Glue all the windows in place and wait for the glue to fully dry.

Glue the two building pieces together along one of the tabs.

Glue the two gold edging pieces to the top. For this building, they need to be lined right up at the top (don’t leave a gap).

When the glue is fully dry, bend it round into a cylinder shape and glue in place along the other tab.

Don’t worry if the house gets slightly out-of-shape. Attaching it to the base on the next step will help to make it more circular.

Step 10) Secure the buildings to the base
Select the green “grass” circle. If you cut the version that comes in two sections, glue them together.

Take the taller building and thread the tabs in the bottom through the holes in the green base that make up the smaller circle.

Tape the tabs in place.

Slot the bottom tabs of the larger building through the remaining holes in the green base. One of the tabs will go through the SAME hold that one of the taller building tabs went through.

Tape the tabs in place.

Glue the green circle to your cake board.

Glue the path in place.

Glue the fence pieces around the edge of the board. Make sure the “gate” part (the bit that doesn’t have the bottom base) lines up with the path.
The fence is designed to have “gaps” between each piece to add to the crumbling appearance of the haunted house, so make sure you leave some spaces. If you find that you can’t fit the last fence piece in, trim it smaller with scissors or leave it out.

Glue the grass around the edge of the board so that it covers up the base of the fences. The grass is designed to “overlap” so that the whole outside of the cake board is covered in green.

Step 11) Add the finishing touches
Phew, well done – your house is now (mostly) complete! We just have a few finishing touches to add on.
It may be easier to refer to the video at the top of the page for these smaller pieces.
First, place both of the roofs onto the houses. The tall roof “slides” over the tall building to hold it in place.
The shorter roof just sits on top of the tabs on the shorter building. If you are not planning on adding lights to your house then you could glue the roof on.
If you are adding lights but would still like it more secure, you could add some Velcro to the tabs on the house and the tabs on the roof.

These two pieces of card make a “witch’s hat” decoration to hang on one of the buildings.

Roll the hat shape up and glue into place.
Bend and twist the other piece around to make a “hanger”.

Glue the hat shape to the hanger.

Glue onto your house.

These four pieces make up a lantern.

Fold the yellow and black larger pieces along the score lines and glue the tabs to make the lamp part and the lantern container part.

Glue the black square to the tabs on the black folded piece.

Glue the yellow piece to the other side of the black square.

Add a small amount of glue into the hole at the top of the lantern.
Bend the hanger around and force the ends into the hole (it will be a tight fit).

Glue it onto the house.

Glue the three pieces of the scarecrow together and glue him to the grass outside the house.

Now all that you are left with are a selection of bats, cobwebs and spiders. Glue these wherever you like.
I folded the wings of the bat upwards to make them look more 3D, and the same with the legs of the spiders.

Finally, add one set of lights inside each building and then replace the roofs.

Sit back and admire your hard work! I think you have earned a big cup of tea and a biscuit for managing to get to the end of this project.
Halloween haunted house centrepiece
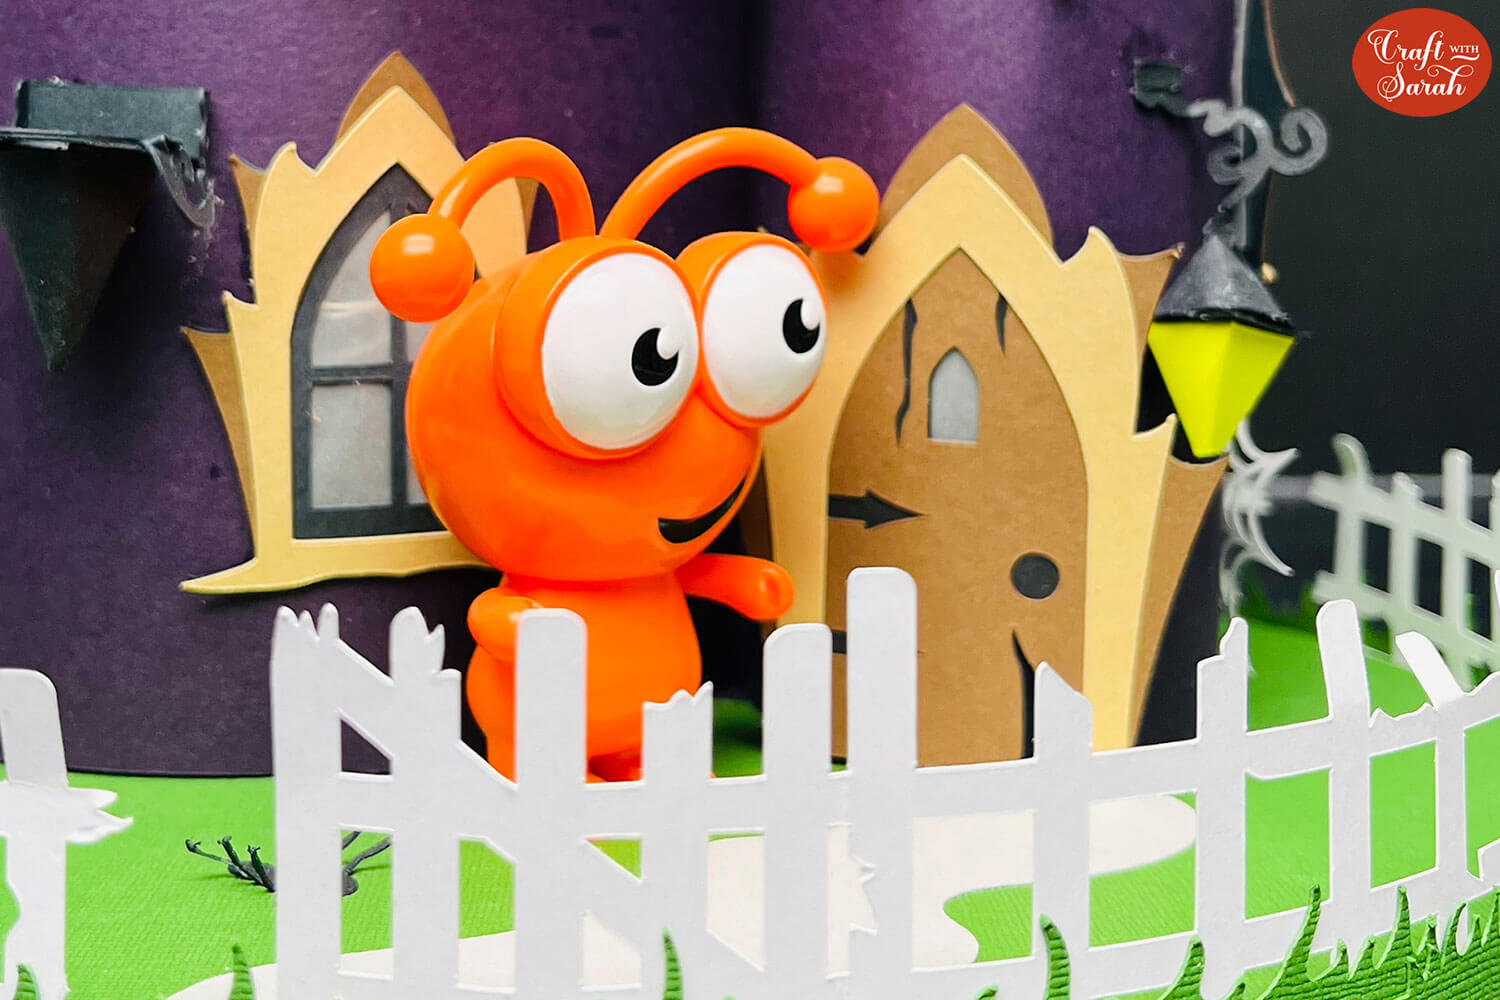
With your 3D haunted house complete, you’ve crafted a standout Halloween decoration that’s sure to impress.
The detailed towers, slotted roofs, and decorative touches like grass and a picket fence bring this spooky scene to life.
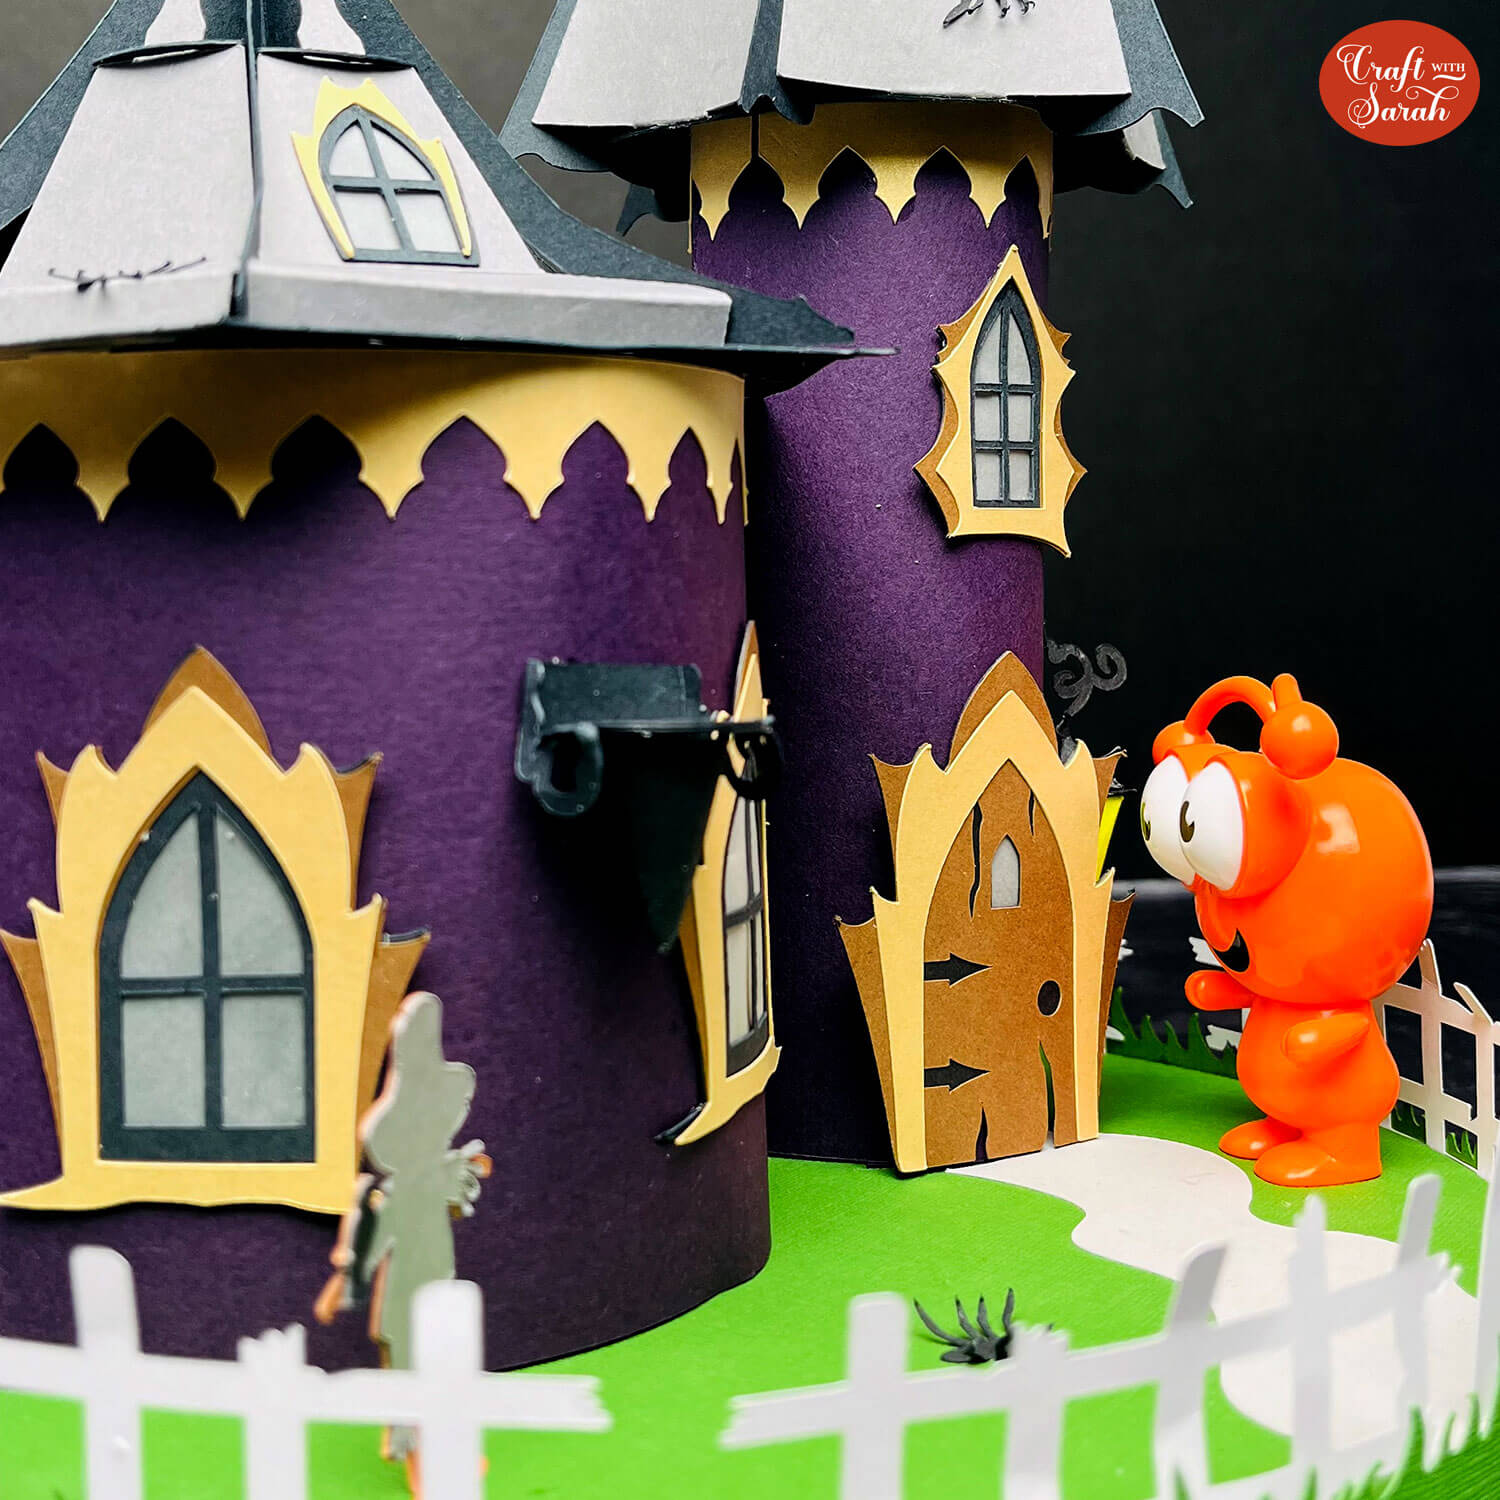
My Cricut cutie decided to go and see if whoever lives in the house was giving out any Halloween candy!

Happy crafting,
Sarah x

