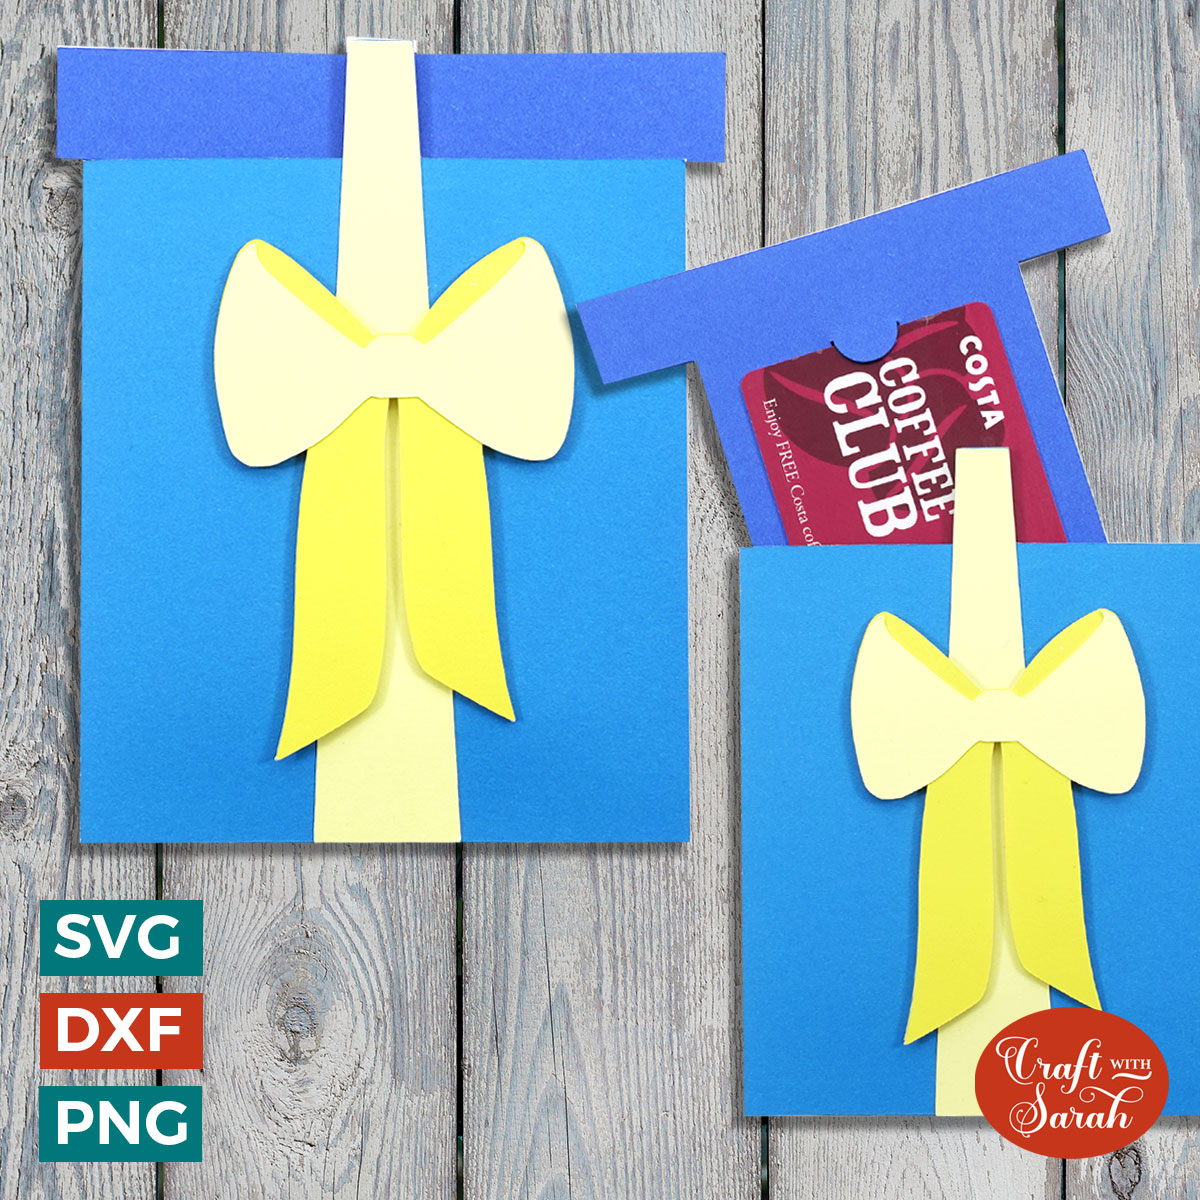
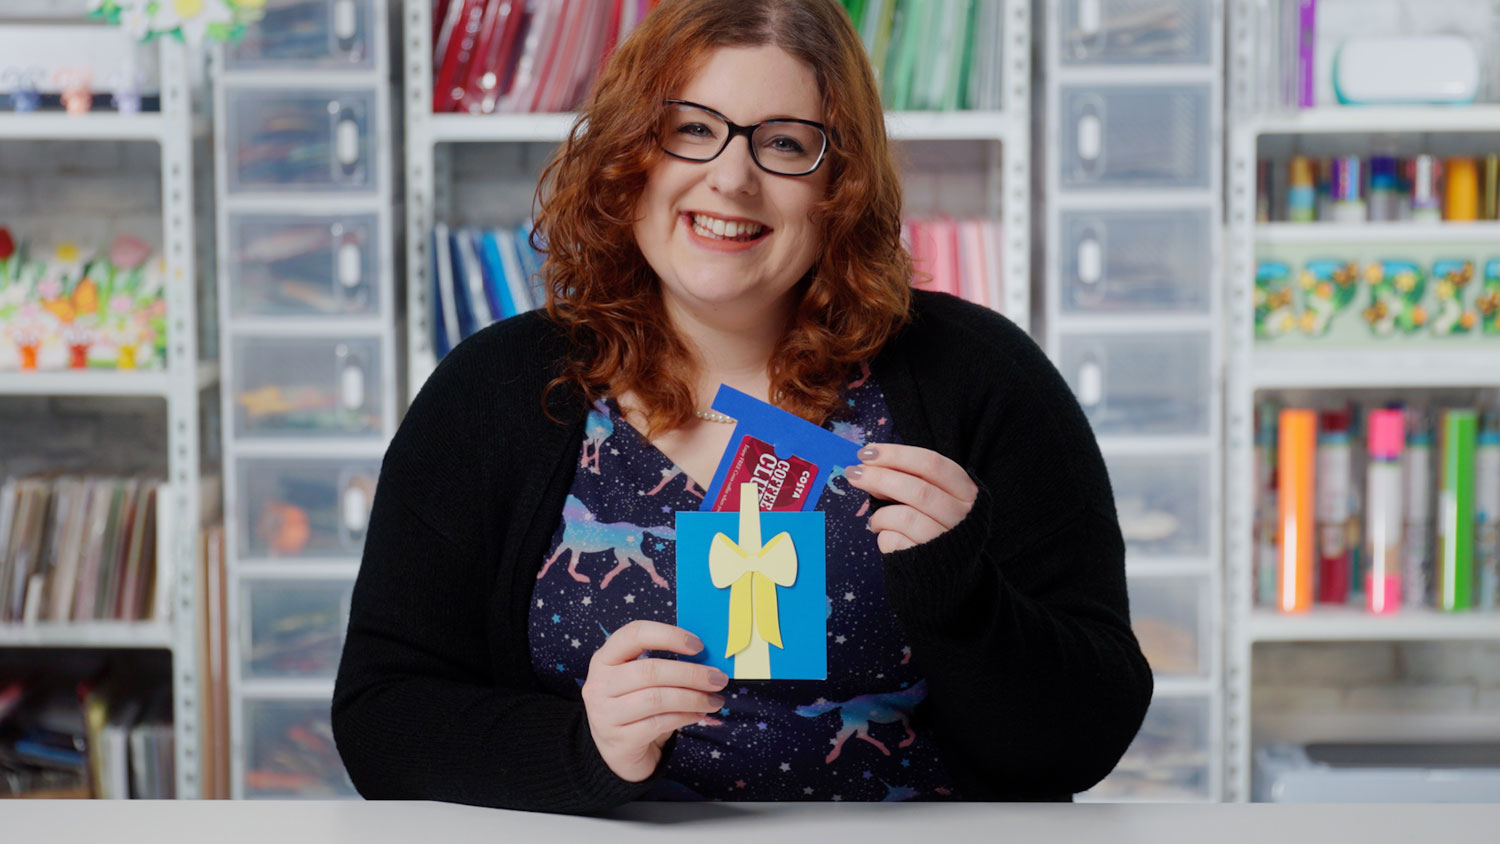
DIY Gift Card Holder šŸ’° Make a Christmas Gift Card Wallet

DIY Gift Card Holder

Make a cute DIY gift card holder for Christmas! Pull the mantlepiece out of the festive fireplace to reveal a hidden surprise inside.

Welcome to Day 18 of the Christmas Craft Countdown, where Iā€™m revealing a new Christmas craft project every day for 20 days.

Today’s project is something to add a little bit of pizzazz if you’re giving someone a gift card this holiday season.

This is a quick-to-make but fun project to wow the recipient when they realize it opens up to reveal the hidden gift card inside!

This project is part of 2021's Christmas Craft Countdown.

View all 20 craft projects

Fireplace gift card holder


DIY gift card holder video tutorial

Watch the video below to see how to make this Christmas gift card holder. Or, keep scrolling for a written tutorial.


Materials list to make a gift card holder for Christmas

Here is a list of the materials that I used to make this project:

Please note that some of the links included in this article are affiliate links, which means that if you click through and make a purchase I may receive a commission (at no additional cost to you). You can read my full disclosure at the bottom of the page.

Christmas Gift Card Wallet


How to make a gift card holder for Christmas

Here’s how to make your very own fireplace gift card holder using a Cricut machine!

Step 1) Download the file & unzip the downloaded folder

Use the box below to download the cutting files for this project. Please note that this is not a free file.

It is part of the Christmas Craft Countdown which is a collection of 20 exclusive Christmas themed craft projects.

This design is part of the 2021 Christmas Craft Countdown.

Find out more

Just want this file without signing up for the Christmas Craft Countdown? Purchase it here


Forgot password?

Before you upload the SVG to Design Space, you need to unzip the download folder that it comes in.


Step 2) Upload the SVG file into Design Space

Open up Cricut Design Space and upload the file called SVG_Gift_Fireplace_CraftWithSarah.svg

Make sure you upload the file which starts SVG_ in the filename!!

This is how it should look after you have uploaded the file:

File in Design Space

After uploading, the design will show in your “Recently Uploaded Images”. Click on it and then press “Add to Canvas” to put it onto your Project.

Add to Canvas


Step 3) Resize the design

This step is REALLY important!!

For some reason, the file isn’t opening in Design Space at the size I created it, so we need to manually resize it otherwise the gift card will not fit.

Click on the design and then look at the width/height boxes along the top. Make sure the padlock icon is closed. If it’s open, click on it to close it.

For a standard sized gift card/credit card, type 7.8 (inches) into the width box and then press enter on your keyboard.

The height should automatically adjust to 5.383 inches.

Resize the design


Step 4) Cut out all of the layers

Click “Make It” and follow the steps on screen to cut everything out from cardstock.

Tip: Cut the white card FIRST as that contains the piece that your gift card will fit into. If your gift card doesn’t fit, click “cancel” on the cut before cutting out the other colours, resize your design and try again.

Cut out all of the layers


Step 5) Stick the gift card together

Fold the red rectangle in half.

Glue the small pieces of holly and the clock to the top of the largest white piece (the bit that has the slots for your gift card).

First steps of the assembly process

My favourite glue to use on papercraft projects is Collall All Purpose Glue.

It’s SO good because it doesn’t “warp” or bend the cardstock like some glues do. You can use as much of it as you want and the card stays perfect – and it dries perfectly clear too!

To make it even easier to apply glue to layered card projects, I highly recommend getting some of these needle tip applicator bottles to put the glue into.

The nozzles are REALLY tiny which makes them perfect for putting glue in the pieces of cardstock that make up this gift card holder.

Collall glue

Line the gift card piece up with the inside of the red rectangle so it’s in position.

Line up the pieces

Use glue or double-sided tape to stick the two halves of the red rectangle together around the gift card piece, making sure you don’t get an adhesive where the white piece is going to go.

Glue the red rectangle shut

Glue the white square to the back of the red piece. This is for you to write a message on.

Glue the white square to the back of the red piece

Glue the red brickwork piece to the front.

Glue the red brickwork piece to the front

Use 3D foam pads to add the white surround to the fireplace and the bigger flame. Use glue for the smaller flame.

Foam pads for the fireplace surround

Use foam pads to stick the top of the mantlepiece along the gift card piece. This is to give it a bit more stability when someone is pulling the section out from the red holder.

Attach the mantlepiece

Slide the gift card piece inside the red holder.

Glue the green stocking pieces to the matching white pieces and then use foam pads to stick them to the red brickwork.

Attach the stockings

That’s it – your DIY gift card holder is finished!

Christmas Gift Card Wallet


I hope you enjoyed this tutorial on how to make a Christmas gift card holder.

This project is part of 2021's Christmas Craft Countdown.

View all 20 craft projects

Happy crafting,
Sarah x